-
Welcome To Bidzpro

Welcome To Bidzpro
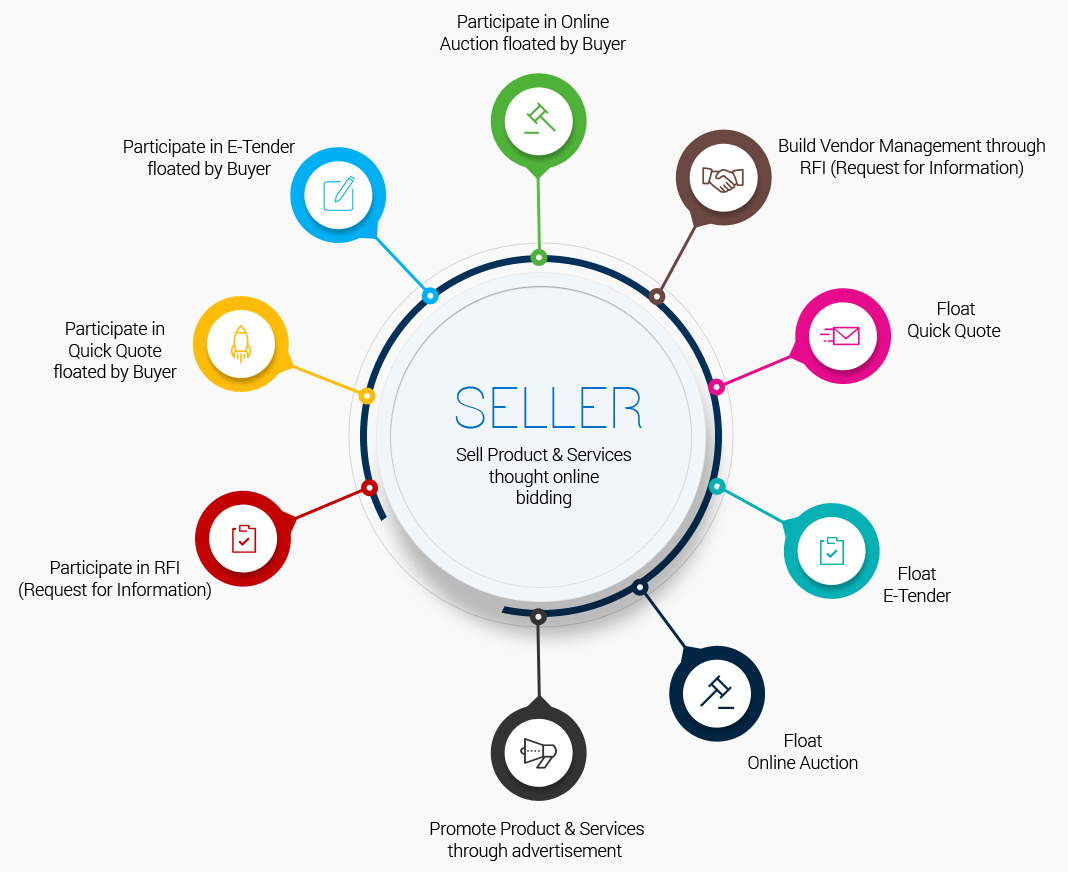
Bidzpro is a B2B online bidding portal providing e-procurement solutions and services. It helps buyers and sellers to purchase, sell, and save more effectively through online bidding module.
Here's everything you wanted to know about it and how it works!
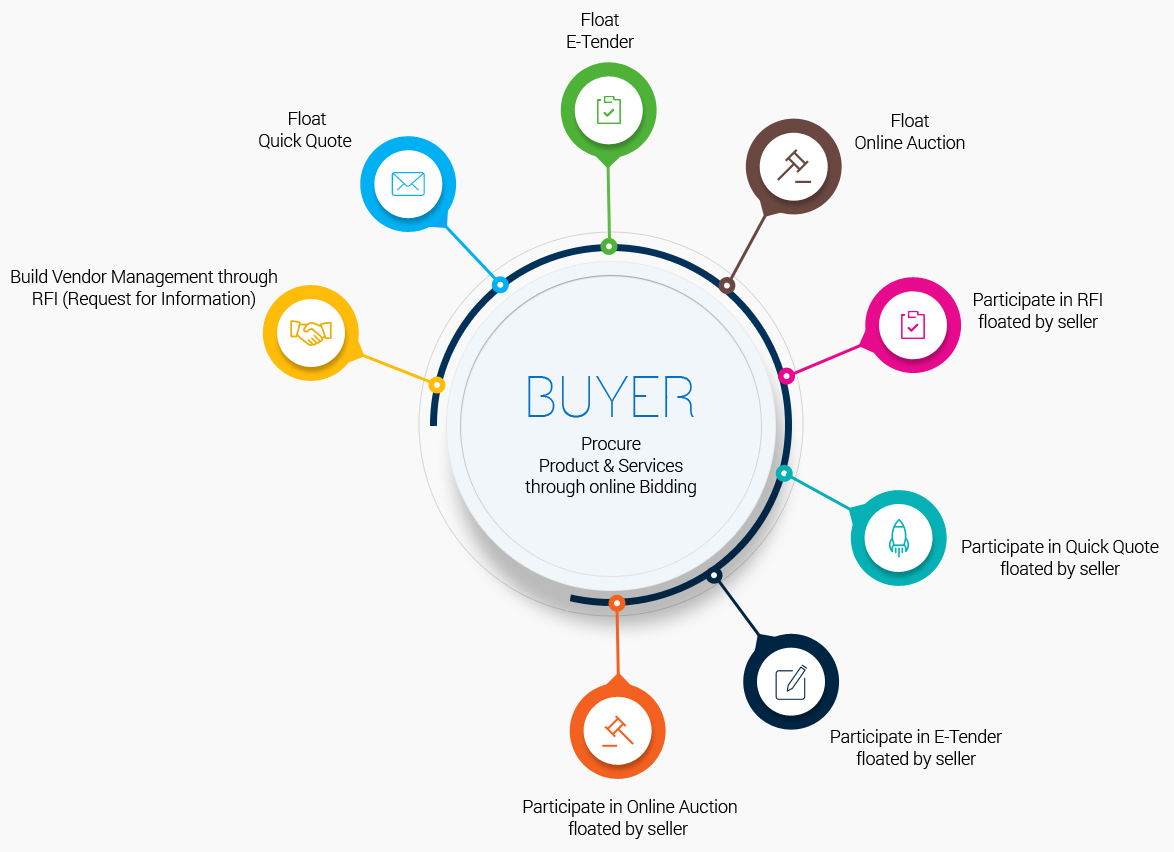
Registration is mandatory for both buyers and sellers to start enjoying bidzpro's B2B e-procurement services. It is absolutely FREE OF COST!
In order to register for free on Bidzpro, follow the steps given below:
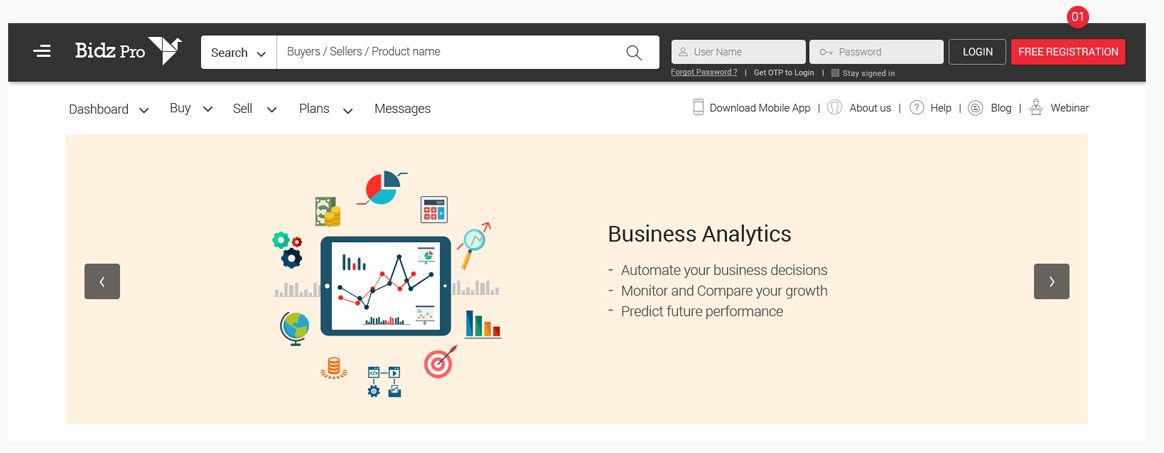
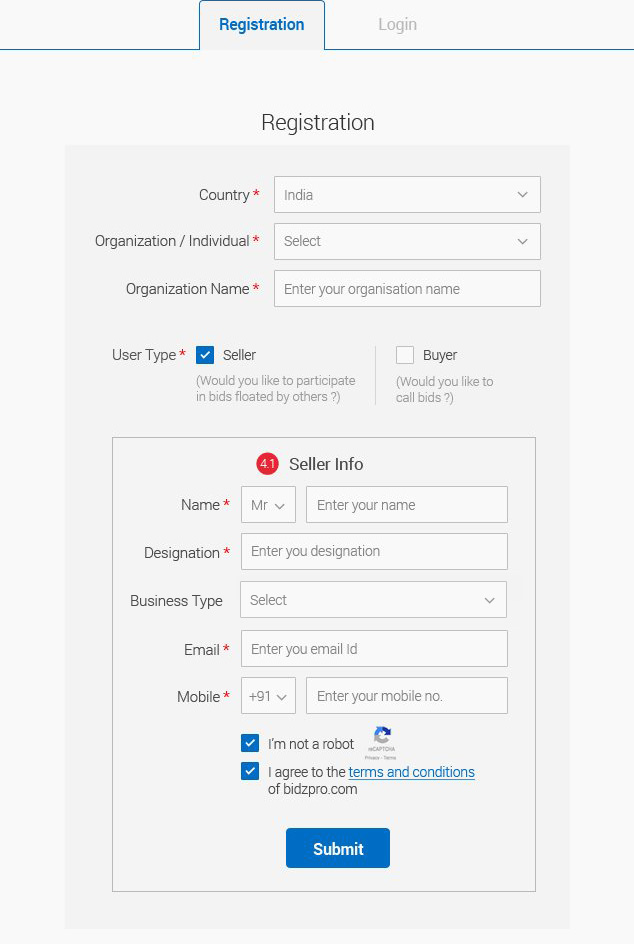
01 Click on “FREE REGISTRATION” on the top right of Bidzpro home page.
02 Select your country from the drop down menu.
3.1 Organization :
3.2 Individual :
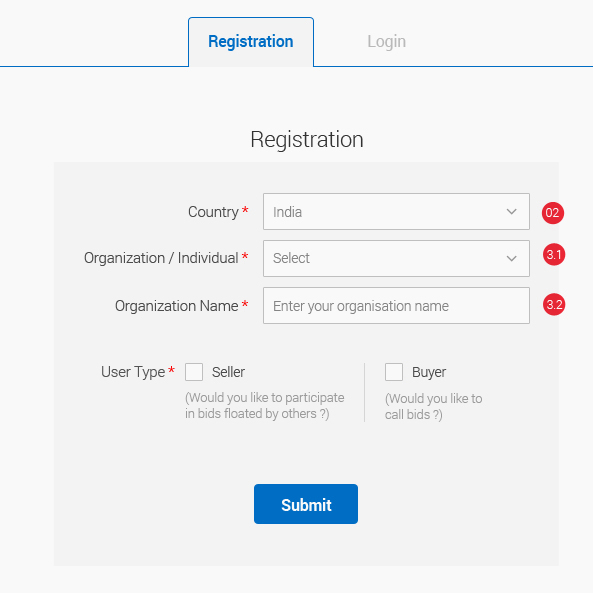
4.1 Seller :
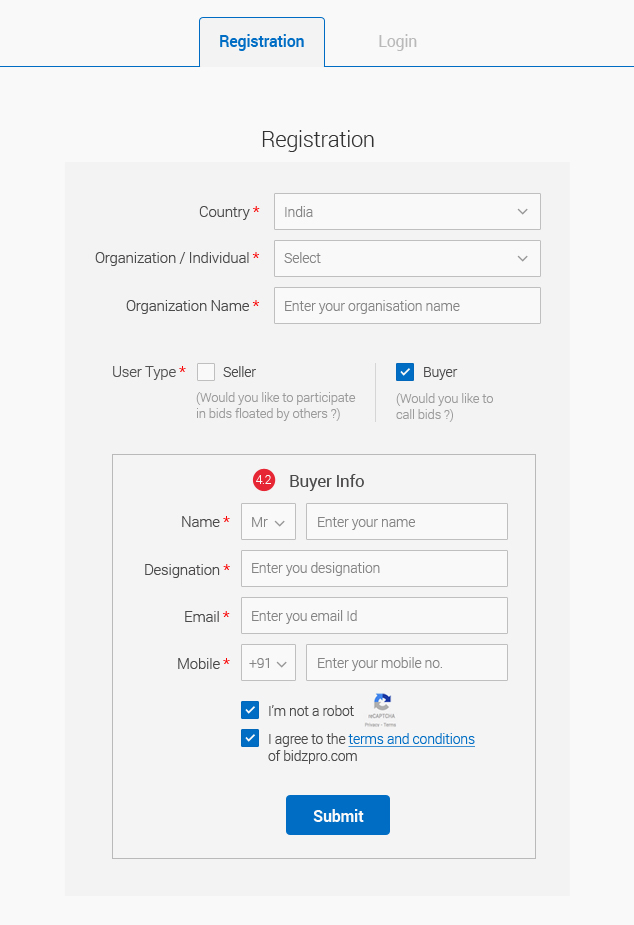
4.2 Buyer :
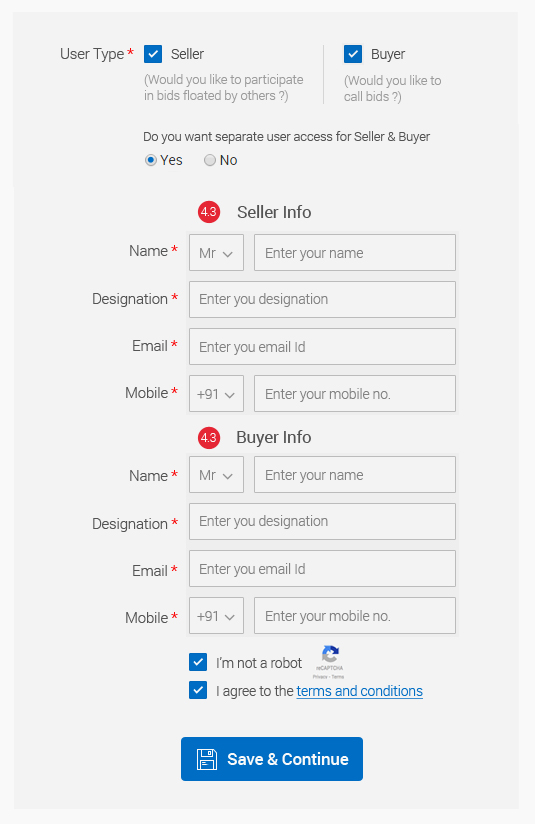
4.3 Seller & Buyer :
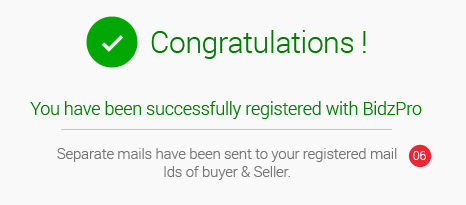
A confirmation message will be sent to your registered Email ID as you submit all the details. Log in to your Email ID and confirm your registration by clicking on the CONFIRM REGISTRATION button.
I. Buyer
II. Seller
III. When you register as both buyer and seller, you need to fill in the respective forms (buy and sell) and follow the same procedure.
I. Buyer

II. Seller
III. Buyer and Seller
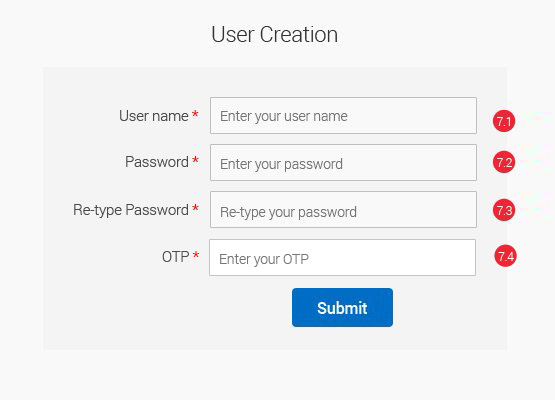
The buyer / seller clicks the link in his email to land in the user creation screen.
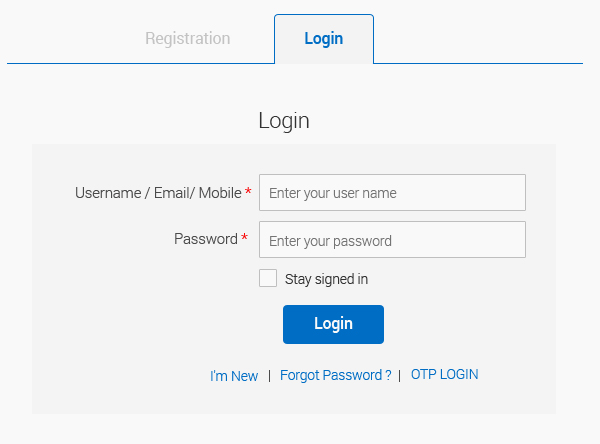
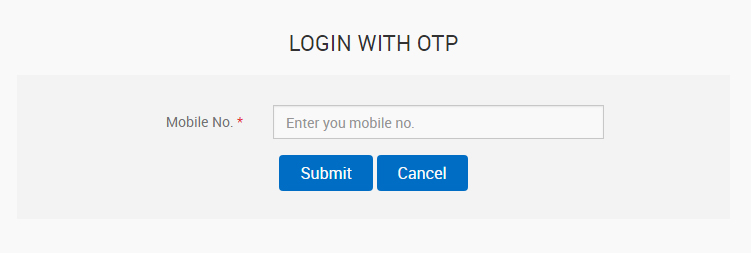
Forgot your username and password? Let us help! Enter your registered mobile number and we'll send you a OTP to login to Bidzpro without much hassle..
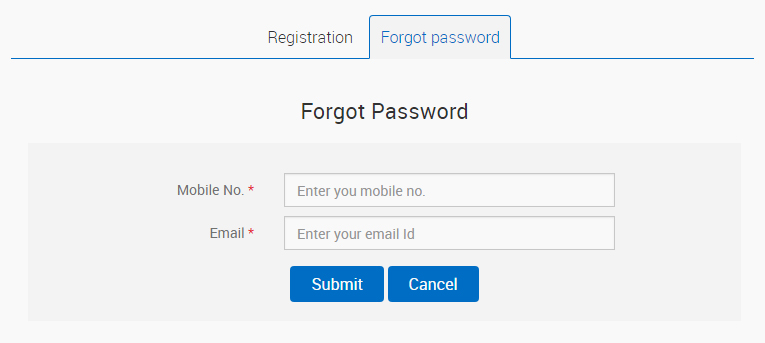
Forgot your password? Not to worry, we have you covered! Lets get you a new password, just enter your registered email address and mobile number we'll send you a link to reset your password.
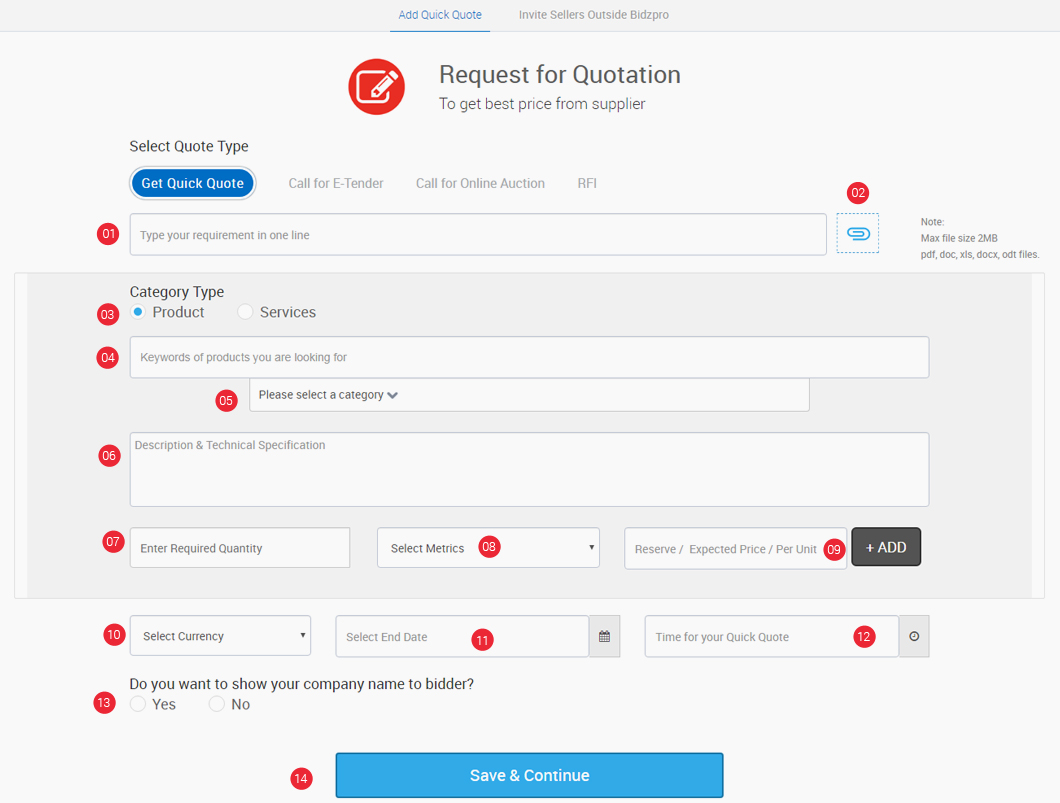
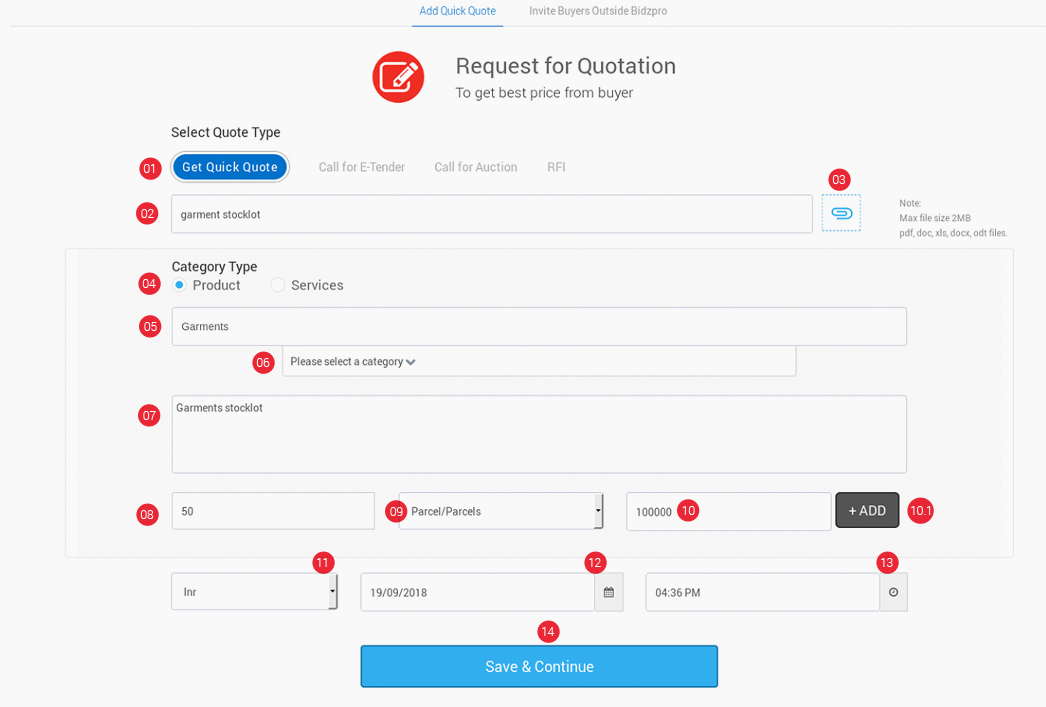
1. Get Quick Quote: Enter your buy requirements in one line to help us choose the right supplier.
2. In order to facilitate the flow of information, bidzpro allows you to add multiple attachements, this in turn helps you to scale up your efficiency by leaving more time to perform other essential business tasks.
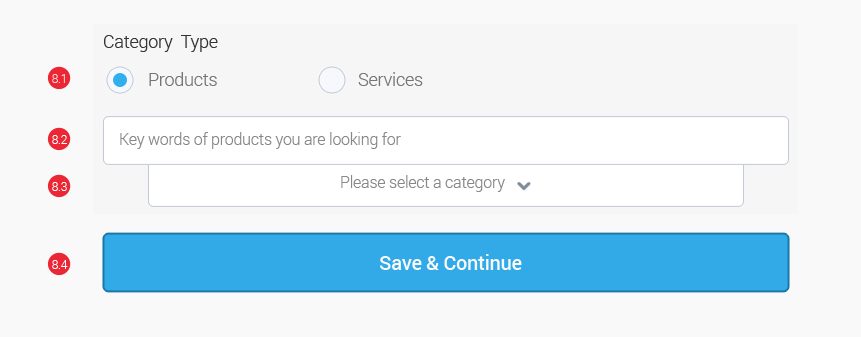
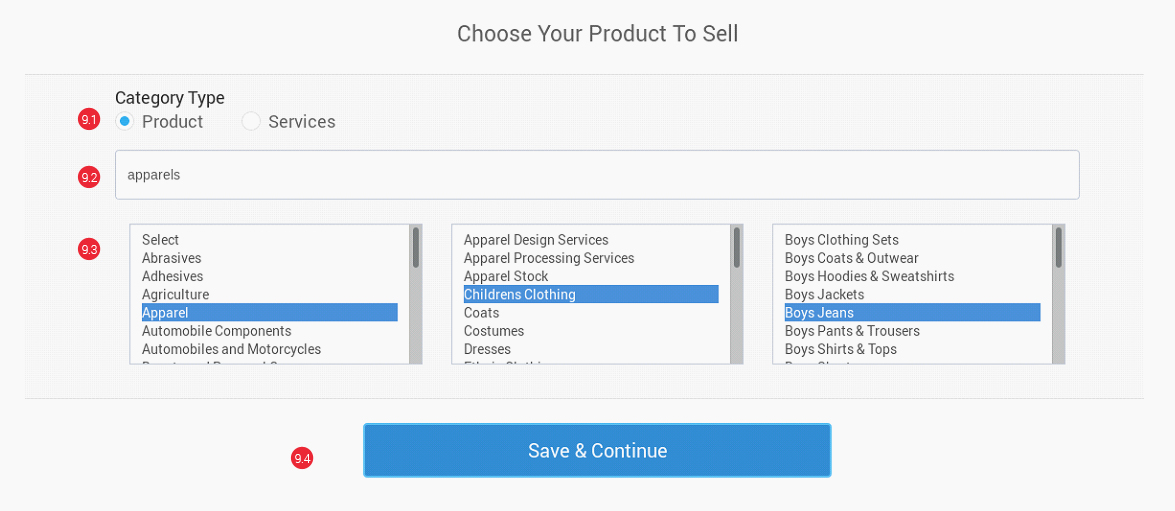
3. Select category type: If your buy requirement is a product, then select the same, on the other hand, if your requirement is service-oriented then select service.
4. Enter the keywords of products you are dealing with.
5. Select the category from the drop down menu where your requirement will best fit in.
6. Enter the specifics of your buy requirement. In case if there is any technical specification for your buy requirement, then you can specify here.
7. Enter the required quantity of your buy requirement.
8. Select the metrics of your buying requirement.
9. Enter your Reserve /Expected Price per unit. (Reserve price is the price that the buyer is willing to accept for an item.)
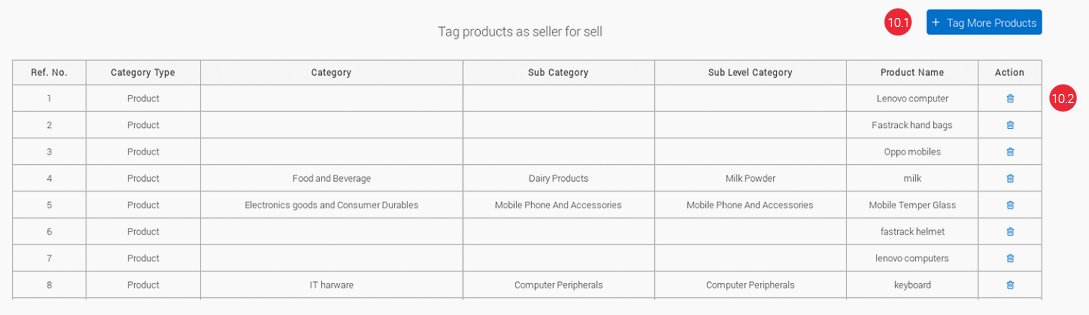
9.1. Click on the “+ADD button” to add more products matching your category.
9.2. If you want to delete the added products, click on the delete icon.
10. Select the currency type.
11. Select an End Date for your buy requirement.
12. Select your End Time.
13. If you want your company name to be displayed to the bidder, then select "Yes", on the other hand, if you would like to keep your company name clandestine then select "No".
14. Click on the “Save and Continue” button to proceed.

Note: Upon clicking the button “Save & Continue”, an invitation will be sent automatically to sellers inside bidzpro who have tagged in that particular product category.
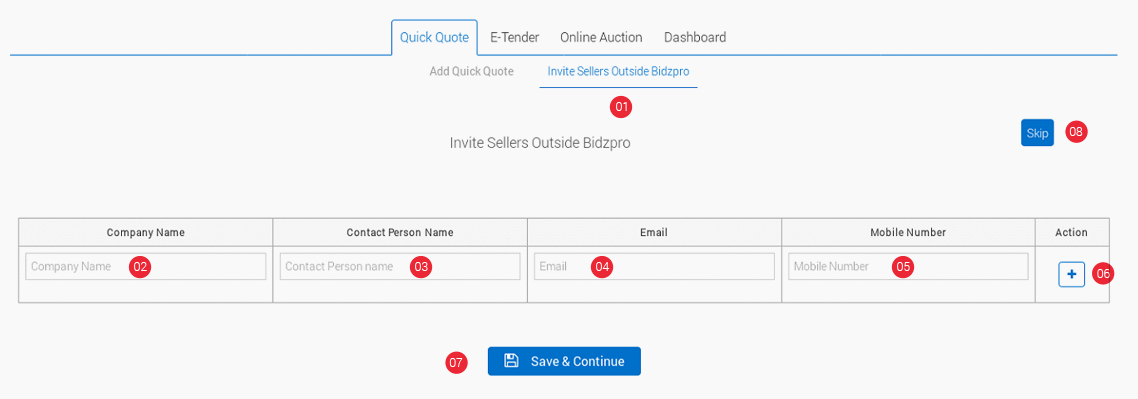
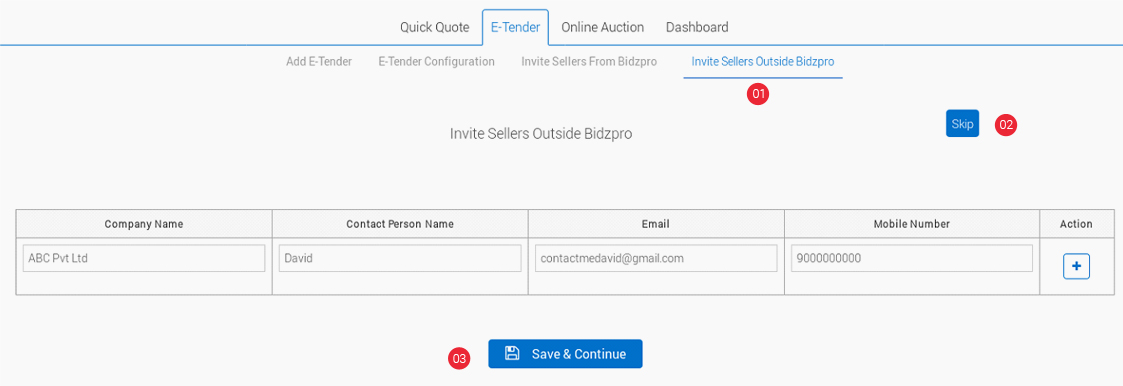
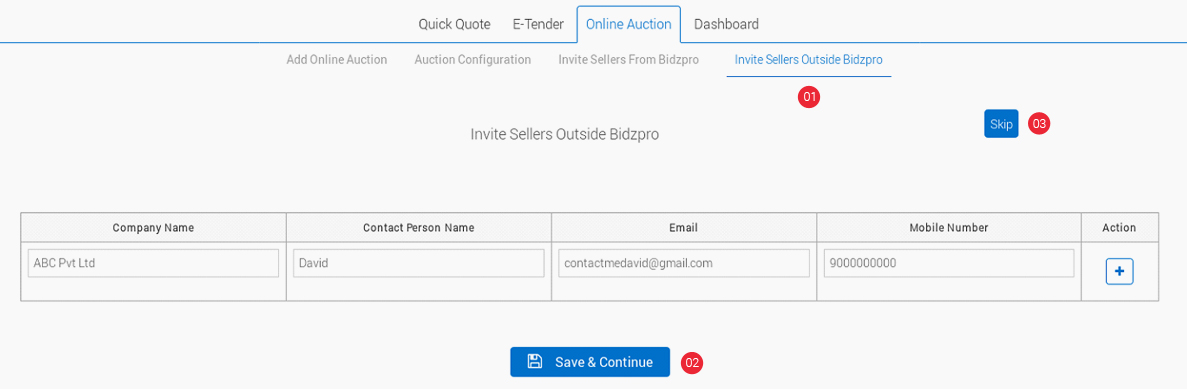
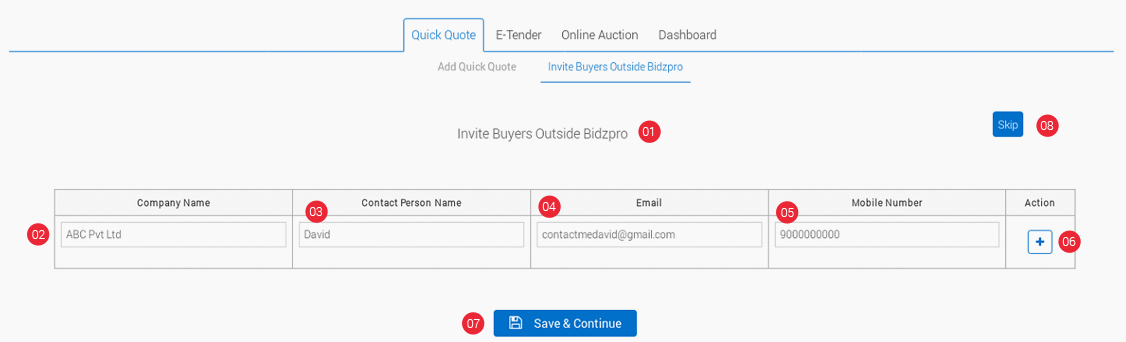
1. Additionally, you (buyer) can also invite sellers outside bidzpro.
2. Enter the Company Name, Person Name, Email address and Mobile Number of the Seller whom do you want to participate in the bidding.
3. Click on the “+” button to add more sellers of your choice.
4. When you are done entering the details of the seller, click on the “Save and Continue” button to proceed further.
5. If you do not want to invite any sellers outside Bidzpro, you can pass over this option by clicking on the “Skip” button.
The Quick Quote list page helps you to view the entire listings along with other details like whom you have invited, the attachments added and so on.
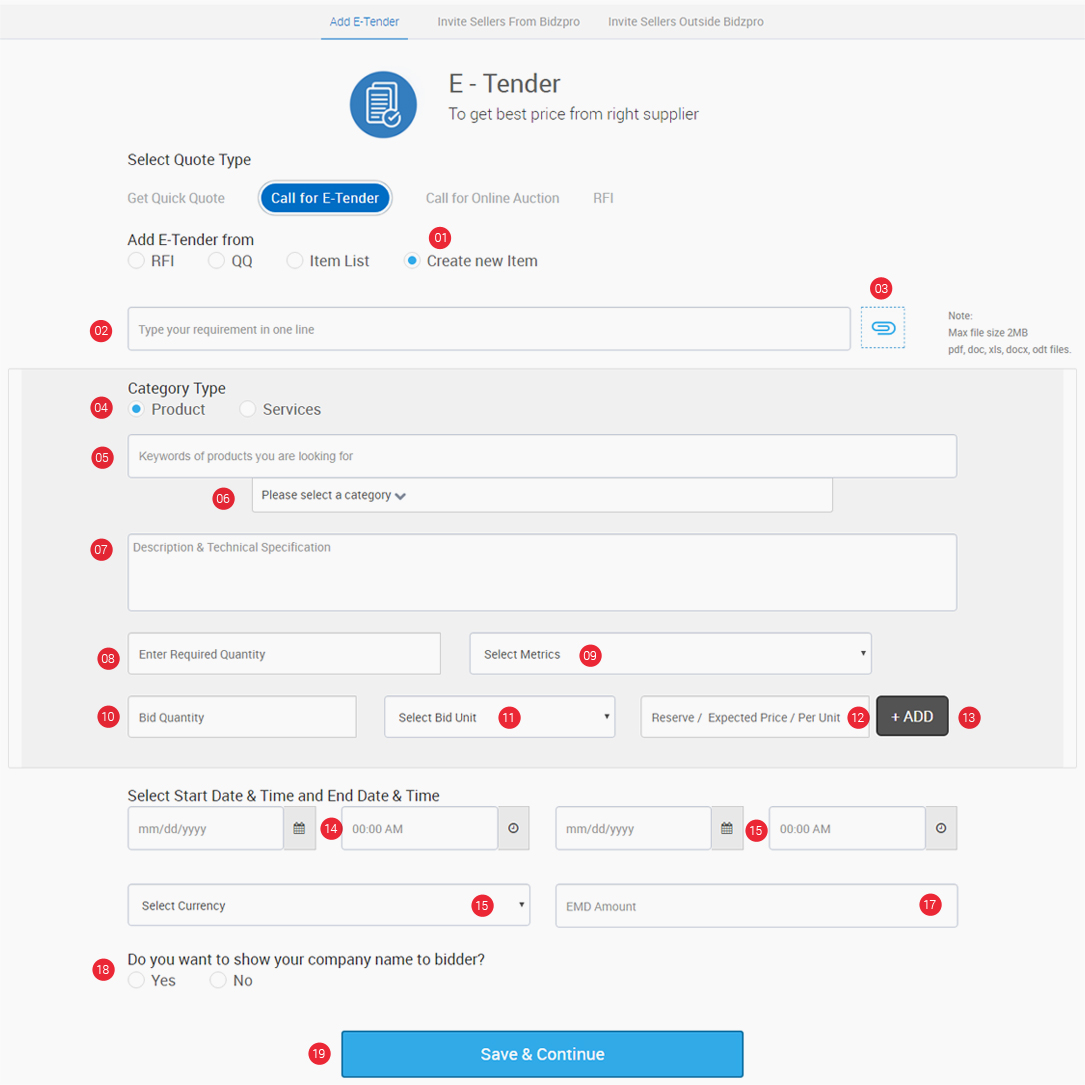
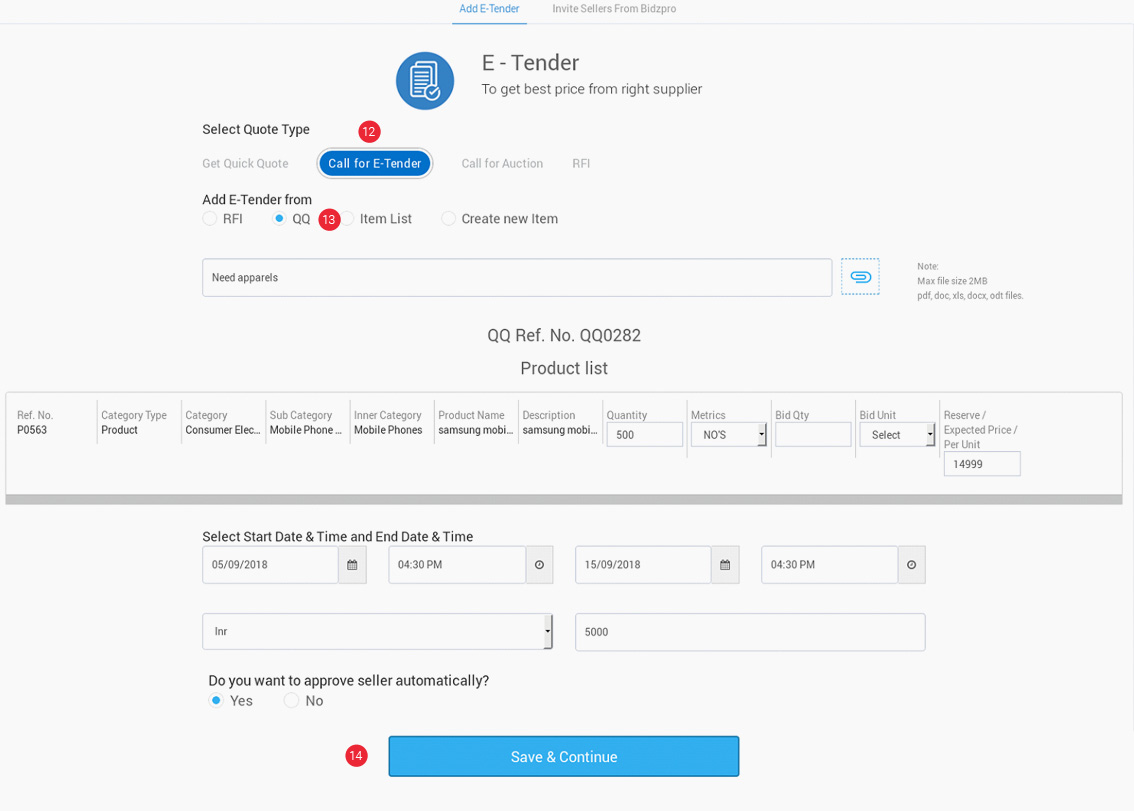
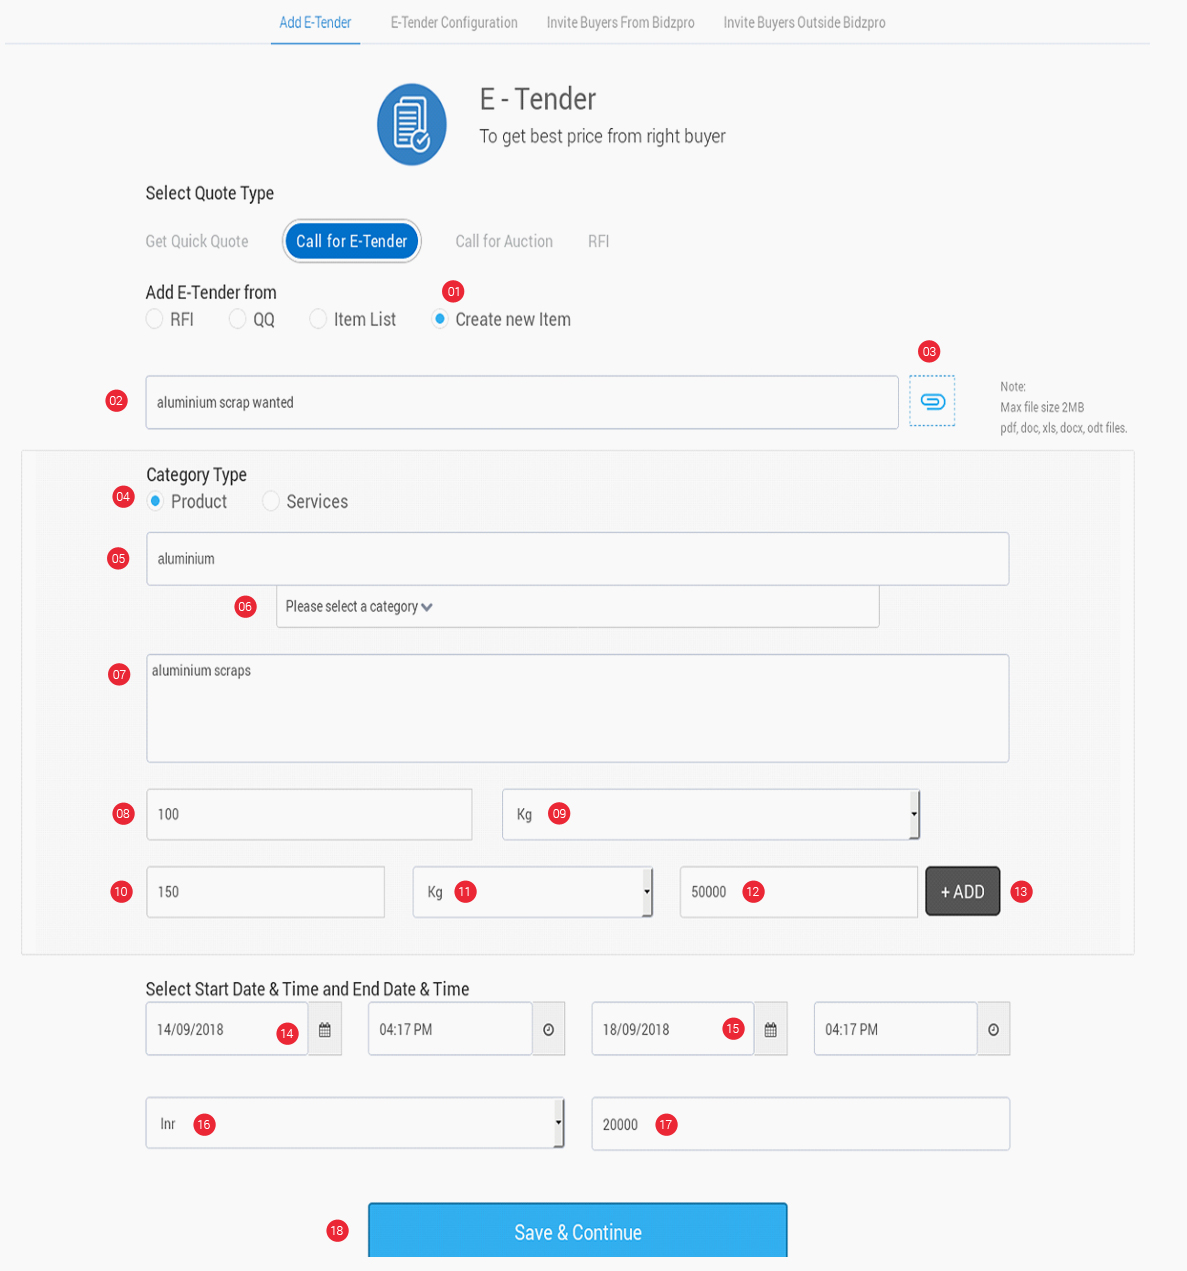
1. If you wanted to push RFI (Request For Information) to E-Tender, select “RFI”. On the other hand, if you wanted to push your Quick Quote to E-Tender, then select “QQ”. Similarly, you can select the “Item List” to add from the existing ones. Select “Create New Item” to post a new buy requirement.
2. Enter your buying requirement to help us choose the right supplier.
3. In order to facilitate the flow of information, bidzpro allows you to add multiple attachements, this in turn helps you to scale up your efficiency by leaving more time to perform other essential business tasks.
4. Select category type: If your buy requirement is a product, then select the same, on the other hand, if your requirement is service-oriented then select service.
5. Enter the keywords of your buy requirement.
6. Select an appropriate category matching your product or service requirement.
7. Enter the technical specification of your requirement (if any).
8. Enter the quantity required for your requirement.
9. Select the metrics from the drop-down.
10. Enter the bid quantity. (Ask bid price for one product or for the wholelot)
11. Select the bid unit from the drop-down.
12. Enter your Reserve /Expected Price per unit. (Reserve price is the price the buyer is willing to accept an item for.)
13. Click on the “+ ADD” button to add more requirements. If you want to delete the added products, click on the delete icon.
14. Select your start date and time.
15. Select your end date and time.
16. Select your currency type.
17. Enter the EMD amount. (EMD is a deposit amount. This is to ensure that a Bidder does not submit a Dummy Bid or back out at time of tender opening)
18. If you want your company name to be displayed to the bidder, then select "Yes", on the other hand, if you would like to keep your company name clandestine then select "No".
19. Click on the “Save and Continue” button to proceed further
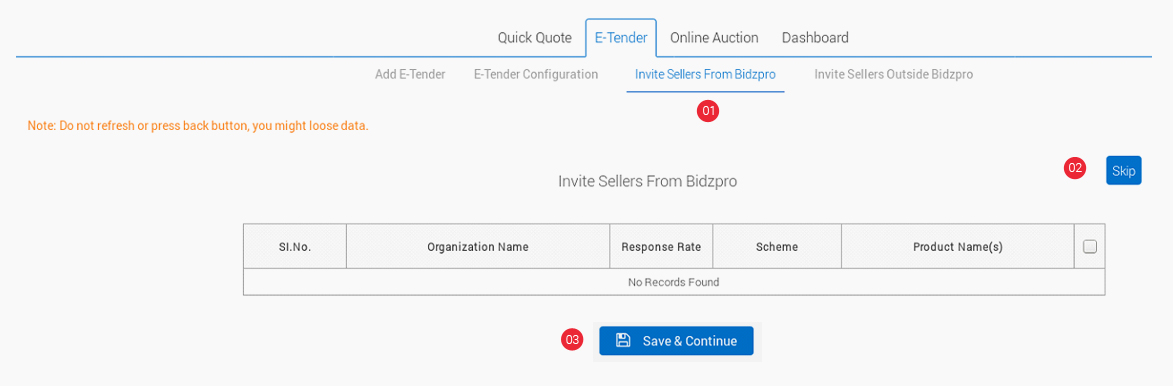
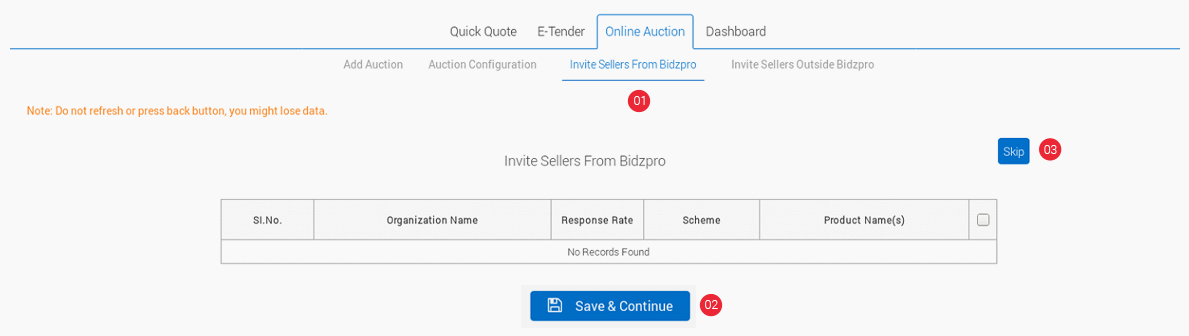
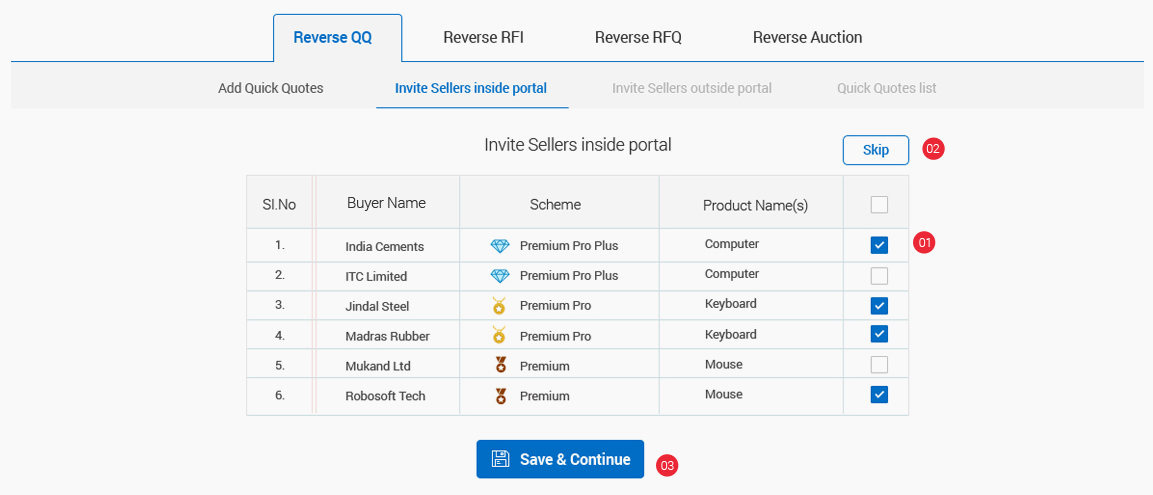
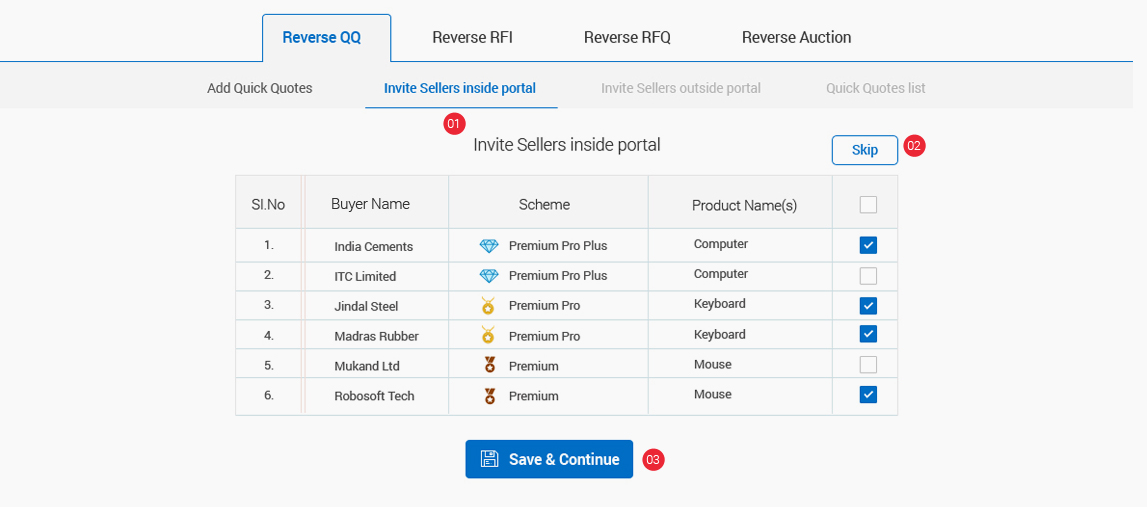
1. Select the seller from the list whom you would like to invite from Bidzpro.
2. If you do not want to invite any sellers inside Bidzpro, you can pass over this option by clicking on the “Skip” button.
3. When you are done selecting the details of the seller, click on the “Save and Continue” button to proceed further.
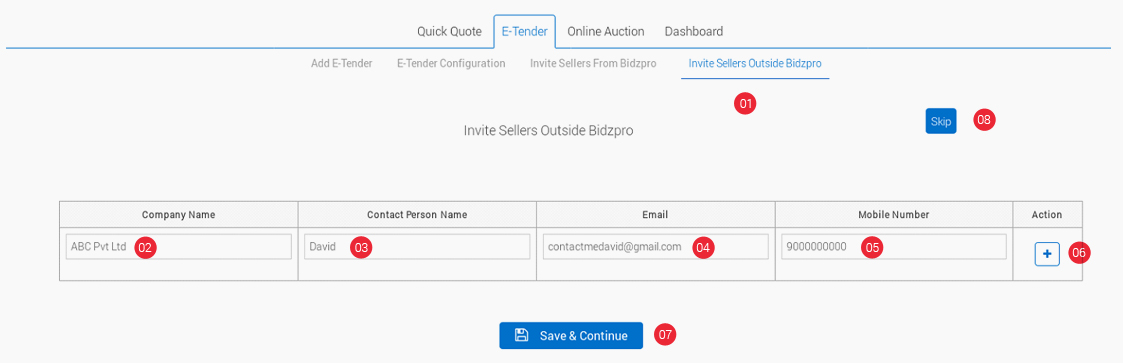
1. To invite sellers outside Bidzpro, enter the Company Name, Person Name, Email address and Mobile Number of the Seller whom do you want to participate in the bidding.
2. Click on the “+” button to add more sellers of your choice.
3. When you are done entering the details of the seller, click on the “Save and Continue” button to proceed further.
4. If you do not want to invite any sellers outside Bidzpro, you can pass over this option by clicking on the “Skip” button.
1. The E-Tender list page helps you to view the entire listing along with other details which you added at the time of posting your buy requirement in E-Tender.
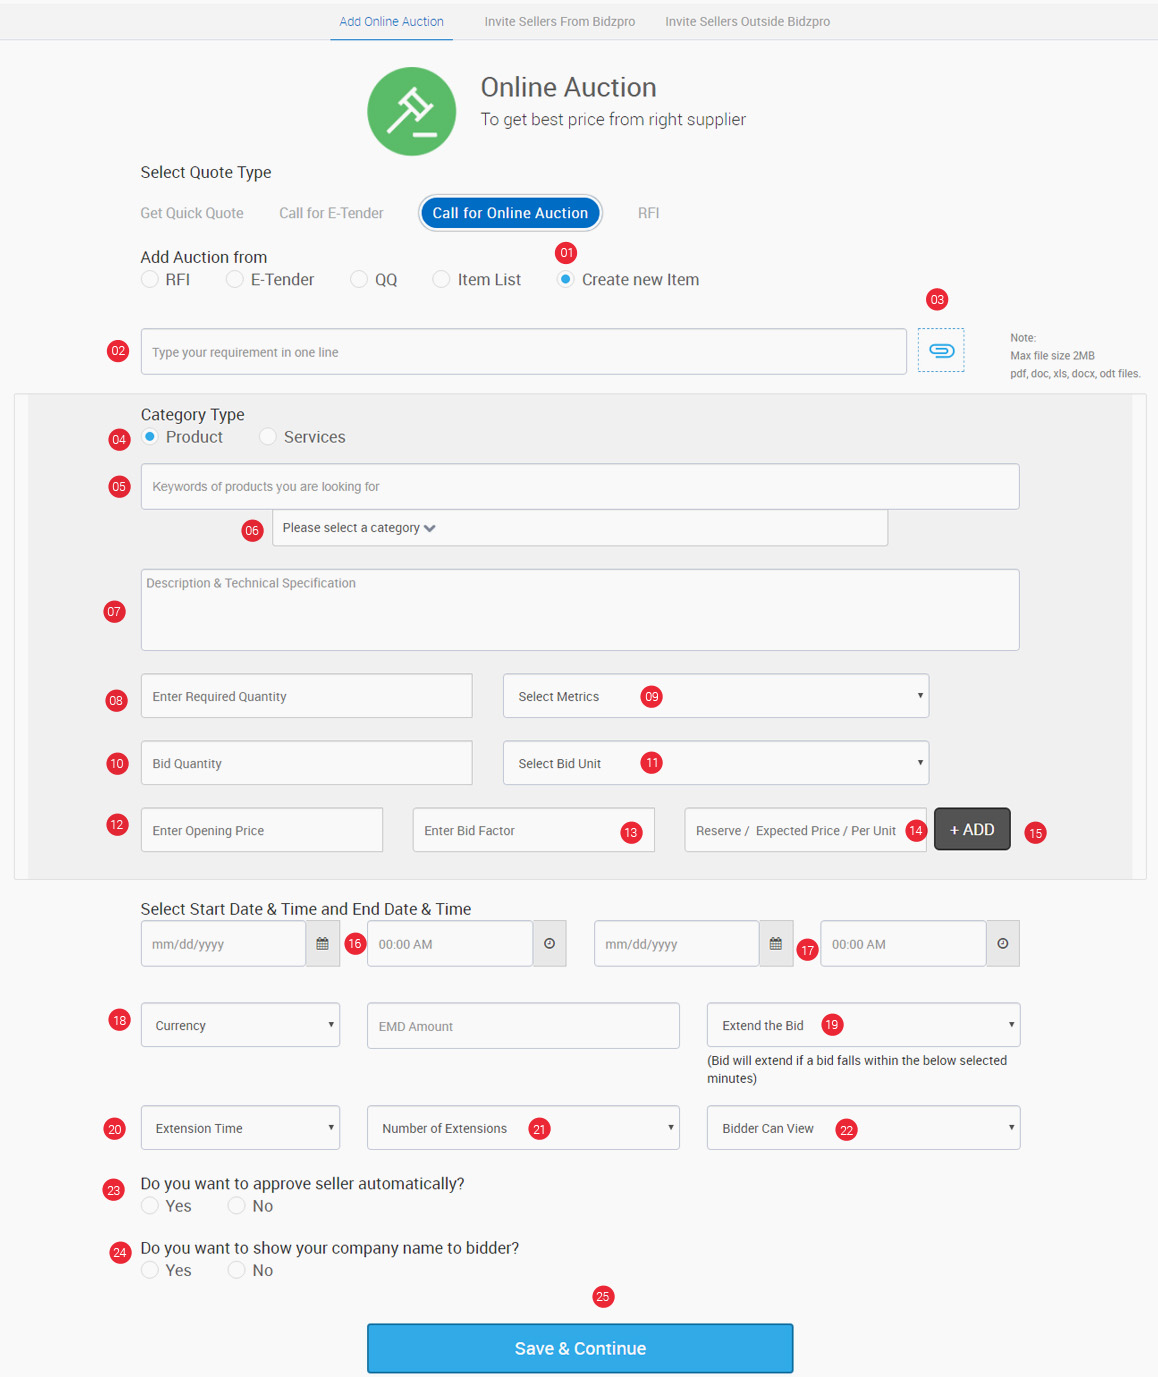
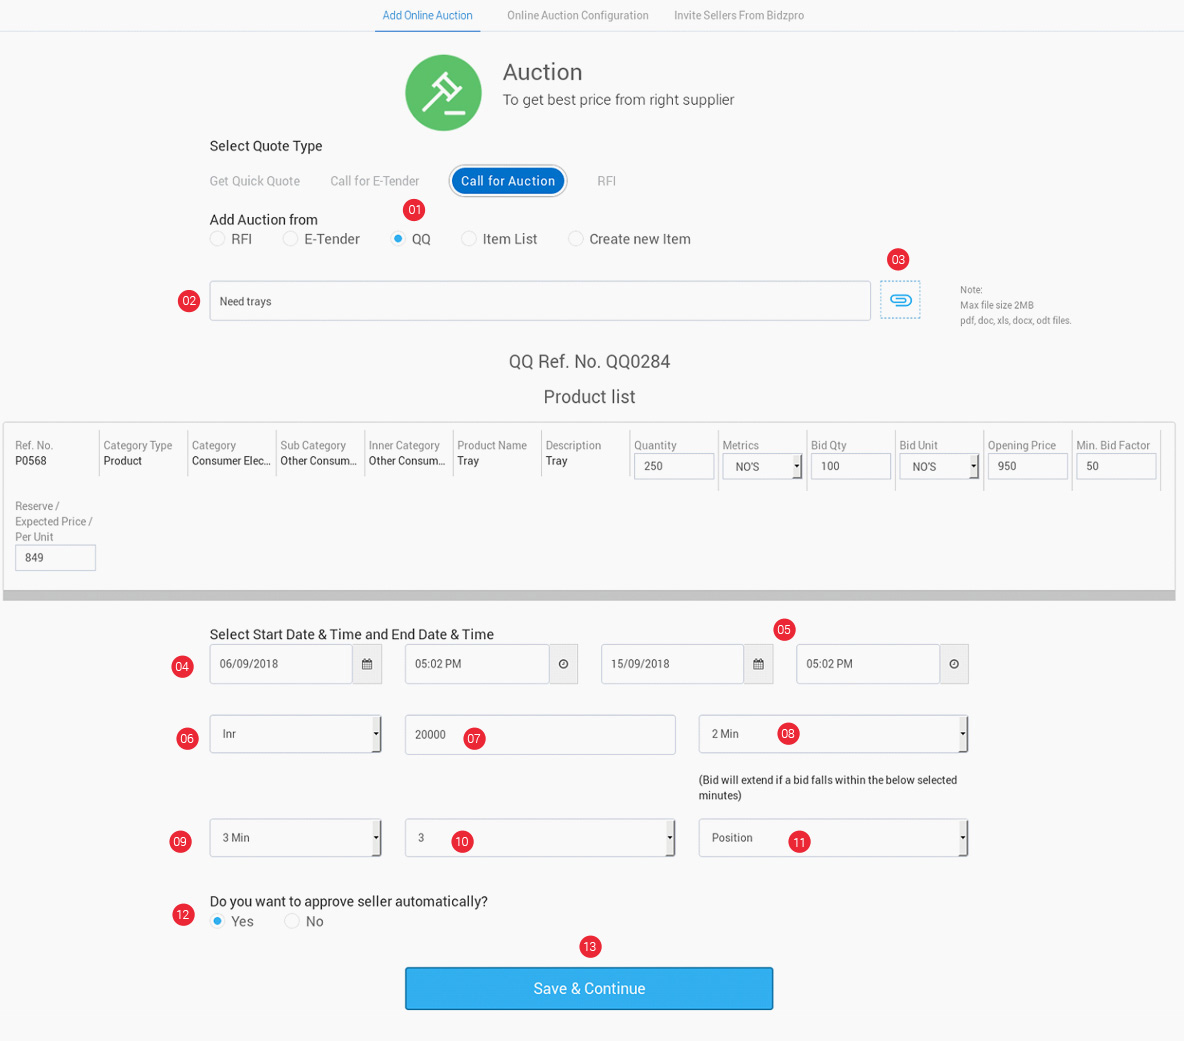
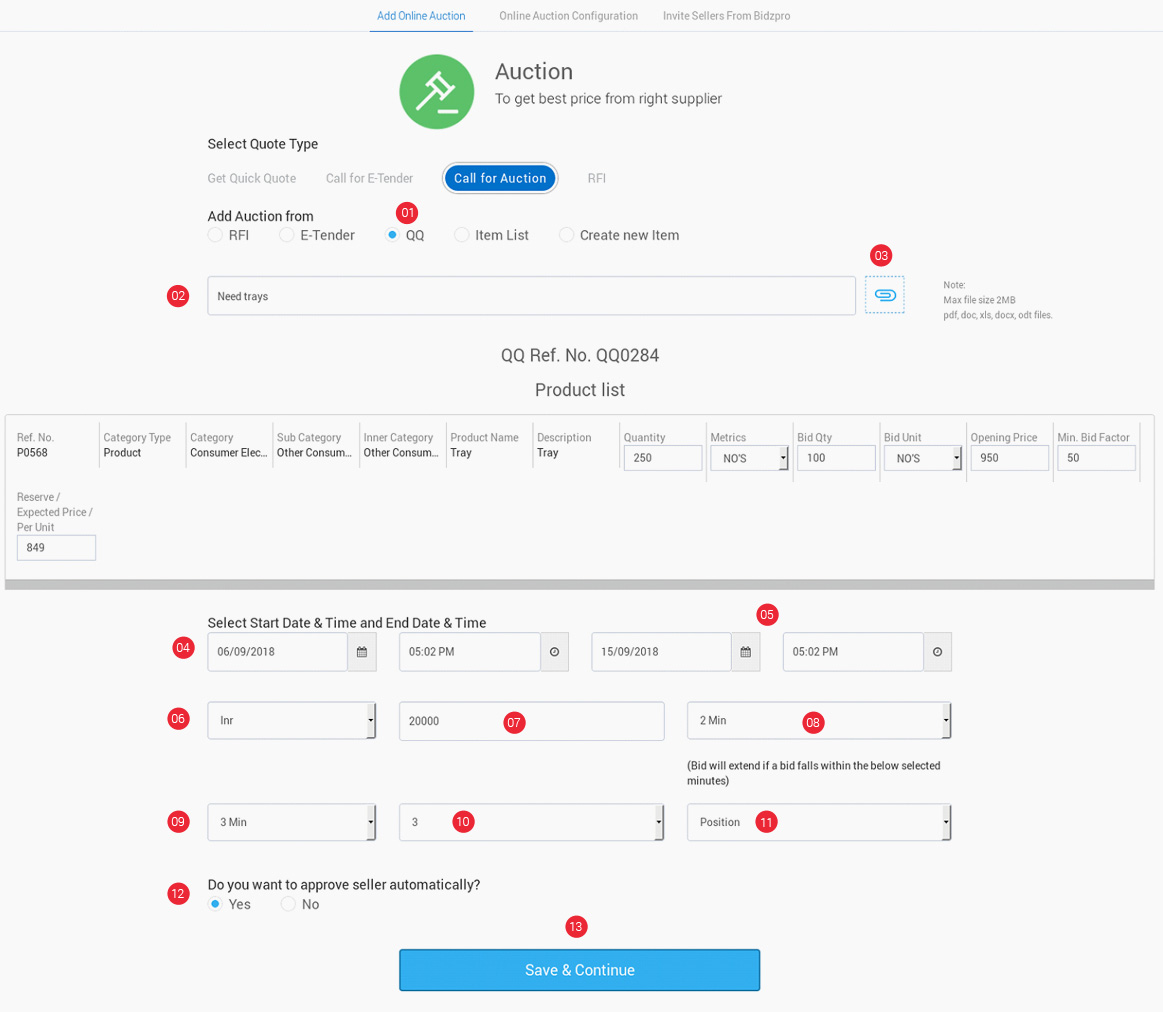
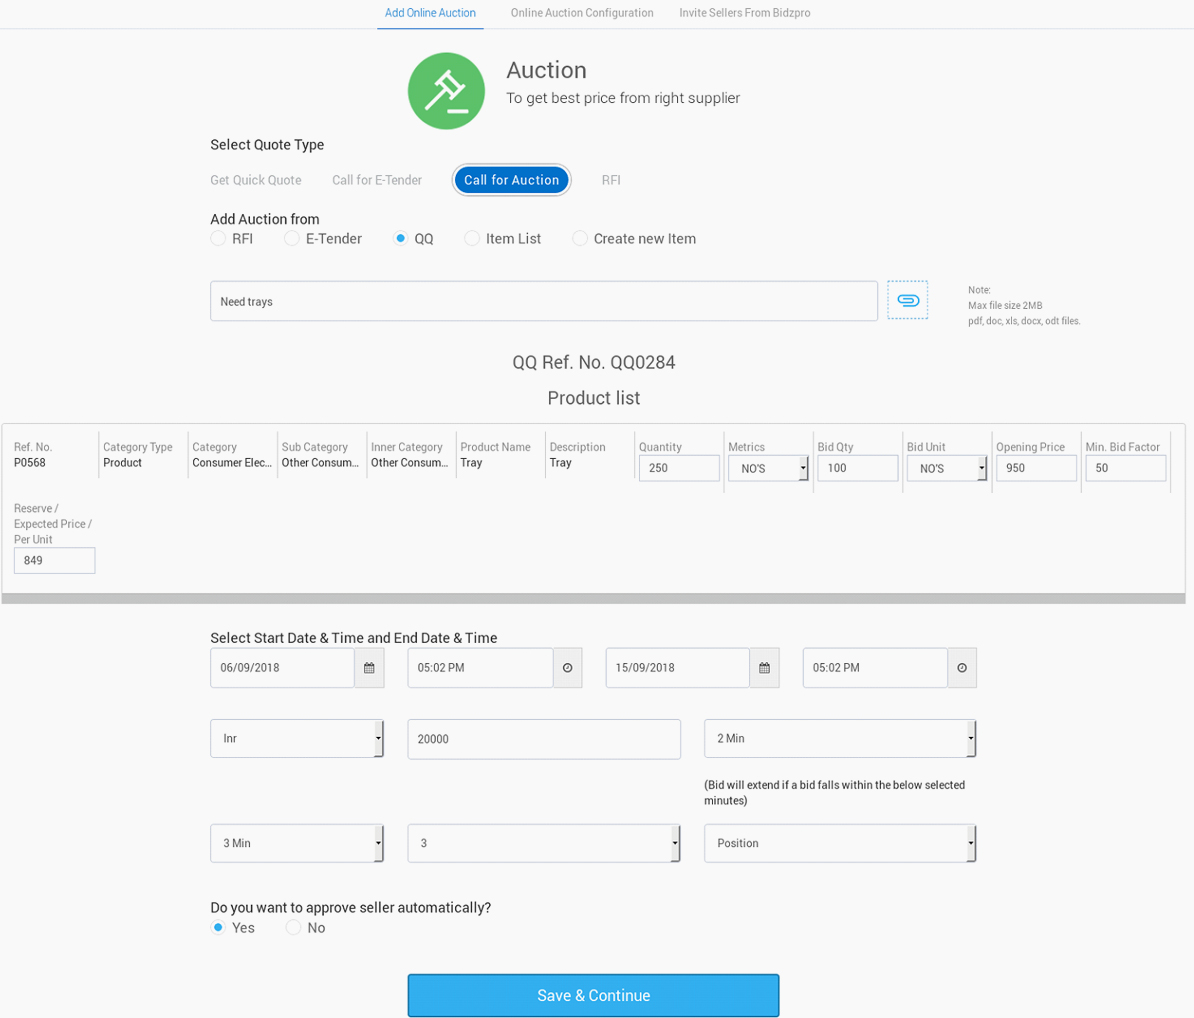
1. If you wanted to push RFI (Request For Information) to Online Auction, select “RFI”. On the other hand, if you wanted to push your Quick Quote to Online Auction, then select “QQ”. Similarly, you can select the “Item List” to add from the existing ones. Select “Create New Item” to post a new buy requirement.
2. Enter your buy requirements in one line to help us choose the right supplier.
3. In order to facilitate the flow of information, bidzpro allows you to add multiple attachements, this in turn helps you to scale up your efficiency by leaving more time to perform other essential business tasks.
4. Select category type: If your buy requirement is a product, then select the same, on the other hand, if your requirement is service-oriented then select service.
5. Enter appropriate keywords of the product or service you are looking for.
6. Select an appropriate category from the drop-down.
7. Enter the specifics of your buy requirement. In case if there is any technical specification for your buy requirement, then you can specify here.
8. Enter the required quantity of your buy requirement.
9. Select the Metrics. (Unit of Measurement)
10. Enter the bid quantity. (Ask bid price for one unit or for the whole lot)
11. Select bid unit.
12. Enter opening price. (Opening price is the amount the bid starts from)
13. Enter bid factor. (Bid factor is the difference between the bid and the ask price)
14. Enter the Reserve/Expected Price/Per Unit. (Reserve price is the price that the buyer is willing to accept an item for.)
15. Click on the “+ADD” button to add more products.
16. Select your start date and time.
17. Select your end date and time.
18. Select your currency type.
19. Select a time frame from the drop-down to extend the bid in the last minutes of a listing.
20. Select the extending time from the drop-down to extend the bid and gain competitive edge.
21. Select from the drop-down, the number of time to extend the bid time.
22. Select “Bidder can view” Drop down to allow the bidder to view Position or Price & Position.
23. If you want to approve the sellers automatically, then select “Yes”, on the other hand, if you want approve manually then select “No”.
24. If you want your company name to be displayed to the bidder, then select "Yes", on the other hand, if you would like to keep your company name clandestine then select "No".
25. Click on the “Save and Continue” button to proceed further.
1. Select the seller from the list whom you would like to invite from Bidzpro.
2. If you do not want to invite any sellers inside Bidzpro, you can pass over this option by clicking on the “Skip” button.
3. When you are done entering the details of the seller, click on the “Save and Continue” button to proceed further.
1. To invite sellers outside Bidzpro, enter the Company Name, Person Name, Email address and Mobile Number of the Seller whom do you want to participate in the bidding.
2. Click on the “+” button to add more sellers of your choice.
3. When you are done entering the details of the seller, click on the “Save and Continue” button to proceed further.
4. If you do not want to invite any sellers Outside Bidzpro, you can pass over this option by clicking on the “Skip” button.
The Online Auction list helps you to view the entire listing. In order to initiate the process of your Online Auction, you need to click on the “Publish icon” in the “Action” column to make it available for public participation. Until you publish it, the particular entry will be in “draft” form.
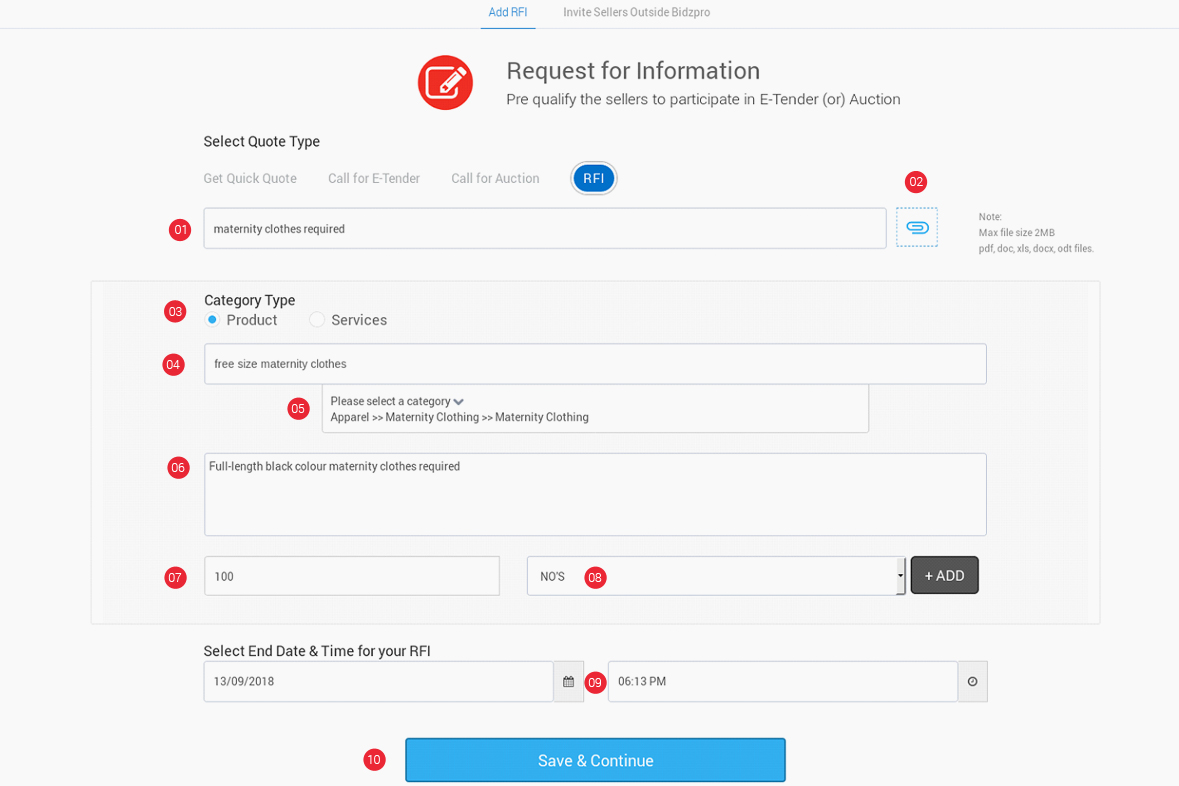
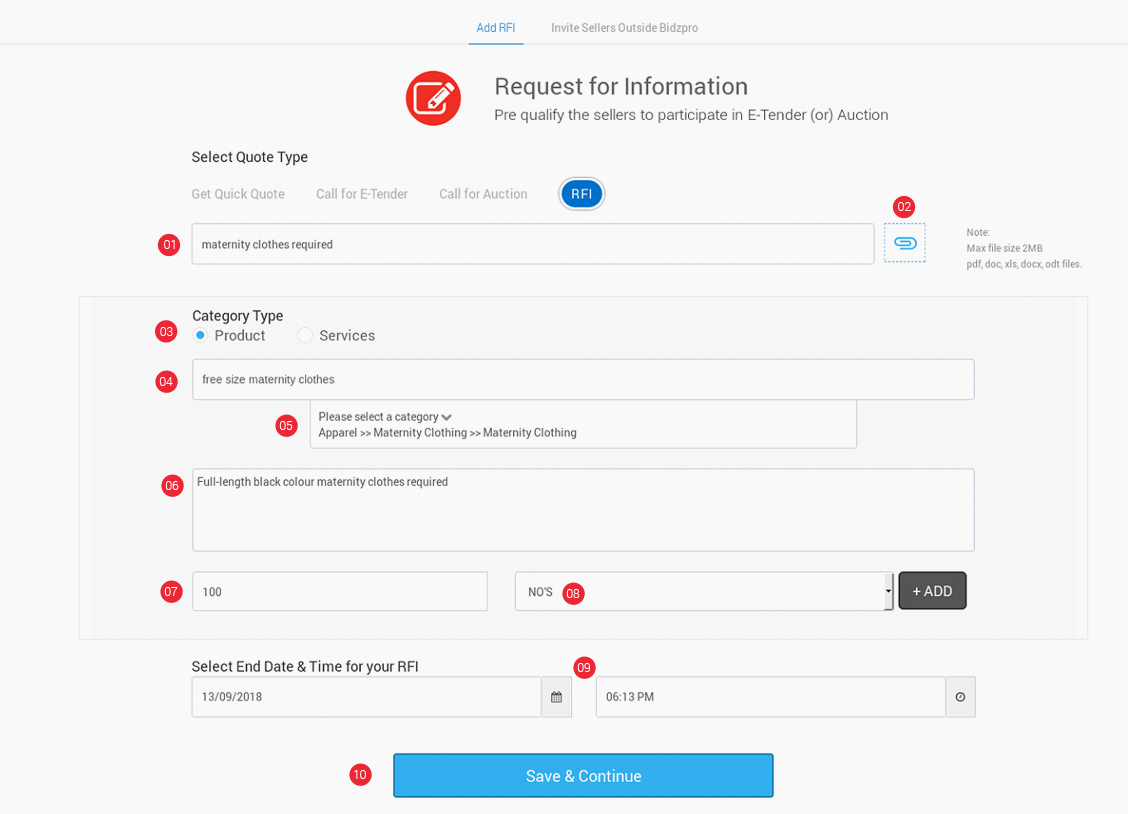
1. Enter your buy requirements in one line to help us choose the right supplier.
2. In order to facilitate the flow of information, bidzpro allows you to add multiple attachements, this in turn helps you to scale up your efficiency by leaving more time to perform other essential business tasks.
3. Select category type: If your buy requirement is a product, then select the same, on the other hand, if your requirement is service-oriented then select service.
4. Enter appropriate keywords of the product or service you are looking for.
5. Select an appropriate category from the drop-down.
6. Enter the specifics of your buy requirement. In case if there is any technical specification you wanted to mention for your buy requirement, then you can specify here.
7. Enter the required quantity of your buy requirement.
8. Select the Metrics. (Unit of Measurement)
9. Select the End date and time.
10. Click on the “Save and Continue” button to proceed further.
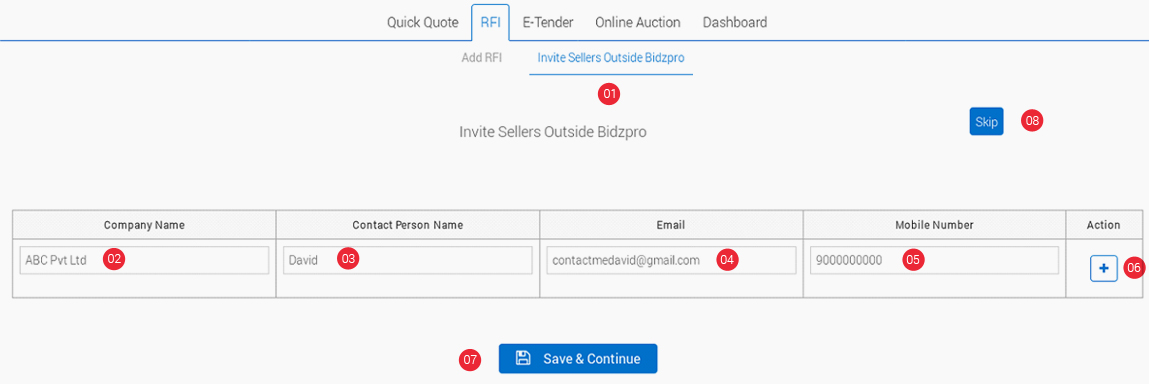
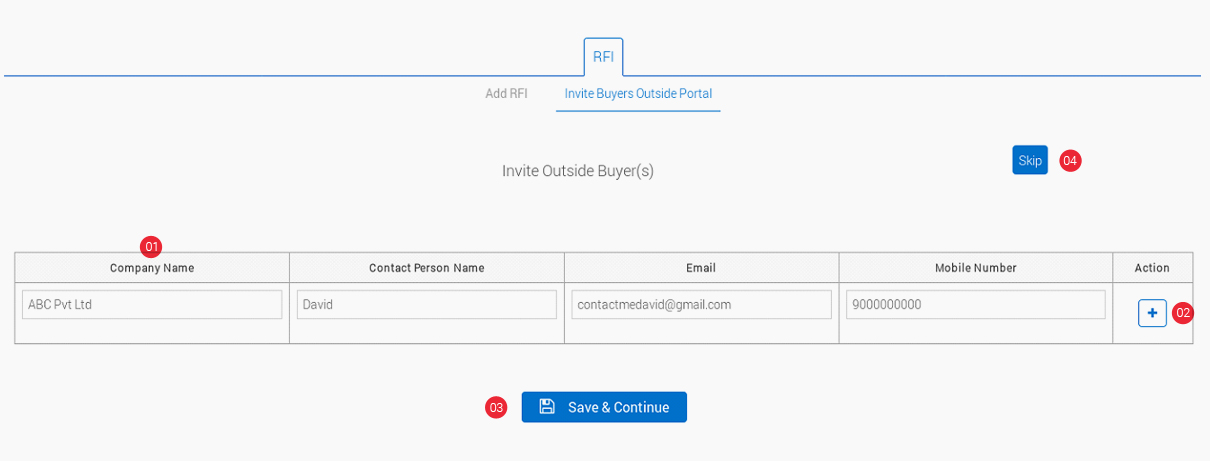
1. To invite sellers outside Bidzpro, enter the Company Name, Person Name, Email address and Mobile Number of the Seller whom do you want to participate in the bidding.
2. Click on the “+” button to add more sellers of your choice.
3. When you are done entering the details of the seller, click on the “Save and Continue” button to proceed further.
4. If you do not want to invite any sellers Outside Bidzpro, you can pass over this option by clicking on the “Skip” button.
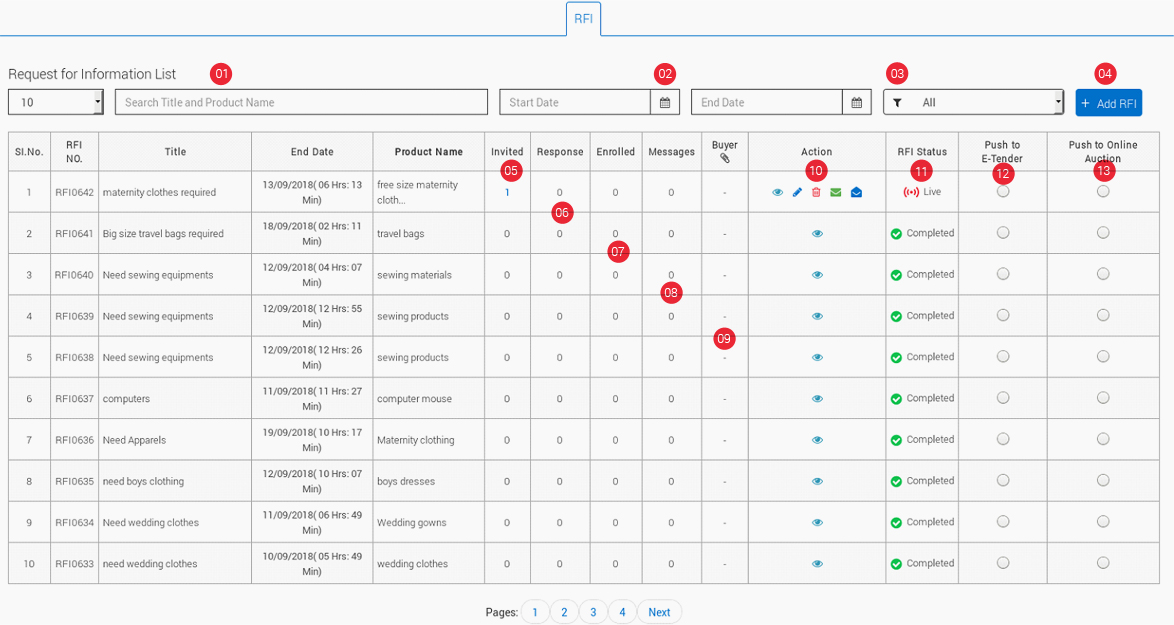
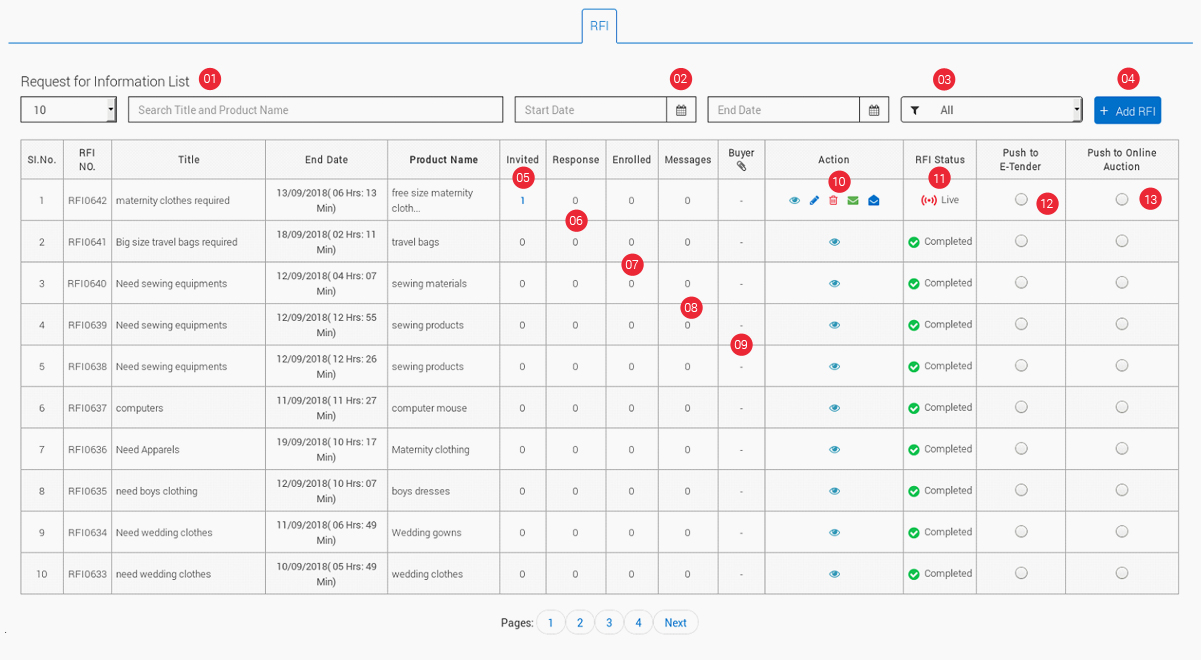
1. The RFI list page helps you to view the entire listing. Click on the search box and enter a title or product name to filter your search product wise.
2. If you want to view the listings date wise, then click on the calendar icon and enter the start and end date to view the same.
3. Similarly, the filter box helps you to view the RFI that is in live, completed, and the canceled ones as well.
4. At this point of time, if you wanted to add a new RFI, then you click on the “+ Add RFI” and post your requirements if any.
5. The invited column will display the number of invited sellers for RFI. By clicking on the number, you will be able to view the details, additionally, you can also send a reminder to the sellers.
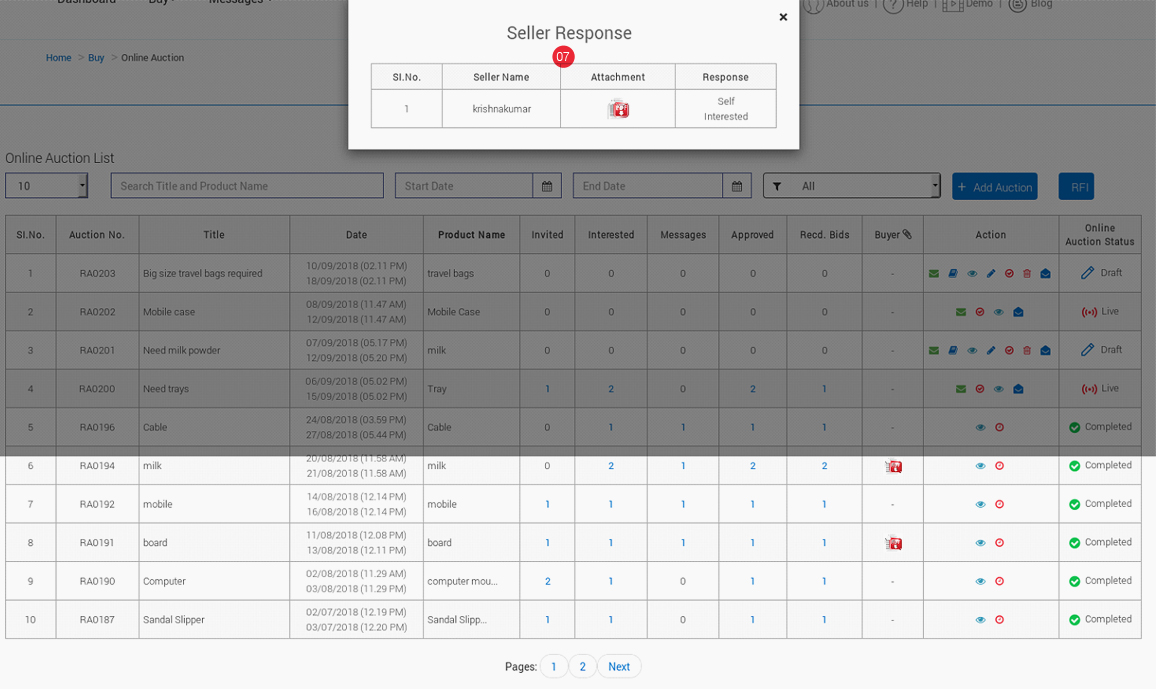
6. The “Response” column will help you view the details of the sellers who have responded to your buy requirement. A click on the number will display the entire information of the same and if you find them suitable, then you can click on the “Enroll Now” button to have that particular enrolled to your sellers list.
7. The “Enrolled” column will display the details of the sellers whom you have enrolled.
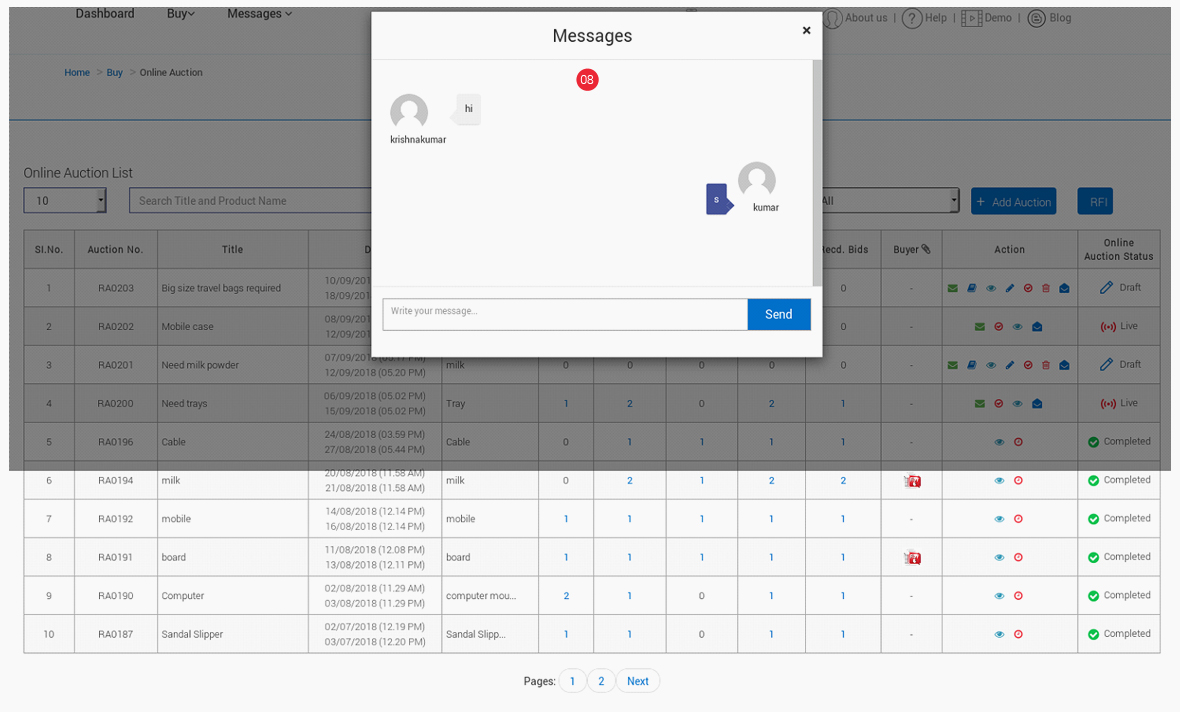
8. The messages column will display the number of messages received and by clicking on the number you will be able to view the message and start a conversation with the seller.
9. In order to facilitate the flow of information, bidzpro allows you to add multiple attachments, this in turn helps you to scale up your efficiency by leaving more time to perform other essential business tasks.
10. The Action column will help you to view, edit, cancel, and delete your RFI.
11. RFI Status column will display the status of your Request For Information.
12. To push your RFI to E-Tender click on the radio button matching the respective row.
13. To push your RFI to Online Auction click on the radio button matching the respective row.
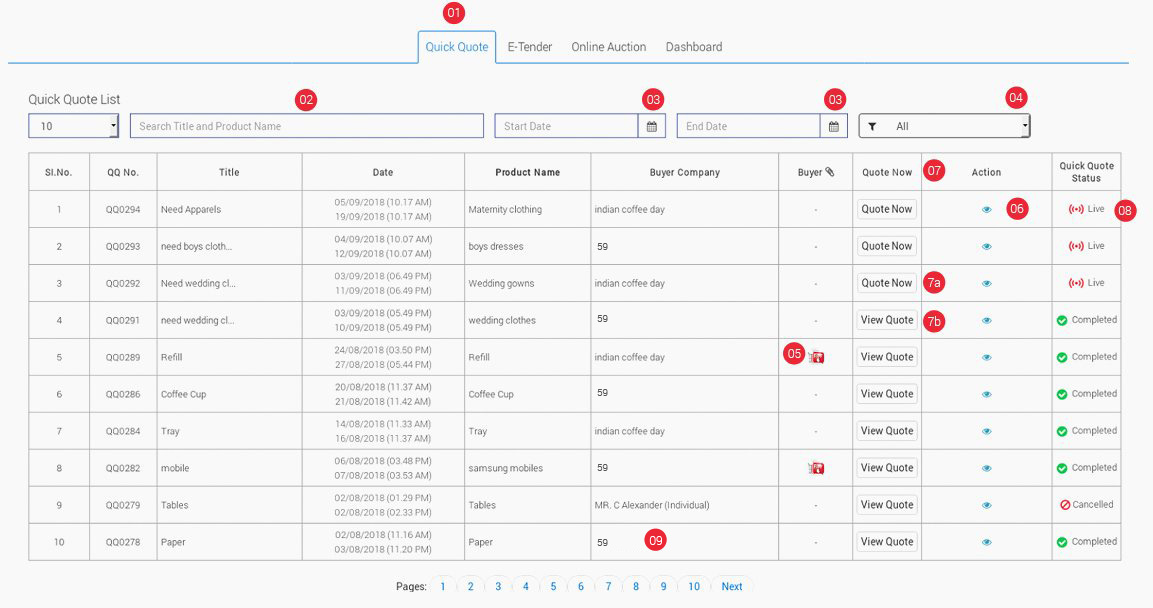
1. The Quick Quote list page is where you (buyer) can view the requirements of the seller and participate in the (seller) posting.
2. Click on the search box and enter a title or product name to filter the search product wise.
3. If you wanted to view the requirements date wise, then click on the calendar icon and enter the start and end date to view the same.
4. Similarly, the filter box helps you to view the Quick Quote that is in live, completed, and the canceled ones as well.
5. In order to facilitate the flow of information, bidzpro allows you to add multiple attachments, this in turn helps you to scale up your efficiency by leaving more time to perform other essential business tasks.
6. Action: Click on the view icon to see the details of seller requirement in detail. It includes particulars like description, quantity, and units.
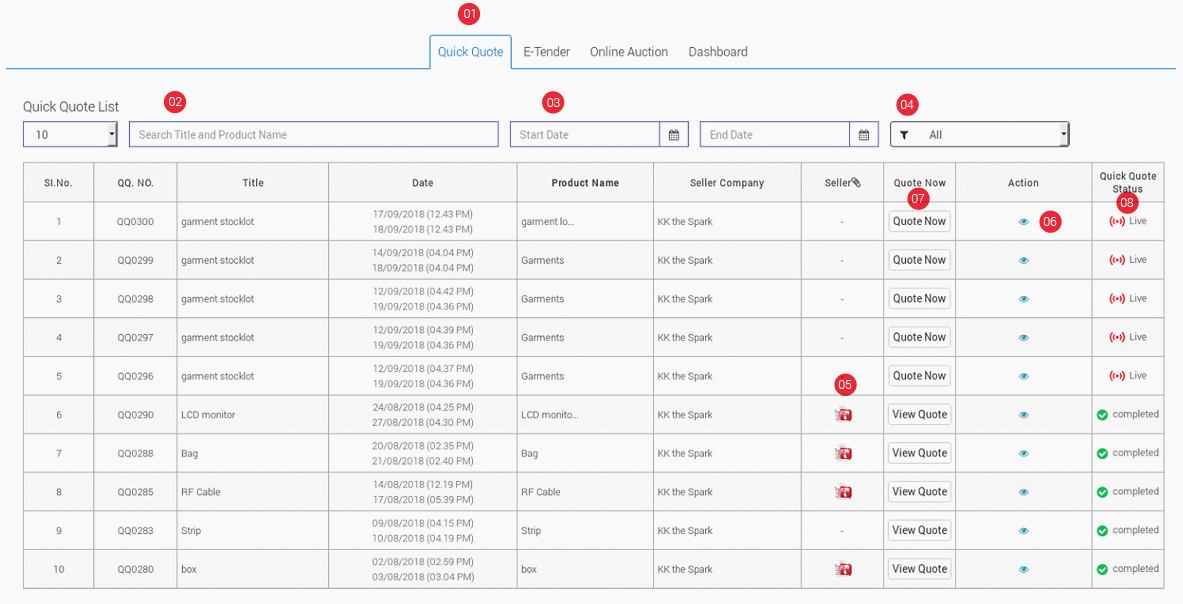
7. The “Quote Now” column is where you will be able to quote for a buy requirement and also be able to view the quotes for completed quick quote.
a) Click on the “Quote now” button to Quote your price for a buy requirement which is in live.
b) A click on the “View Quote” button will help you view the details of the completed bid.
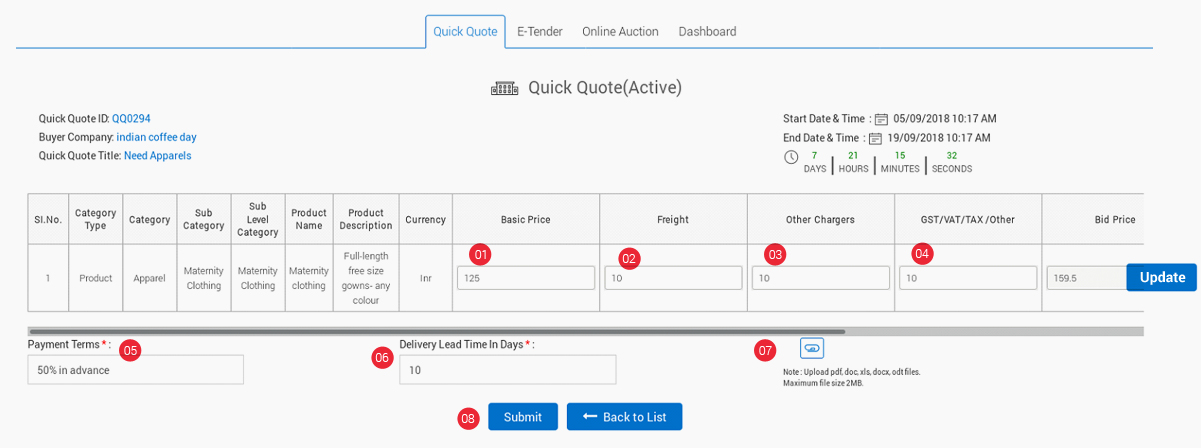
7.1. Enter the basic price of the product. (The initial price of products or services without the additional charges.)
7.2. Enter the Freight charges. (Cost associated with the delivery of goods.)
7.3. Enter the other charges if any. (Service charge)
7.4. Enter the GST/VAT/TAX amount for the product or service.
7.5. Click on the Update button in the Action column to update your details successfully.
7.6. Enter the Payment terms. (Typically, this is about the period allowed to pay the amount due, e.g 50% in advance.)
7.7. Enter the Delivery Lead Time in Days. (The time from the receipt of a customer order to delivery of the product/service.)
7.8. Attach a file document (if any) to help the seller better understand about the product/service you are to offer.
7.9. Click on the Submit button to successfully update the details entered to let the seller view your quote details.
8. The Quick Quote Status column will help you know the position of the requirement, whether it is completed, canceled, or live.
Note: You (buyer) can quote price only for the QQ that is in live.
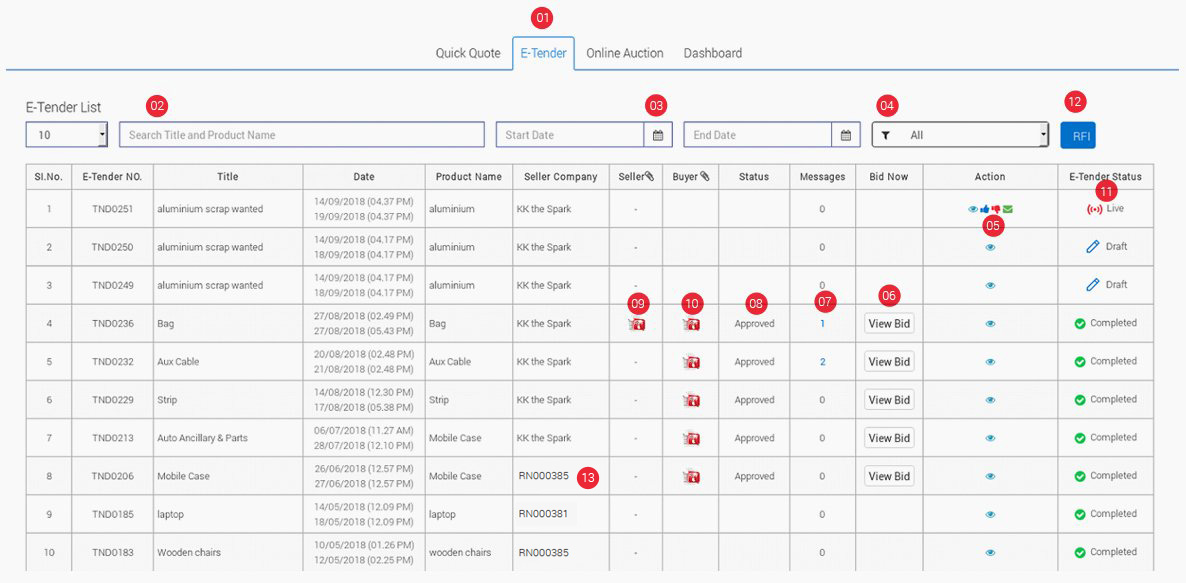
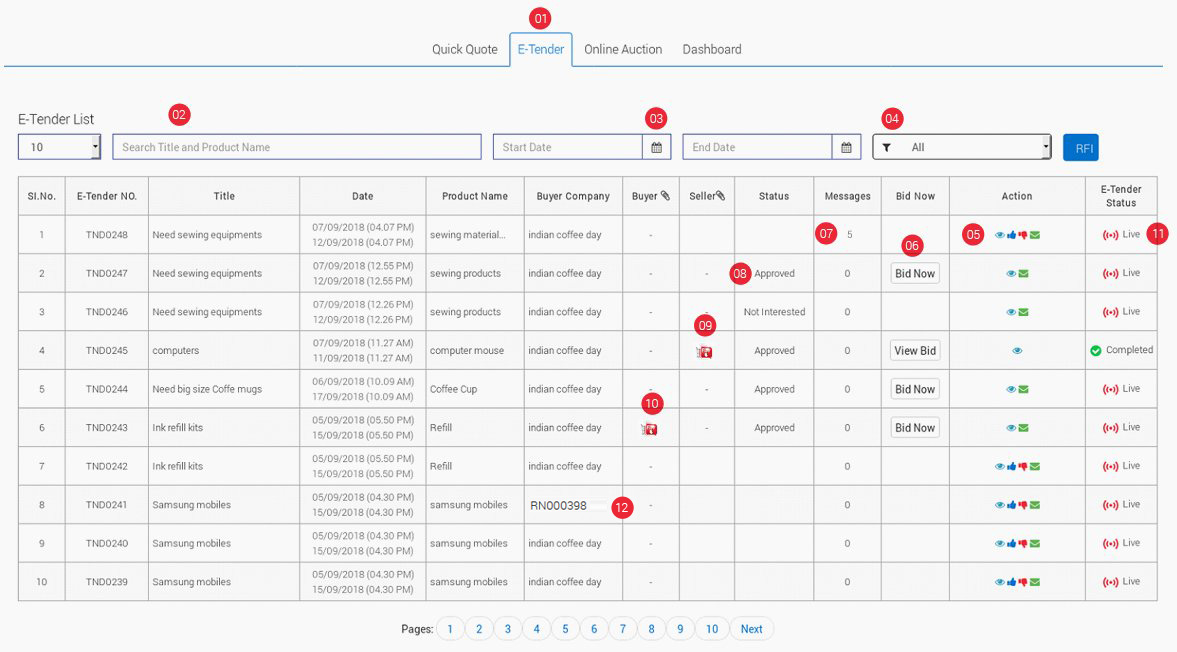
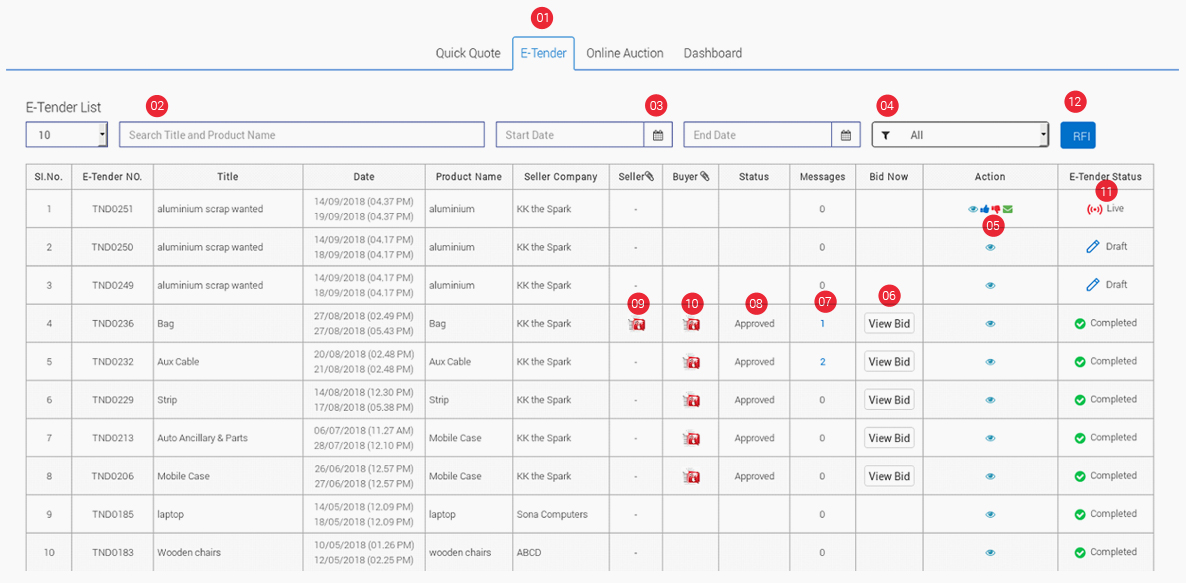
1. The E-Tender list page helps you to view the entire listing posted by the sellers.
2. Click on the search box and enter a title or product name to filter your search product wise.
3. If you want to view the listings date wise, then click on the calendar icon and enter the start and end date to view the same.
4. Similarly, the filter box helps you to view the E-Tender that is in live, completed, and the canceled ones as well.
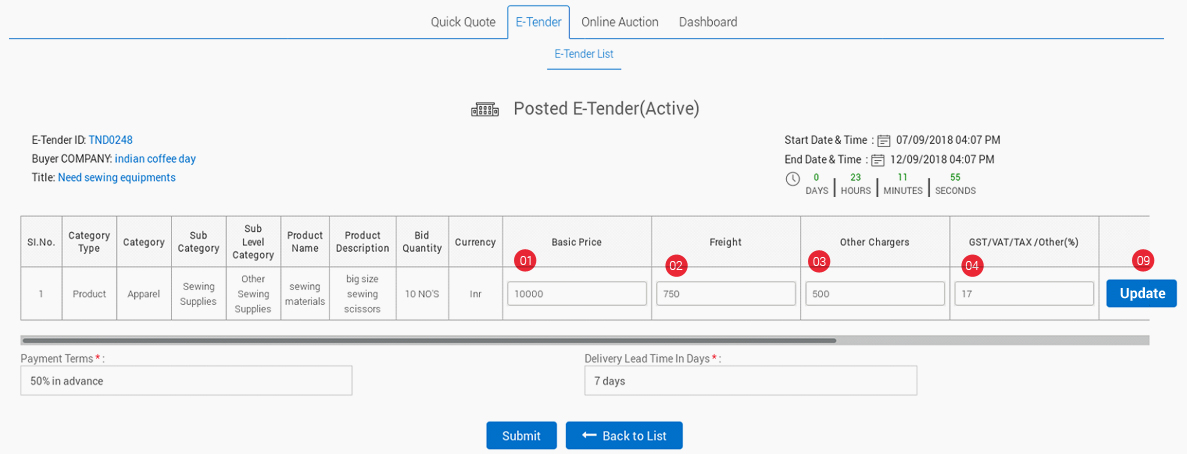
5. Action: *Click on the view icon to have a look at the details posted by the seller.
*A click on the post query icon will open a pop-up box that will allow you to message the seller for further clarifications (if any).6. Bid Now: Click on the “BID NOW” button in this column to participate in the E-Tender. A click on the “VIEW BID” button will display the already quoted details of the completed E-Tender.
6.1. Enter the basic price of the product/service. (The initial price of products or services without the additional charges.)
6.2. Enter the Freight charges. (Cost associated with the delivery of goods.)
6.3. Enter the other charges if any. (Service charge)
6.4. Enter the GST/VAT/TAX amount for the product or service.
6.5. Click on the Update button in the Action column to update your details successfully.
6.6. Enter the Payment terms. (Typically, this is about the period allowed to a buyer to pay the amount due, e.g 50% in advance.)
6.7. Enter the Delivery Lead Time in Days. (The time from the receipt of a customer order to delivery of the product/service.)
6.8. Click on the Submit button to successfully update the details entered and let the seller view your quote details.
7. Messages: This will display the number of messages received and by clicking on the number you will be able to view the message and start a conversation with the seller.
8. Status: This column will display if the buyer has approved your interest or not.
9. Seller attachment: The attachments can be viewed here.
10. In order to facilitate the flow of information, bidzpro allows you to add multiple attachments, this in turn helps you to scale up your efficiency by leaving more time to perform other essential business tasks.
11. E-Tender Status: This will display the status of your E-Tender, whether it is in live, completed, or canceled.
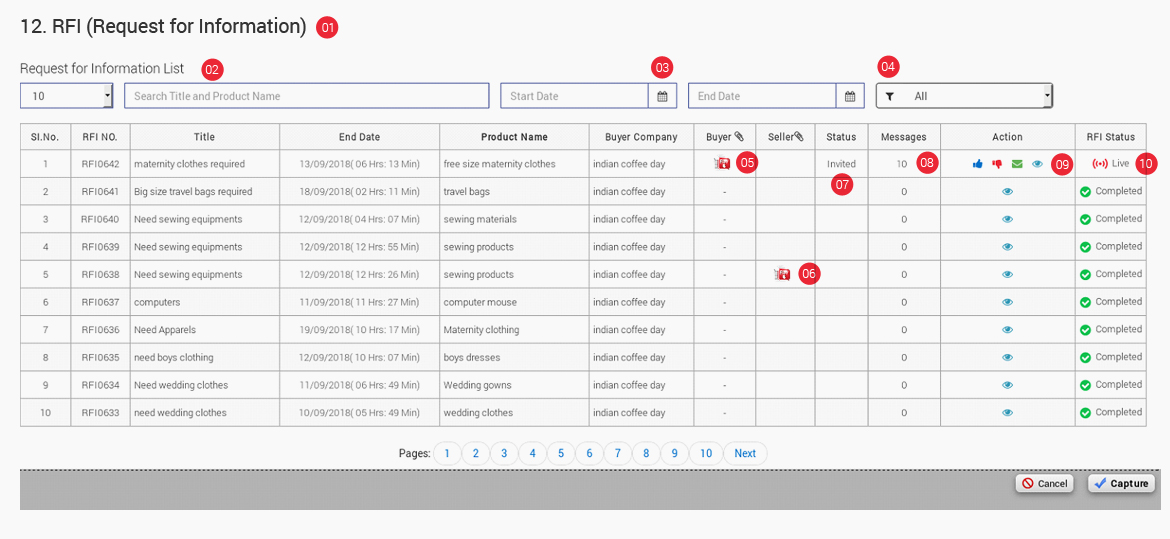
12. RFI (Request for Information)
1. The RFI list page helps you to view the entire listing of the requirements posted by the seller.
2. Click on the search box and enter a title or product name to filter your search product wise.
3. If you want to view the listings date wise, then click on the calendar icon and enter the start and end date to view the same.
4. Similarly, the filter box helps you to view the E-Tender that is in live, completed, and the canceled ones as well.
5. In order to facilitate the flow of information, bidzpro allows you to add multiple attachments, this in turn helps you to scale up your efficiency by leaving more time to perform other essential business tasks.
6. View seller attachments.
7. Status: This column will show your status in RFI
8. Message: This will display the number of messages received and by clicking on the number you will be able to view the message and start a conversation with the seller.
9. Action: Click on the view icon to have a look at the details posted by the buyer. A click on the post query icon will open a pop-up box that will allow you to message the seller for further clarifications (if any). If you are disinterested in the requirement, you can click the thumbs down icon. On the other hand, if you are interested, a click on the thumbs up icon will open a pop-up box which will allow you to add an attachment (if any). This will help the seller better understand the about the product/service you are to offer.
10. E-Tender status: The status of your E-Tender will be displayed here, whether it is completed, canceled, or in live.
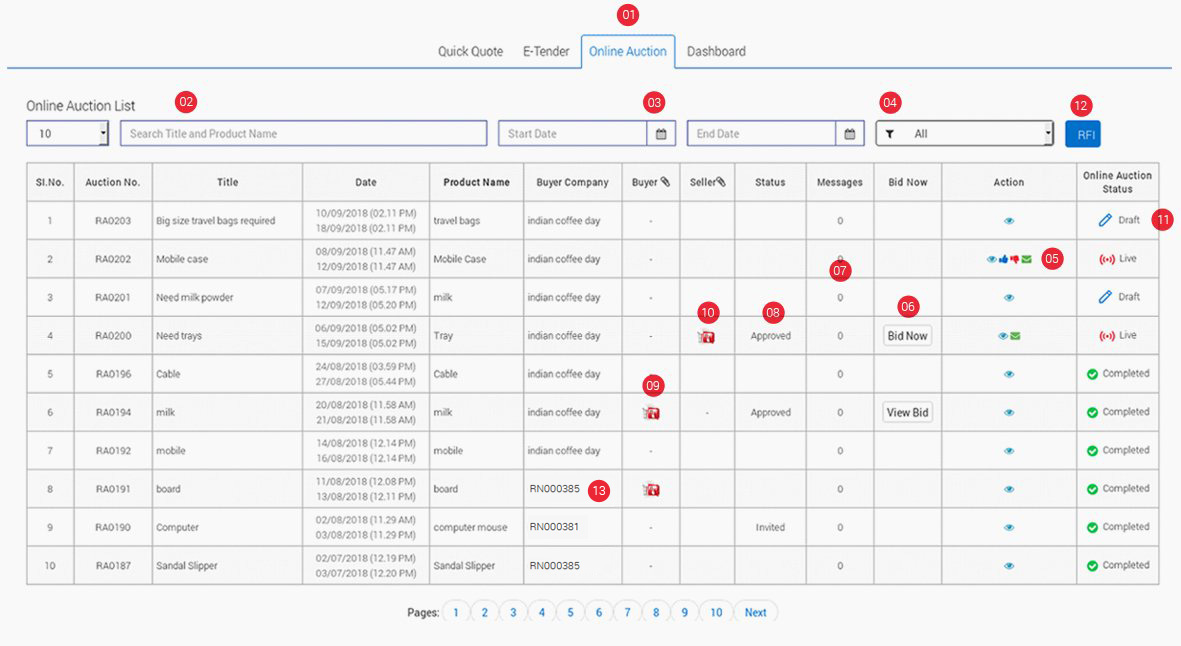
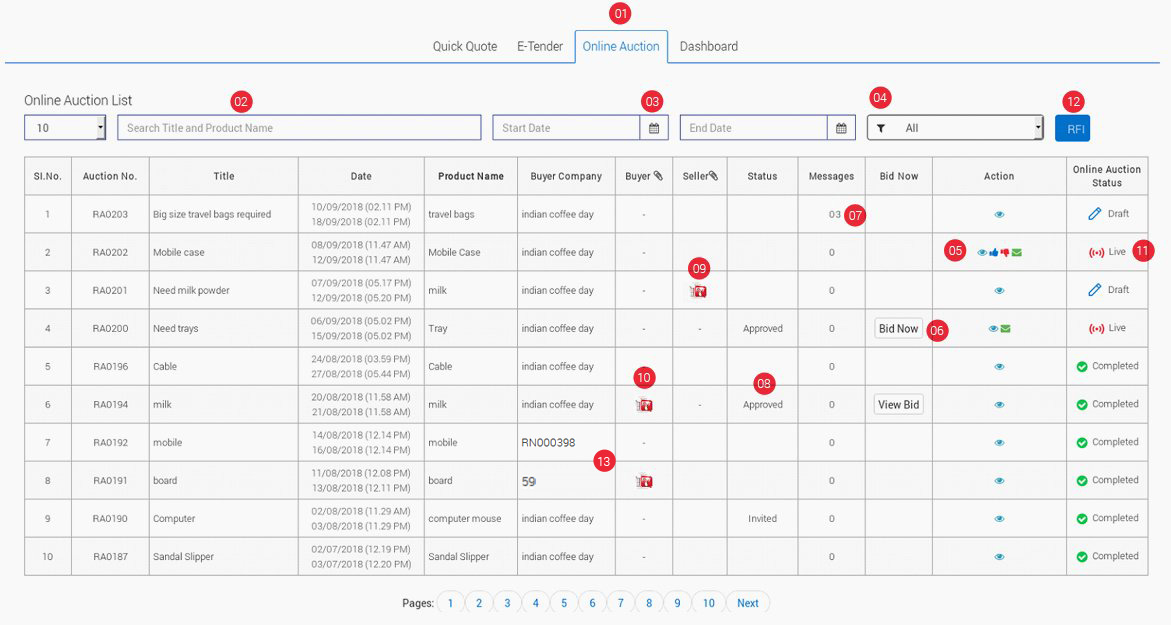
1. The Online Auction list helps you to view the entire listing posted by the seller.
2. Click on the search box and enter a title or product name to filter your search product wise.
3. If you want to view the listings date wise, then click on the calendar icon and enter the start and end date to view the same.
4. Filter your search by selecting an option from the drop-down to view the Online Auction that is in live, completed, upcoming, and the canceled ones as well.
5. Action: *Click on the view icon to have a look at the details posted by the seller.
*A click on the post query icon will open a pop-up box that will allow you to message the seller for further clarifications (if any).
*If you are disinterested in the requirement, you can click the thumbs down icon.
*If you are interested and would like to participate in the bidding, a click on the thumbs up icon will open a pop-up box which will allow you to add an attachment (if any). Then the seller receive response from you, based on the response the seller will decide whether to approve you to bid or not. If the seller approves, then the status column will appear as “Approved”. Then “BID NOW” button will be enabled at the time of the E-Tender is live. The “BID NOW” button will not be enabled if the seller has not approved you, even though the E-Tender is in live.
*If the seller selects “approve automatically” option at the time of posting the E-Tender, then the buyer status column will appear as “Approved” status if the buyer has shown interest by clicking the thumbs up icon. “BID NOW” will be enabled at the time of E-Tender Live.
Note: It is imperative to click on the thumbs up icon if you wanted to bid.
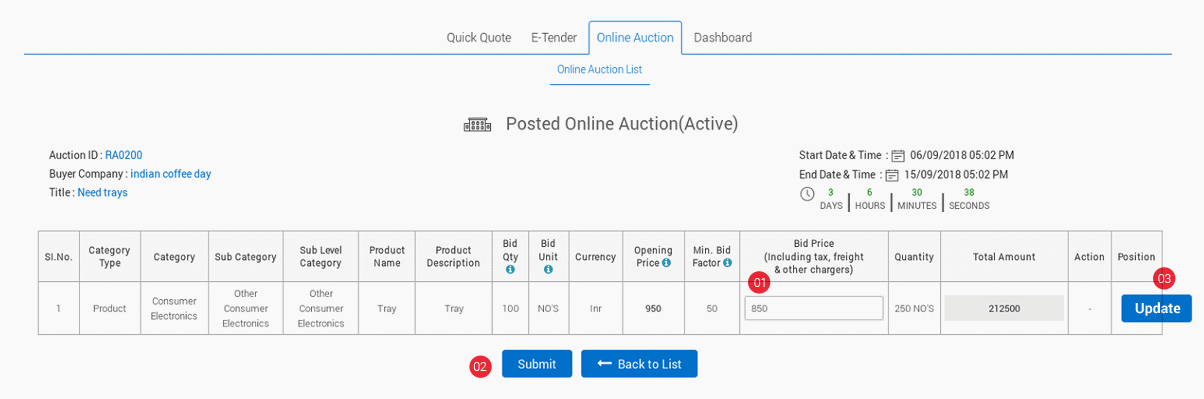
6. Bid Now: Click on the “BID NOW” button in this column to participate in the Online Auction. A click on the “VIEW BID” button will display the already quoted details of the completed Online Auction.
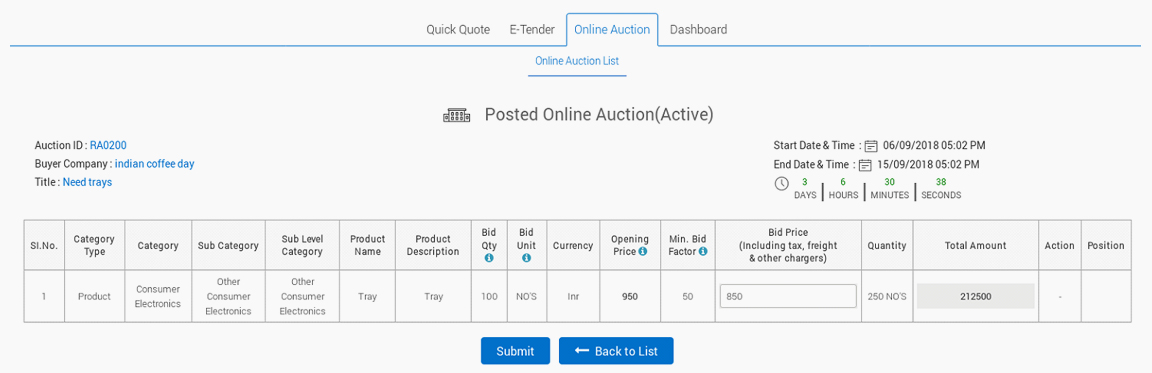
6.1. Enter the bid price including tax, freight and other charges here.
6.2. Click on the update button in the Action column to update the entered details successfully.
6.3. Click on the Submit button to successfully update the details entered and let the seller view your quote details.
7. This will display the number of messages received and by clicking on the number you will be able to view the message and start a conversation with the seller.
8. Status: This column will display if the seller has approved your interest or not.
9. In order to facilitate the flow of information, bidzpro allows you to add multiple attachments, this in turn helps you to scale up your efficiency by leaving more time to perform other essential business tasks.
10. Seller attachment: This column will display the attachments added by the seller at the time of posting the requirement.
11. Online Auction Status: This will display the status of your Online Auction, whether it is in live, completed, or canceled.
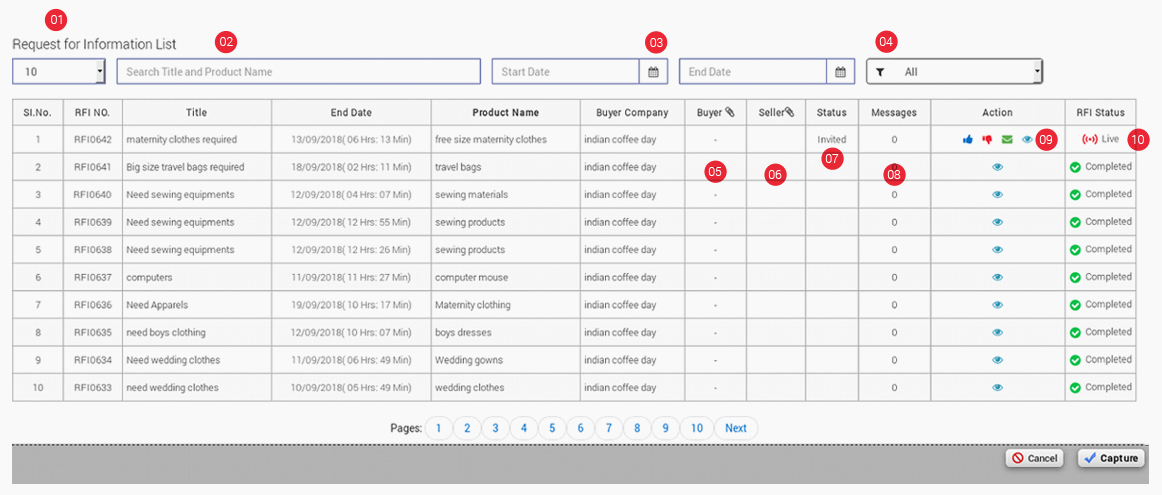
1. Click on the search box and enter a title or product name to filter your search product wise.
2. If you want to view the listings date wise, then click on the calendar icon and enter the start and end date to view the same.
3. The filter box helps you to view the RFI that is in live, completed, and the canceled ones as well.
4. In order to facilitate the flow of information, bidzpro allows you to add multiple attachments, this in turn helps you to scale up your efficiency by leaving more time to perform other essential business tasks.
5. Buyer attachment column will help you to view the attachments added by the buyer.
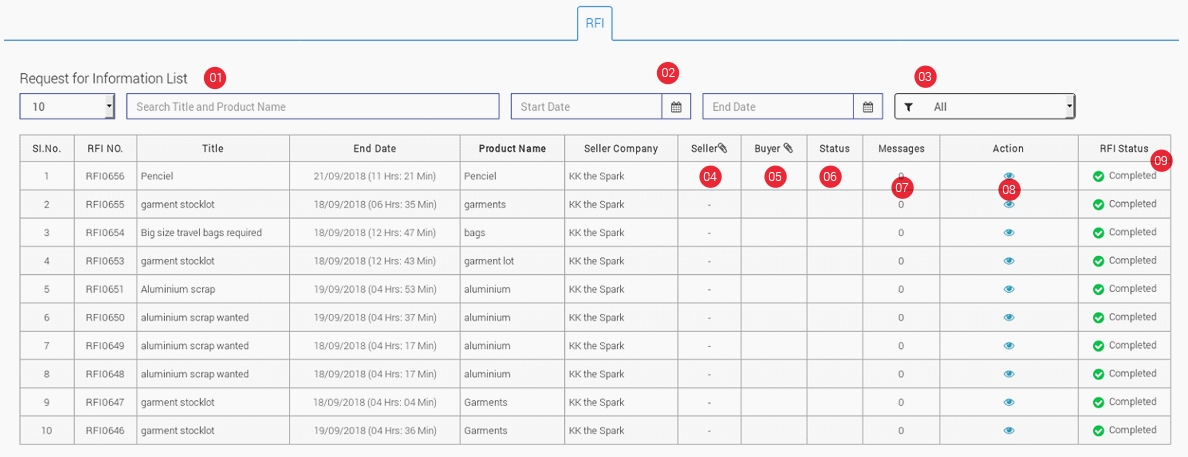
6. Status: This column will display your status of sellers RFI.
7. The messages column will display the number of messages and by clicking on the number you will be able to view the message and start a conversation with the seller.
8. Action: Click on the view icon to have a look at the details posted by the seller. A click on the post query icon will open a pop-up box that will allow you to message the seller for further clarifications (if any). If you are disinterested in the requirement, you can click the thumbs down icon. On the other hand, if you are interested, a click on the thumbs up icon will open a pop-up box which will allow you to add an attachment (if any).
9. RFI Status column will display the status of your Request For Information, whether it is completed, in live, or canceled.
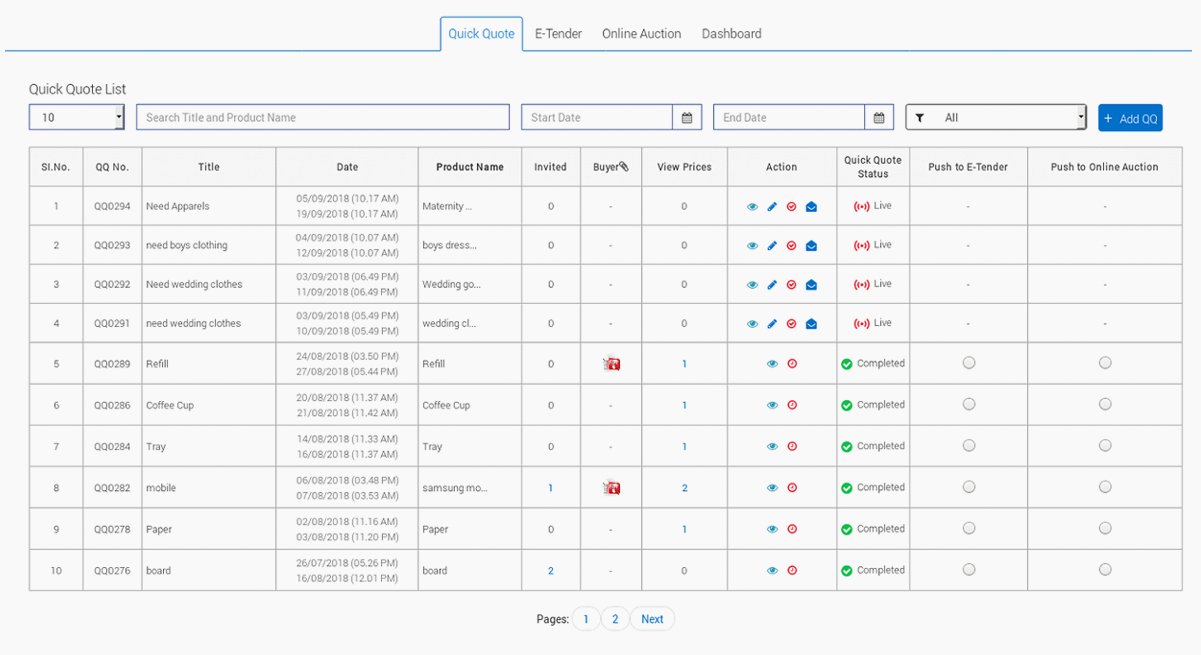
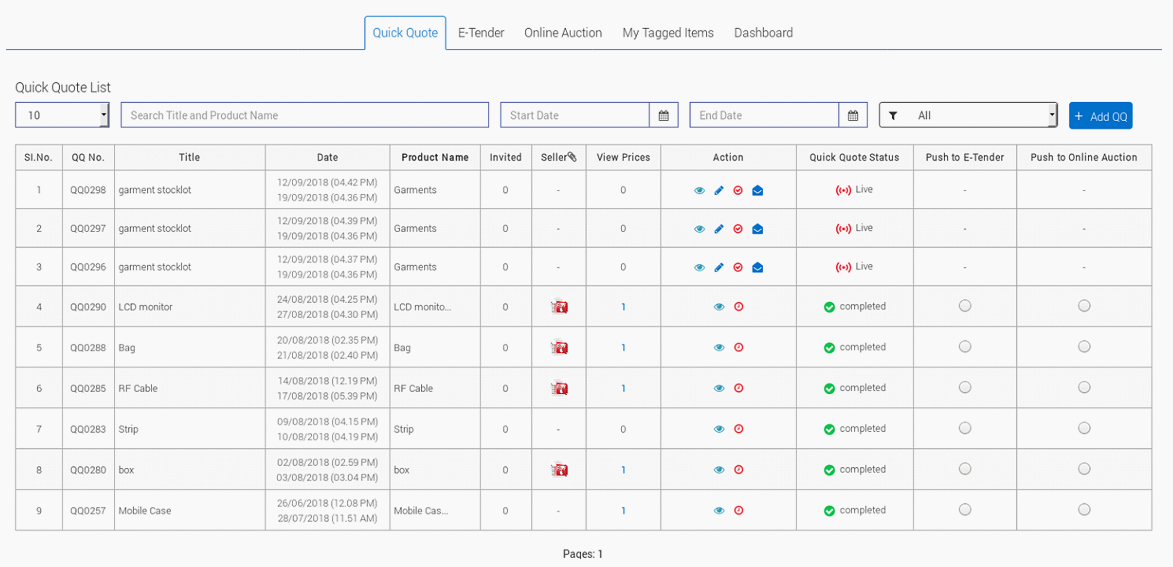
1. Quick Quote list: Manage buy enquiries and keep track of your Quick Quote buy requests here.
2. Click on the search box and enter a title or product name to filter your search product wise.
3. If you wanted to view your buy requirements date wise, then click on the calendar icon and enter the start and end date to view the same.
4. Similarly, the filter box helps you to view the Quick Quote that is in live, completed, and the canceled ones as well.
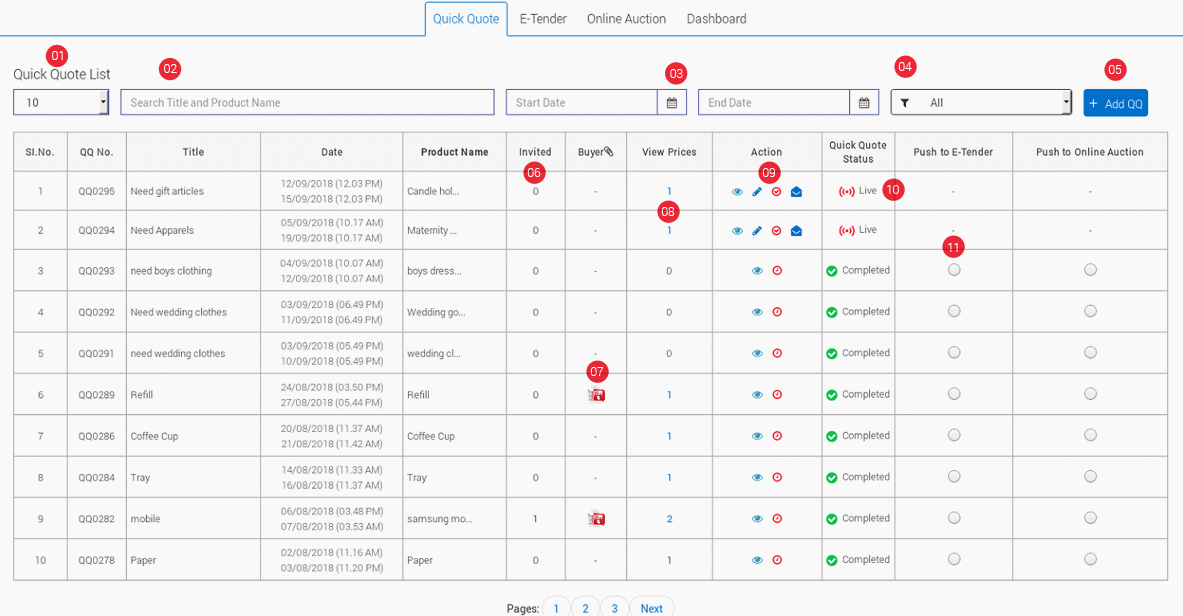
5. At this point of time, if you wanted to add a new buy requirement, then you can click on the “+ Add QQ” and post your requirements if any.
6. The invited column will display the number of sellers you have invited outside Bidzpro. By clicking on the number, you will be able to view the details of the invited seller.
7. In order to facilitate the flow of information, bidzpro allows you to add multiple attachments, this in turn helps you to scale up your efficiency by leaving more time to perform other essential business tasks.
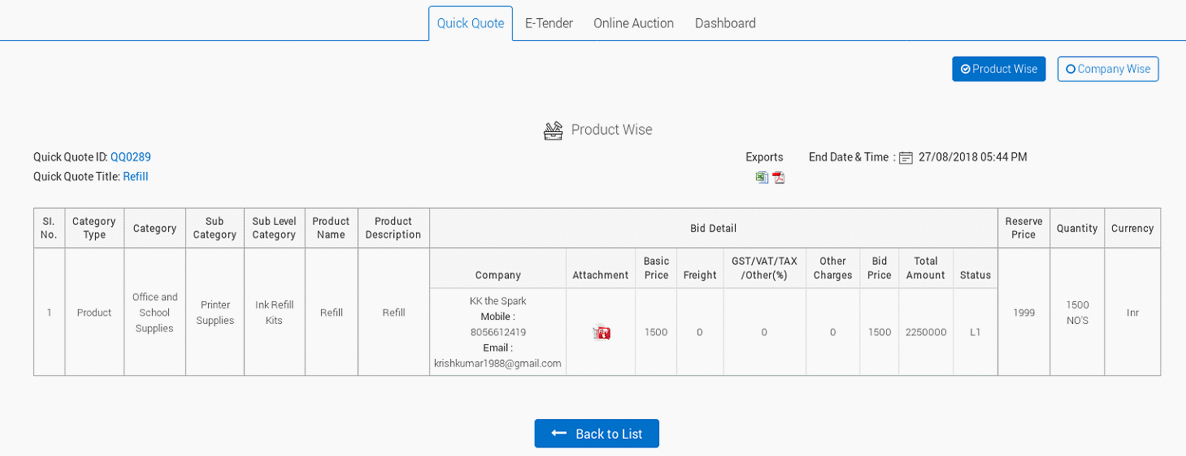
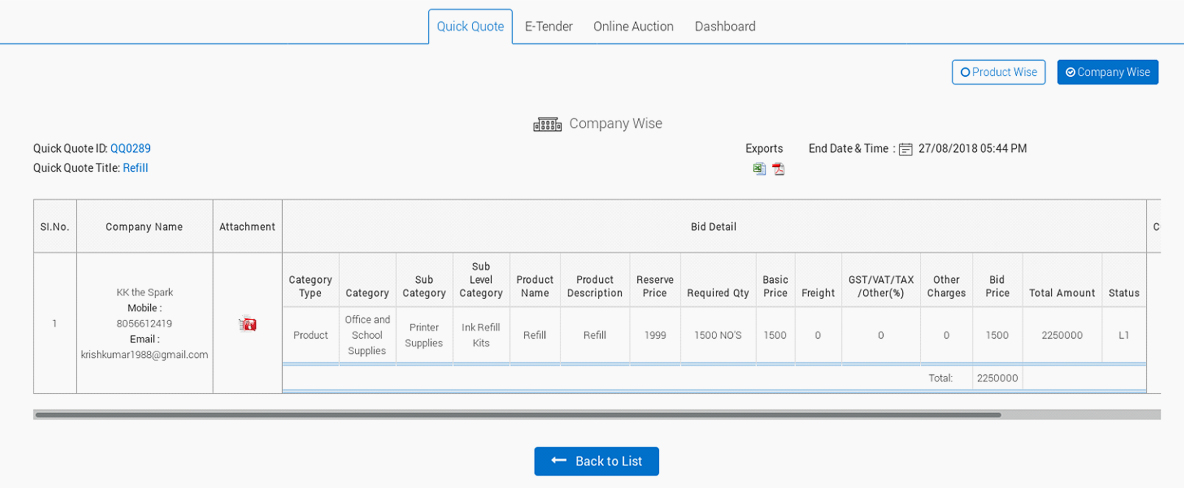
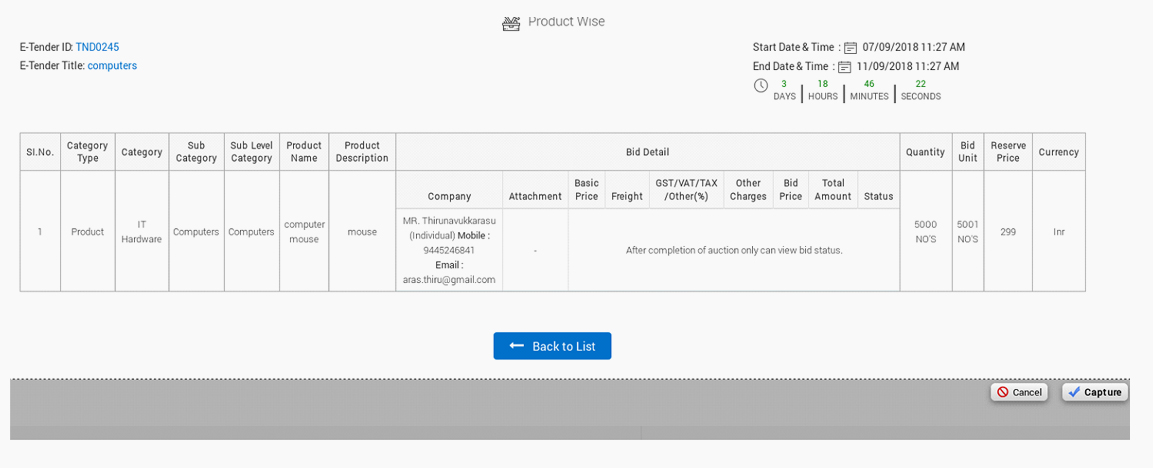
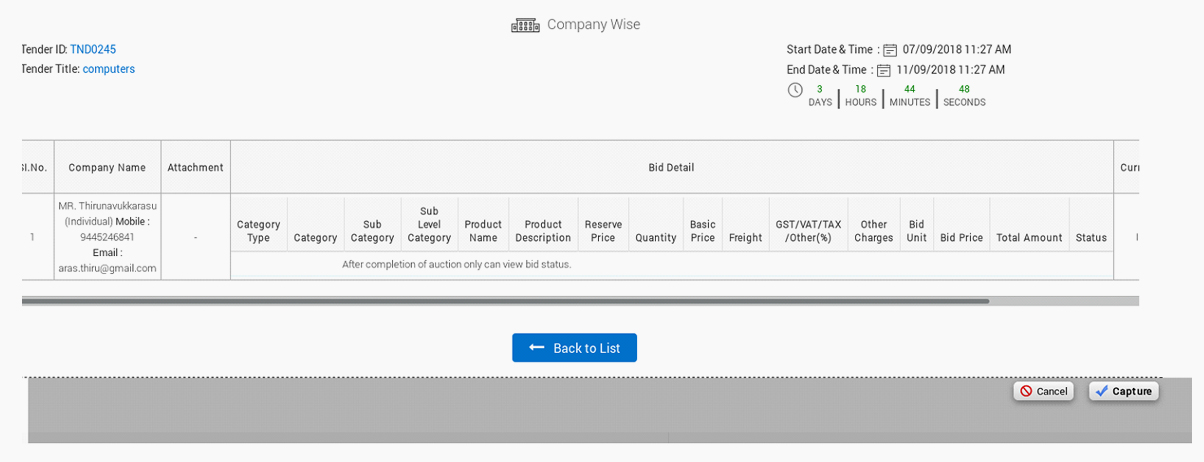
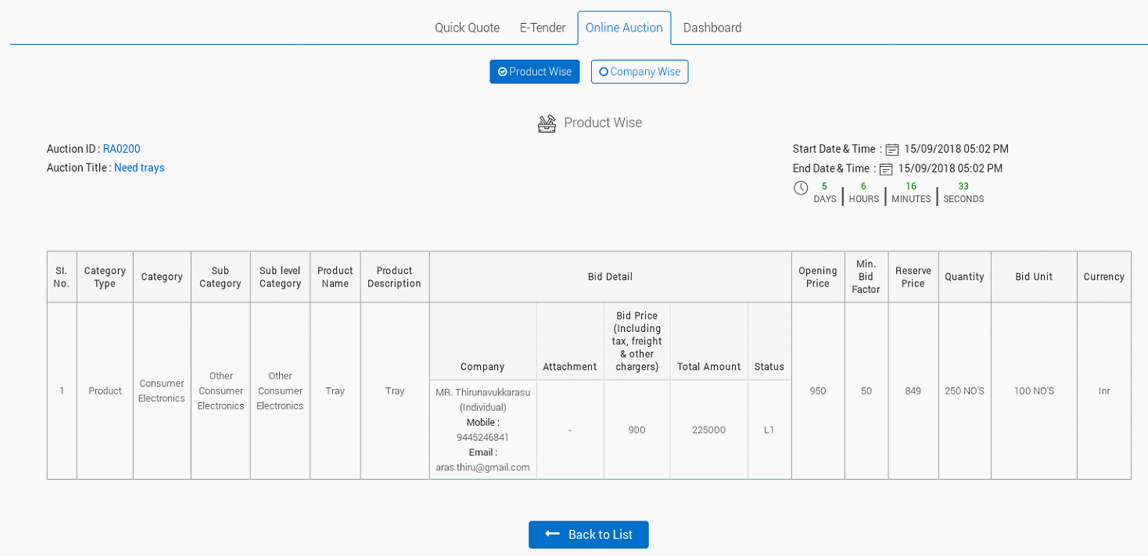
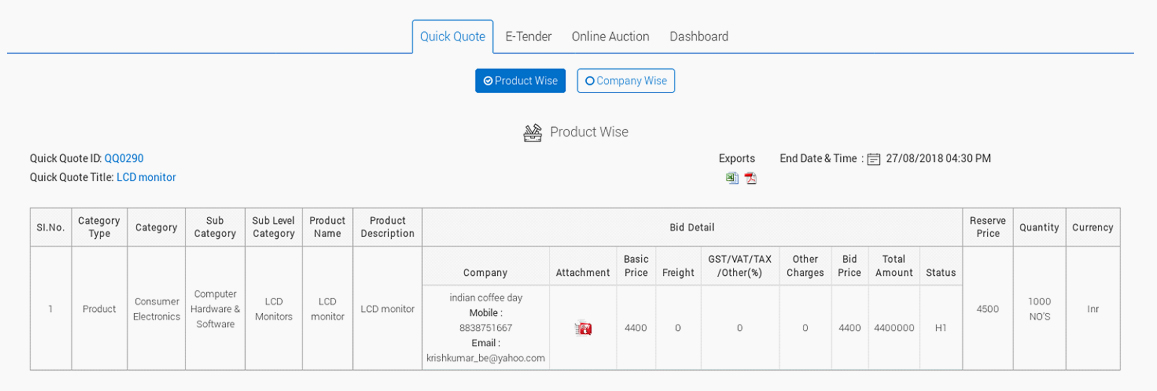
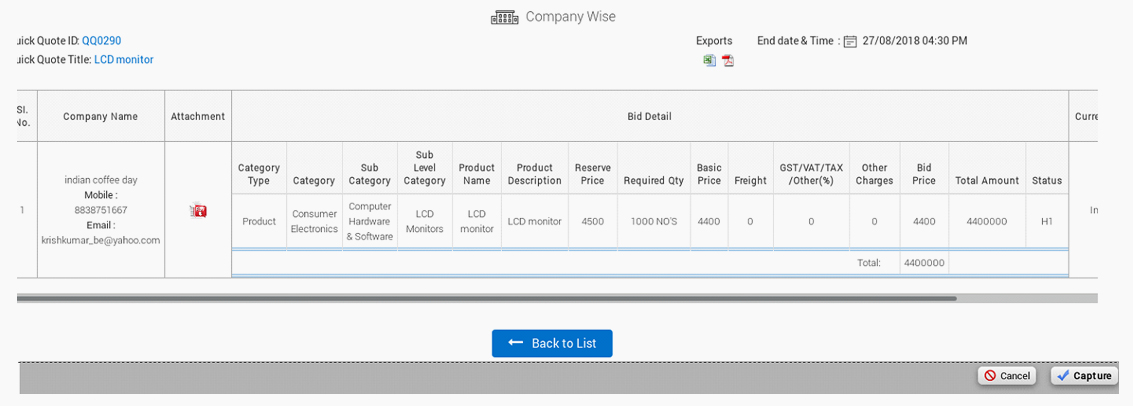
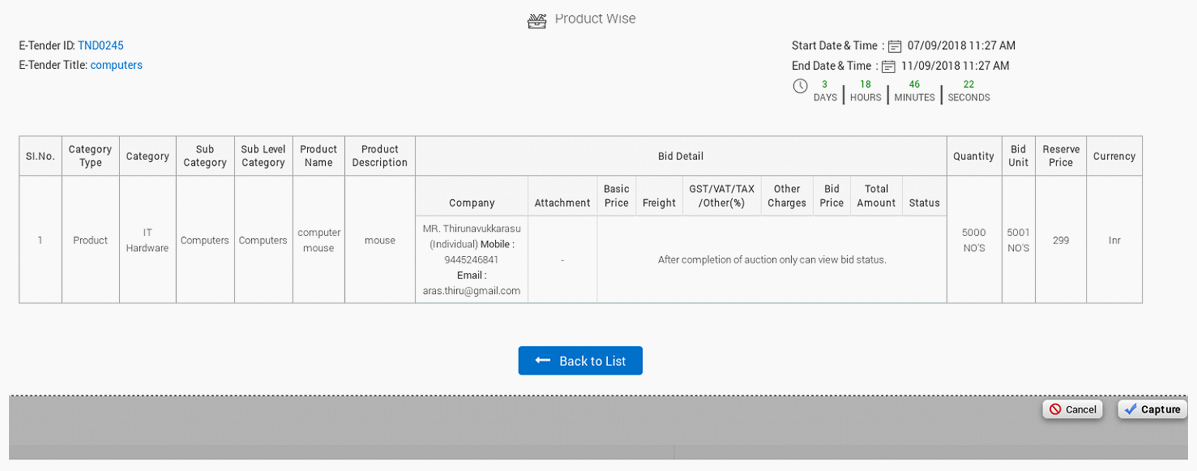
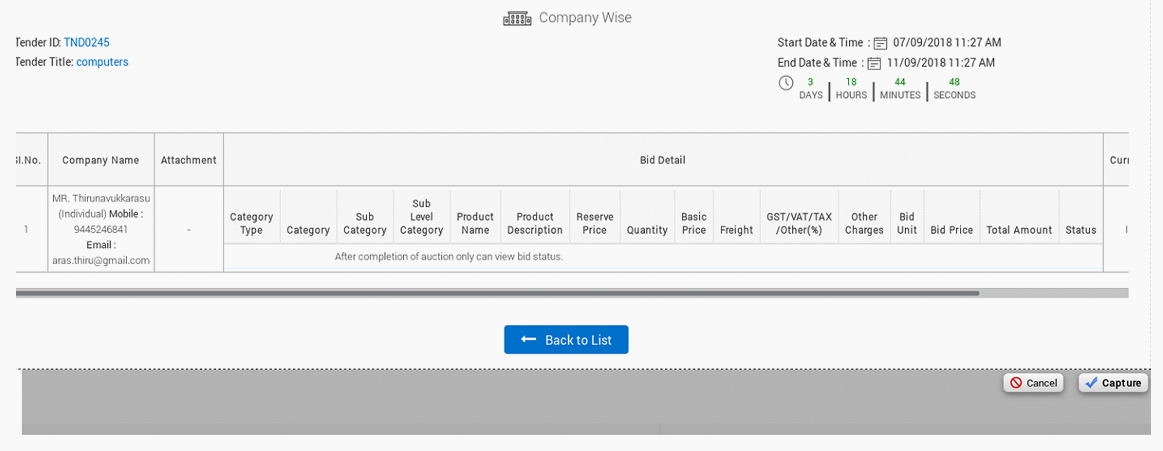
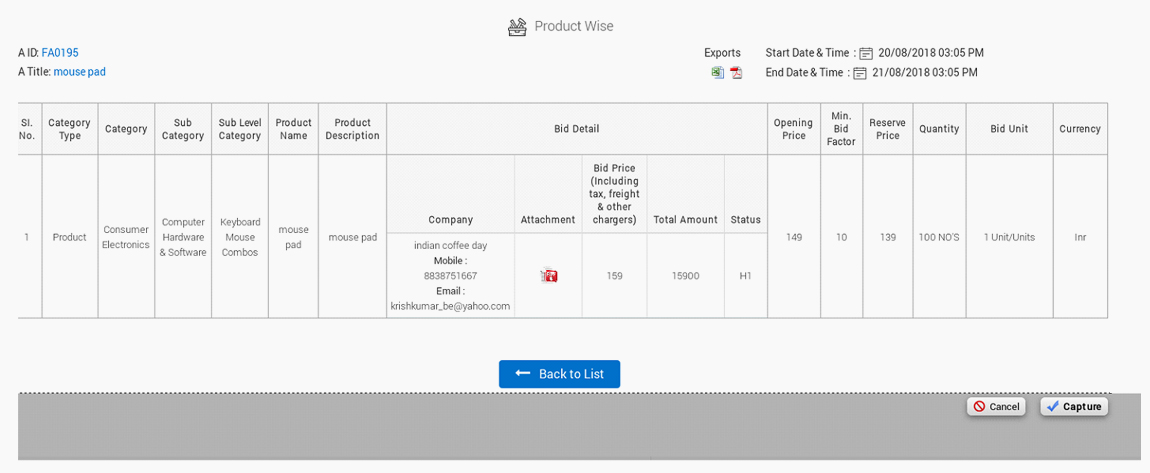
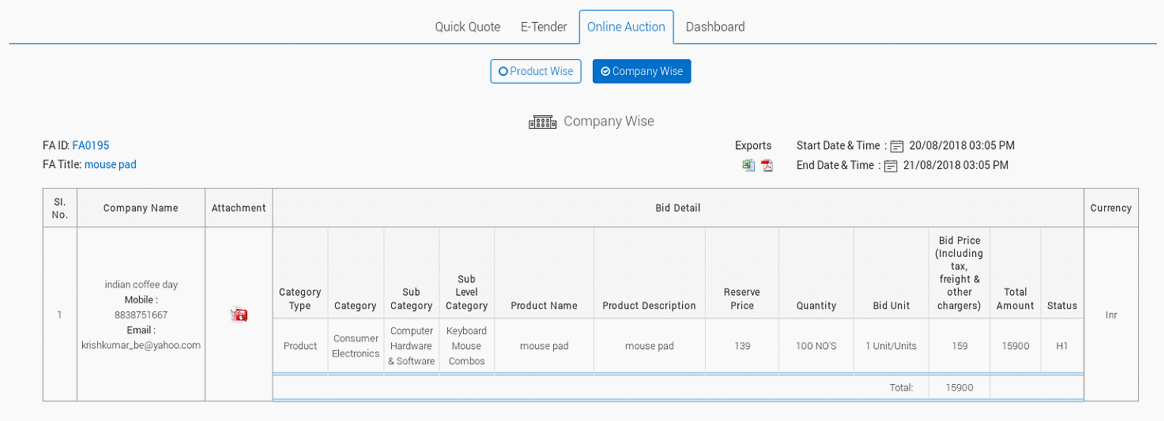
8. View prices: This column will help you view all bids posted by sellers and when you click on the number you will be able to view it in two categories, product and company wise namely. Alongside, you will be able to extract the product wise and company wise report in PDF and Excel form in the respective pages.
a. Product wise:
b. Company wise:
9. Action:
*By clicking on the view icon you can see the already posted Quick Quote, clicking on the editor icon helps you to edit your QQ.
*If you wanted to cancel your QQ, click on the cancel icon, clicking on the invite icon helps you to invite sellers outside Bidzpro.
*The option of extending the date and time of your Quick Quote is also available, however, it is applicable only for the completed QQ bids. As you extend, a notification will be sent to the sellers who have already participated in the deal.
10. The “QQ Status” column will display the status of your Quick Quote whether it is in live, completed, or canceled.
11. Push to E-Tender: If you wanted to move any of your completed Quick Quote to E-Tender, then click on the radio button matching the respective row to do the same.
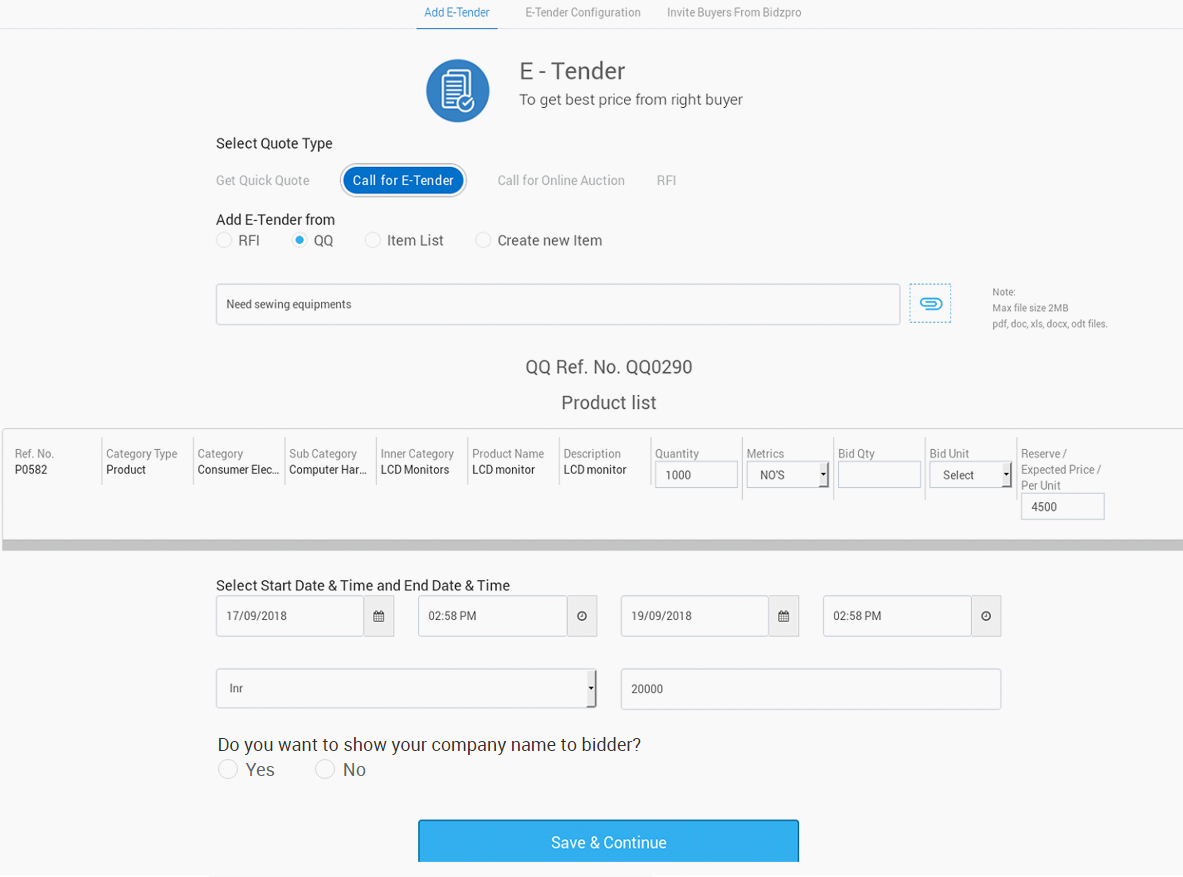
11.1. Call for E-Tender: Fill in the details and click on the “Save and Continue” button to proceed further with moving your completed Quick Quote to E-Tender.
12. Push to Online Auction: If you wanted to move any of your completed Quick Quote to Online auction, then click on the radio button matching the respective row to do the same.
12.1. Fill in the details and click on the “Save and Continue” button to proceed further with moving your completed Quick Quote to Online auction.
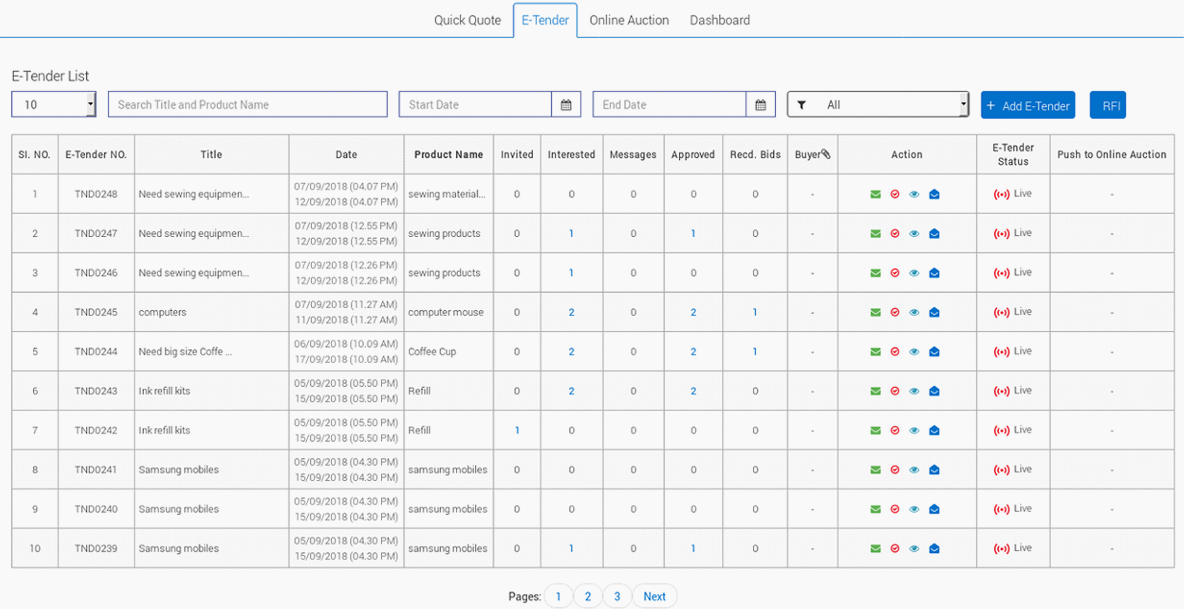
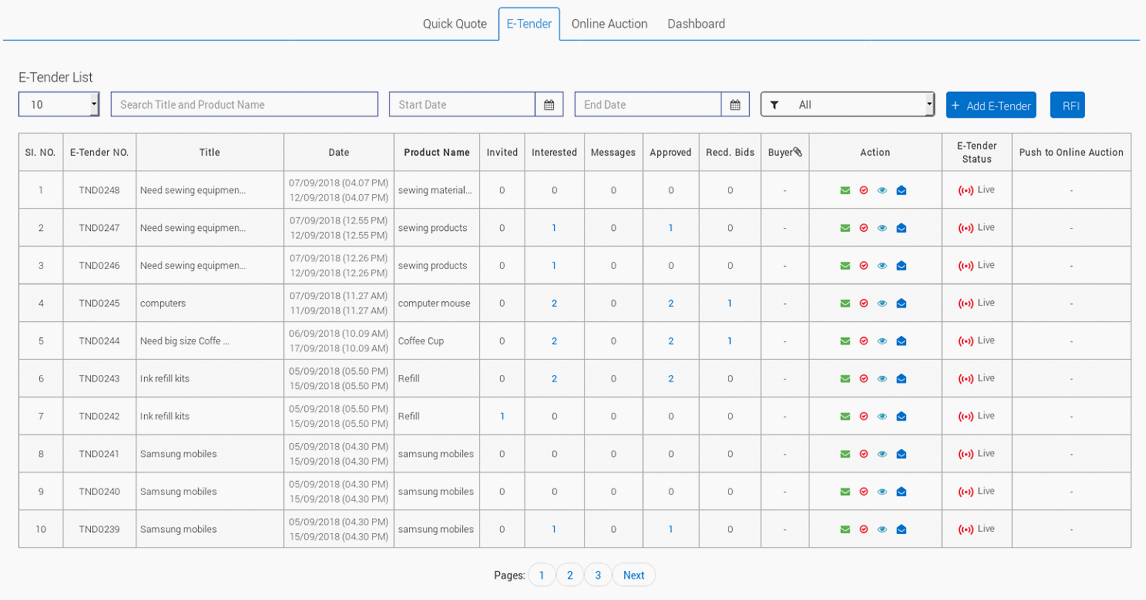
1. E-Tender list: Manage enquiries and keep track of your E-Tender buy requests here. The E-Tender list page helps you to view the entire listing. Click on the search box and enter a title or product name to filter your search product wise.
2. If you want to view the listings date wise, then click on the calendar icon and enter the start and end date to view the same.
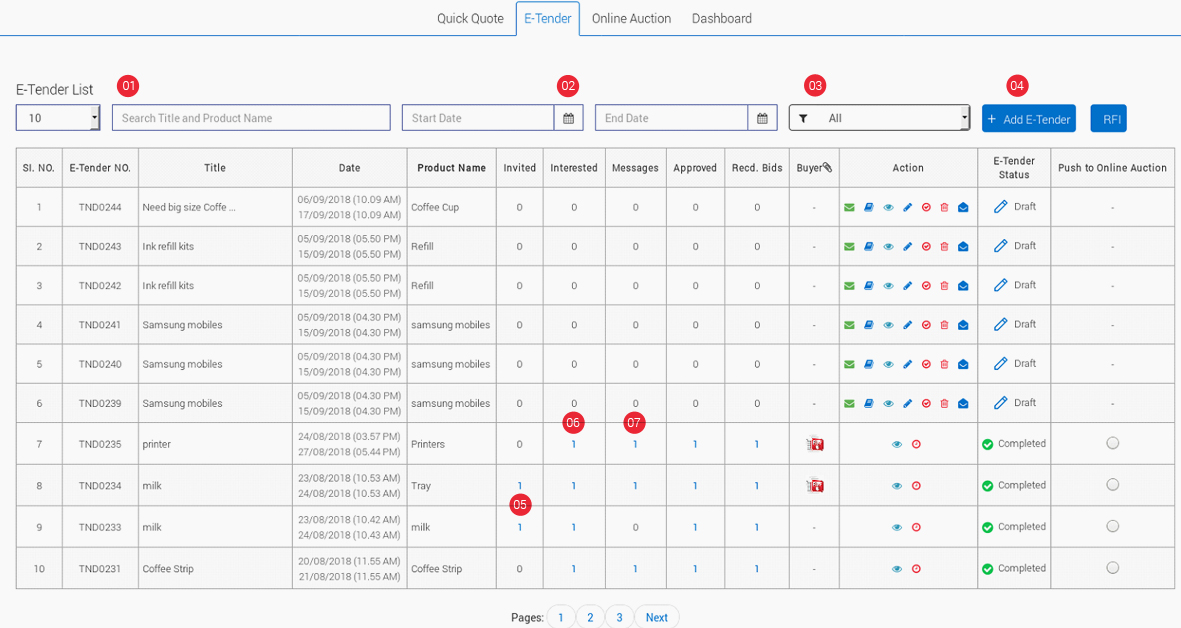
3. Similarly, the filter box helps you to view the E-Tender that is in live, completed, and the canceled ones as well.
4. At this point of time, if you wanted to add a new E-Tender, then you click on the “+ Add E-Tender” and post your requirements if any.
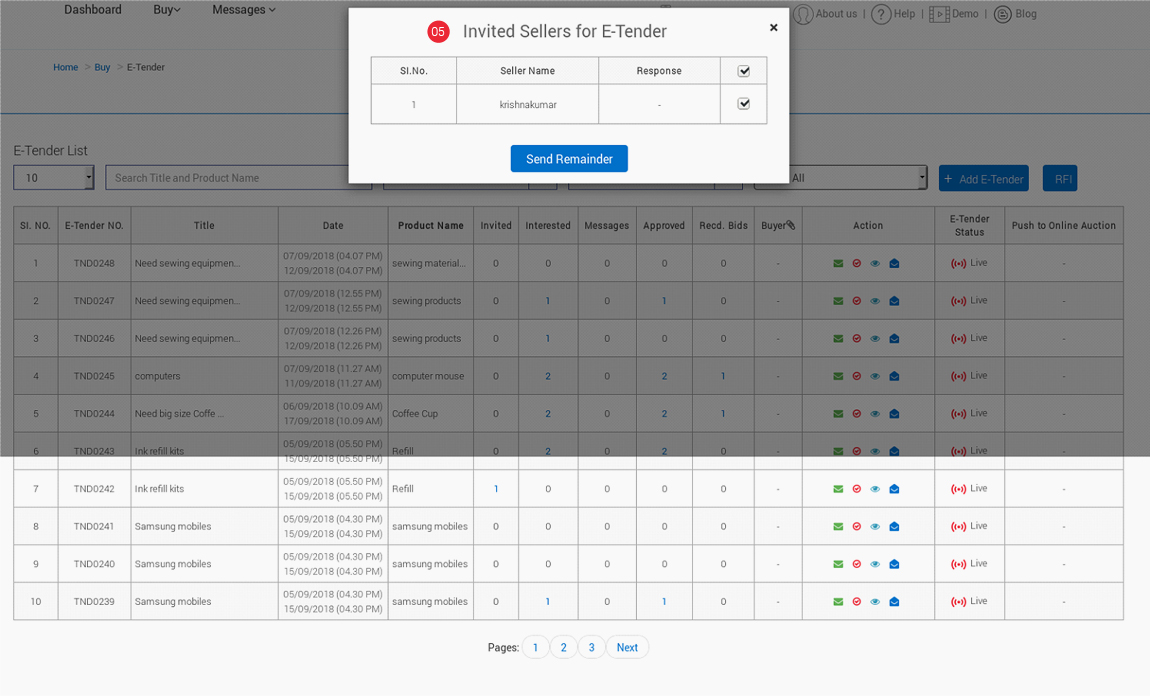
5. The invited column will display the number of invited sellers for E-Tender. By clicking on the number, you will be able to view the details, additionally, you can also send a reminder to the sellers.
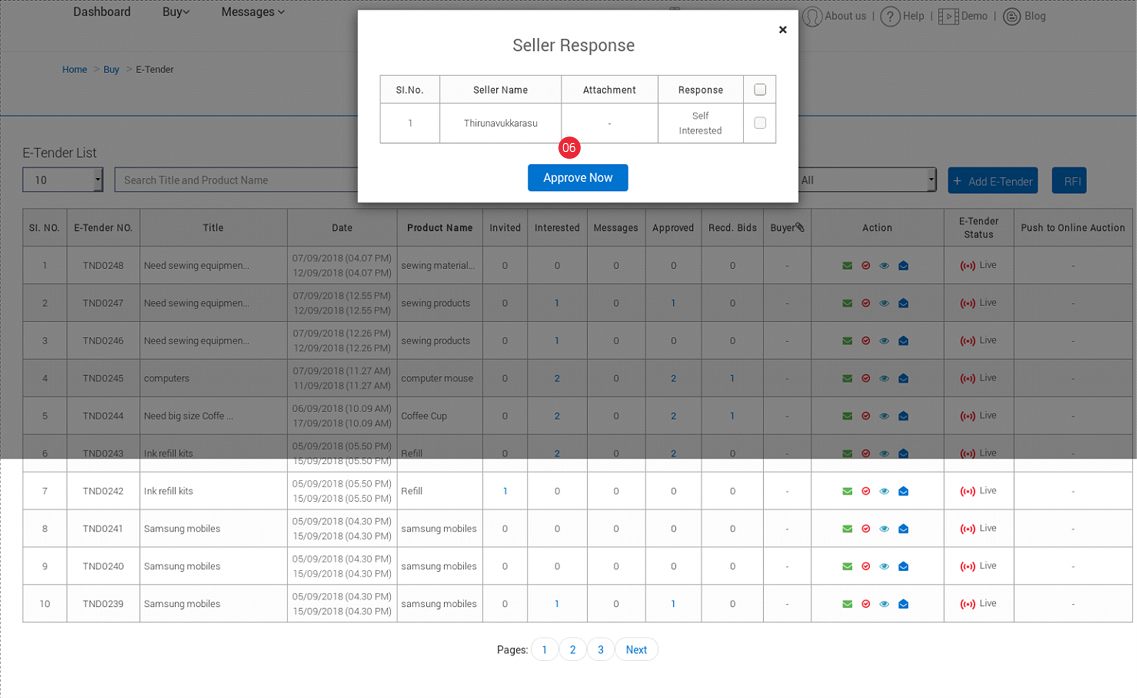
6. interested column will display the number of sellers who have responded to your query. As you click on the number you will be able to view the details and to approve the sellers click on “Approve Now”.
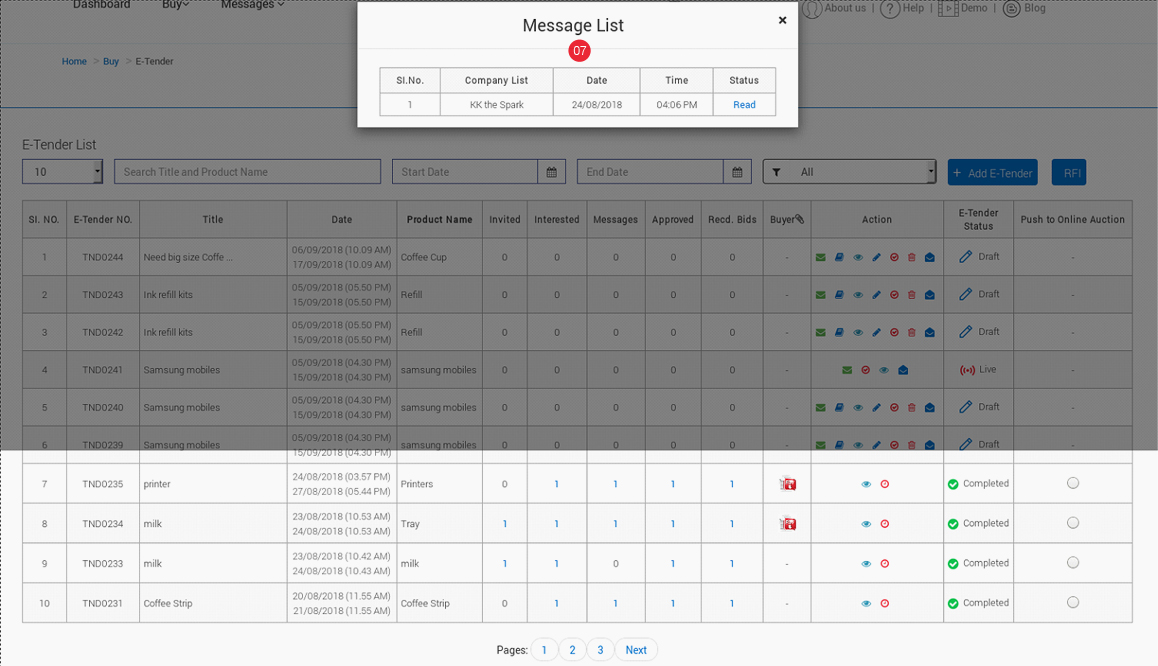
7. The messages column will display the number of messages received and by clicking on the number you will be able to view the message and start a conversation with the seller.
8. The approved column will display the number of interested sellers whom you have approved. By clicking on the number you will be able to view the details of the approved seller.
9. Recd Bids: This column will help you view all bids posted by sellers and when you click on the number you will be able to view it in two categories, product and company wise namely. Alongside, you will be able to extract the product wise and company wise report in PDF and Excel form in the respective pages.
9.1. E-Tender: View all the bids posted by sellers in two categories, product and company wise namely.
a. Product wise
b. Company wise
10. The Buyer column will help you view the attachments you added during the time of posting your E-Tender requirement.
11. Action: *Clicking on the respective icons in this column will help you view the already posted E-Tender, edit, cancel, and delete too.
*Similarly, you can invite sellers inside and outside Bidzpro by clicking on the invite icon.
*A click on the message icon will help you (buyer) to post a query or send messages to invited sellers.
*The option of extending the date and time of your E-Tender is also available, however, it is applicable only for the completed E-Tender. As you extend, a notification will be sent to the sellers who have already participated in the deal.
12. E-Tender Status: The “E-Tender Status” column will display the status of your E-Tender, whether it is in live, completed, or canceled.
13. Push to Online Auction: If you wanted to move any of your completed E-Tender to Online Auction, then click on the radio button matching the respective row to do the same.
13.1. Call for Online Auction
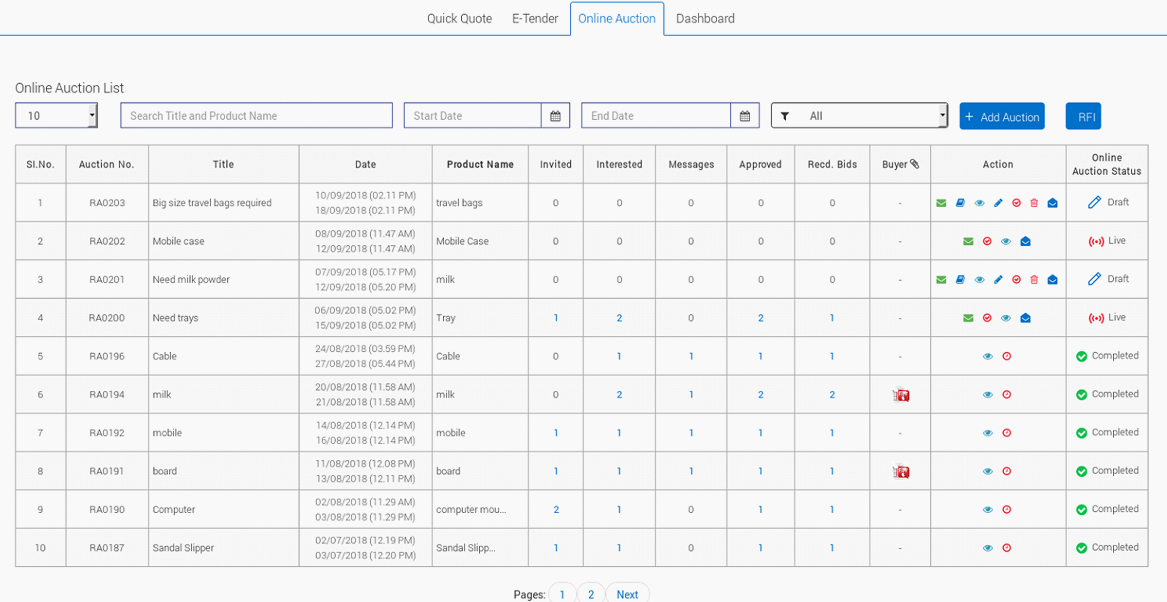
1. The Online Auction list helps you to view the entire listing. In order to complete the process of your Online Auction, you need to click on the publish icon in the “Action” column to make it go live.
2. Click on the search box and enter a title or product name to filter your search product wise.
3. If you want to view the listings date wise, then click on the calendar icon and enter the start and end date to view the same.
4. Filter your search by selecting an option from the drop-down to view the Online Auction that is in live, completed, upcoming, and the canceled ones as well. Similarly, selecting the option draft will help you view the ones that you have not published.
5. At this point of time, if you wanted to add a new Online Auction, then you can click on the “+ Add Auction” button and post your requirements if any.
6. The invited column will display the number of invited sellers for Online Auction. By clicking on the number, you will be able to view the details, additionally, you can also send a reminder to the sellers.
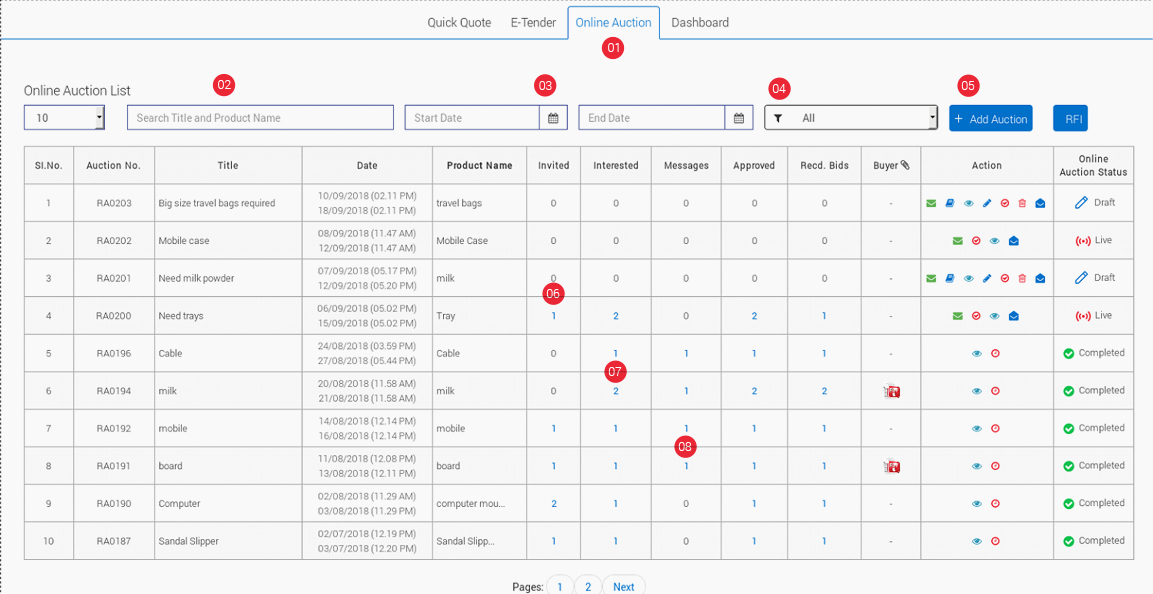
7. The interested column will display the number of sellers who have responded to your query.
8. The messages column will display the number of messages received and by clicking on the number you will be able to view the message and start a conversation with the seller..

9. The approved column will display the number of interested sellers whom you have approved. By clicking on the number you will be able to view the details of the seller whom you have approved.

10. Recd Bids: This column will help you view all bids posted by sellers and when you click on the number you will be able to view it in two categories, product and company wise namely. Alongside, you will be able to extract the product wise and company wise report in PDF and Excel form in the respective pages.
a. Product wise
b. Company wise

9. Action: *By clicking on the view icon you can see the already posted Quick Quote, clicking on the editor icon helps you to edit your QQ.
*If you wanted to cancel your QQ, click on the cancel icon, clicking on the invite icon helps you to invite sellers outside Bidzpro.
*The option of extending the date and time of your Quick Quote is also available, however, it is applicable only for the completed QQ bids. As you extend, a notification will be sent to the sellers who have already participated in the deal.
10. The “QQ Status” column will display the status of your Quick Quote whether it is in live, completed, or canceled.
11. Push to E-Tender: If you wanted to move any of your completed Quick Quote to E-Tender, then click on the radio button matching the respective row to do the same.
11.1. Call for E-Tender: Fill in the details and click on the “Save and Continue” button to proceed further with moving your completed Quick Quote to E-Tender.
12. Push to Online Auction: If you wanted to move any of your completed Quick Quote to Online auction, then click on the radio button matching the respective row to do the same.
12.1. Fill in the details and click on the “Save and Continue” button to proceed further with moving your completed Quick Quote to Online auction.
1. The RFI list page helps you to view the entire listing. Click on the search box and enter a title or product name to filter your search product wise.
2. If you want to view the listings date wise, then click on the calendar icon and enter the start and end date to view the same.
3. Similarly, the filter box helps you to view the RFI that is in live, completed, and the canceled ones as well.
4. At this point of time, if you wanted to add a new RFI, then you click on the “+ Add RFI” and post your requirements if any.
5. The invited column will display the number of invited sellers for RFI. By clicking on the number, you will be able to view the details, additionally, you can also send a reminder message to the sellers.
6. The “Response” column will help you view the details of the sellers who have responded to your buy requirement. A click on the number will display the entire information of the same and if you find them suitable, then you can click on the “Enroll Now” button to have that particular seller enrolled to your list.
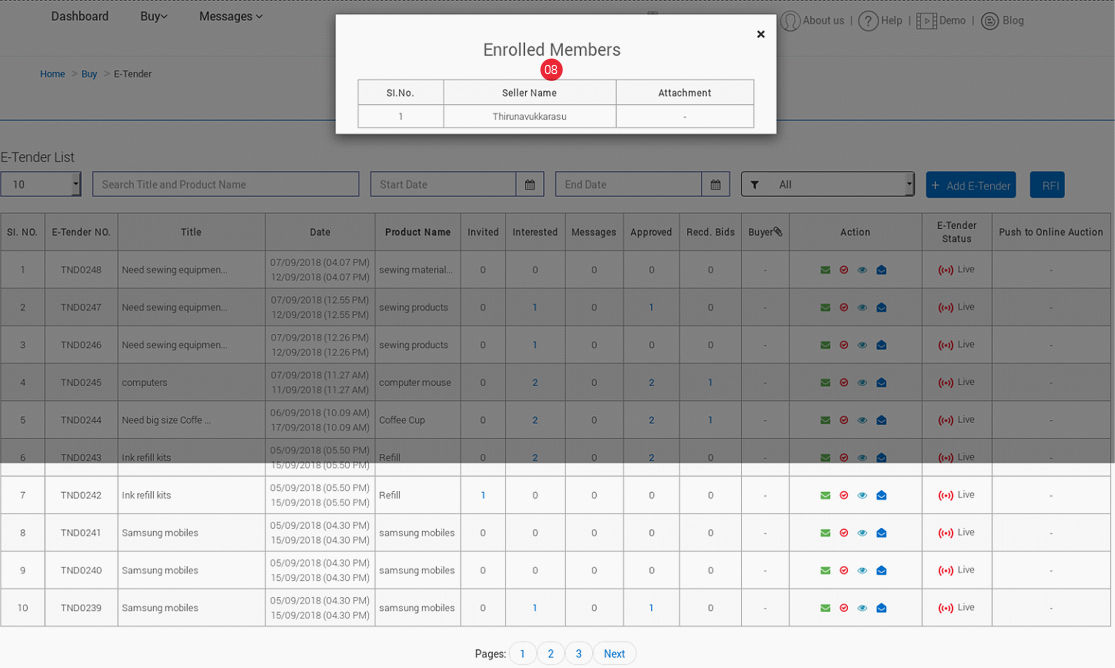
7. The “Enrolled” column will display the details of the sellers whom you have enrolled.
8. The messages column will display the number of messages received and by clicking on the number you will be able to view the message and start a conversation with the seller.
9. In order to facilitate the flow of information, bidzpro allows you to add multiple attachments, this in turn helps you to scale up your efficiency by leaving more time to perform other essential business tasks.
10. The Action column will help you to view, edit, cancel, and delete your RFI.
11. RFI Status column will display the status of your Request For Information.
12. To push your RFI to E-Tender click on the radio button matching the respective row.
13. To push your RFI to Online Auction click on the radio button matching the respective row.
1. The Quick Quote list page is where you (seller) can view the requirements of the buyer and participate in the (buyer) posting.
2. Click on the search box and enter a title or product name to filter the search product wise.
3. If you wanted to view the buy requirements date wise, then click on the calendar icon and enter the start and end date to view the same.
4. Similarly, the filter box helps you to view the Quick Quote that is in live, completed, and the canceled ones as well.
5. In order to facilitate the flow of information, bidzpro allows you to add multiple attachments, this in turn helps you to scale up your efficiency by leaving more time to perform other essential business tasks.
6. Action: Click on the view icon to see the details of buyer requirement in detail. It includes particulars like description, quantity, and units.
7. The “Quote Now” column is where you will be able to quote for a buy requirement and also be able to view the quotes for completed quick quote.
a) Click on the “Quote now” button to Quote your price for a buy requirement which is in live.
b) A click on the “View Quote” button will help you view the details of the completed bid.
7.1. Enter the basic price of the product. (The initial price of products or services without the additional charges.)
7.2. Enter the Freight charges. (Cost associated with the delivery of goods.)
7.3. Enter the other charges if any. (Service charge)
7.4. Enter the GST/VAT/TAX amount for the product or service.
7.5. Click on the Update button in the Action column to update your details successfully.
7.6. Enter the Payment terms. (Typically, this is about the period allowed to a buyer to pay the amount due, e.g 50% in advance.)
7.7. Enter the Delivery Lead Time in Days. (The time from the receipt of a customer order to delivery of the product/service.)
7.8. Attach a file document (if any) to help the buyer better understand about the product/service you are to offer.
7.9. Click on the Submit button to successfully update the details entered and let the buyer view your quote details.
8. The Quick Quote Status column will help you know the position of the requirement, whether it is completed, canceled, or live.
Note: You (seller) can quote price only for the QQ that is in live.
1. The E-Tender list page helps you to view the entire listing posted by the buyer.
2. Click on the search box and enter a title or product name to filter your search product wise.
3. If you want to view the listings date wise, then click on the calendar icon and enter the start and end date to view the same.
4. Similarly, the filter box helps you to view the E-Tender that is in live, completed, and the canceled ones as well.
5. Action: *Click on the view icon to have a look at the details posted by the buyer.
*A click on the post query icon will open a pop-up box that will allow you to message the buyer for further clarifications (if any).
*If you are disinterested in the requirement, you can click the thumbs down icon.
*If you are interested and would like to participate in the bidding, a click on the thumbs up icon will open a pop-up box which will allow you to add an attachment (if any). Then the buyer receive response from you, based on the response he/she will decide whether to approve you to bid or not. If the buyer approves, then the status column will appear as “Approved” and then “BID NOW” button will be enabled at the time of the E-Tender is live. The “BID NOW” button will not be enabled if the buyer has not approved you, even though the E-Tender is in live.
*If the buyer selects “approve automatically” option at the time of posting the E- Tender, then the seller status column will appear as “Approved” status if the seller has shown interest by clicking the thumbs up icon. “BID NOW” will be enabled at the time of E-Tender Live.
Note: It is imperative to click on the thumbs up icon if you wanted to bid.
6. Bid Now: Click on the “BID NOW” button in this column to participate in the E-Tender. A click on the “VIEW BID” button will display the already quoted details of the completed E-Tender.
6.1. Enter the basic price of the product/service. (The initial price of products or services without the additional charges.)
6.2. Enter the Freight charges. (Cost associated with the delivery of goods.)
6.3. Enter the other charges if any. (Service charge)
6.4. Enter the GST/VAT/TAX amount for the product or service.
6.5. Click on the Update button in the Action column to update your details successfully.
6.6 Enter the Payment terms. (Typically, this is about the period allowed to a buyer to pay the amount due, e.g 50% in advance.)
6.7. Enter the Delivery Lead Time in Days. (The time from the receipt of a customer order to delivery of the product/service.)
6.8. Click on the Submit button to successfully update the details entered and let the buyer view your quote details.
7. Messages: This will display the number of messages received and by clicking on the number you will be able to view the message and start a conversation with the buyer.
8. Status: This column will display if the buyer has approved your interest or not.
9. Seller attachment: In order to facilitate the flow of information, bidzpro allows you to add multiple attachments, this in turn helps you to scale up your efficiency by leaving more time to perform other essential business tasks.
10. Buyer attachment: This column will display the attachments added by the buyer at the time of posting the requirement.
11. E-Tender Status: This will display the status of your E-Tender, whether it is in live, completed, or canceled.
12. RFI (Request for Information)
1. The Online Auction list helps you to view the entire listing posted by the buyer.
2. Click on the search box and enter a title or product name to filter your search product wise.
3. If you want to view the listings date wise, then click on the calendar icon and enter the start and end date to view the same.
4. Filter your search by selecting an option from the drop-down to view the Online Auction that is in live, completed, upcoming, and the canceled ones as well.
5. Action: *Click on the view icon to have a look at the details posted by the buyer.
*A click on the post query icon will open a pop-up box that will allow you to message the buyer for further clarifications (if any).
*If you are disinterested in the requirement, you can click the thumbs down icon.
*If you are interested and would like to participate in the bidding, a click on the thumbs up icon will open a pop-up box which will allow you to add an attachment (if any). Then the buyer receive response from you, based on the response the buyer will decide whether to approve you to bid or not. If the buyer approves, then the status column will appear as “Approved”. Then “BID NOW” button will be enabled at the time of the E-Tender is live. The “BID NOW” button will not be enabled if the buyer has not approved you, even though the E-Tender is in live.
*If the buyer selects “approve automatically” option at the time of posting the E-Tender, then the seller status column will appear as “Approved” status if the seller has shown interest by clicking the thumbs up icon. “BID NOW” will be enabled at the time of E-Tender Live.
Note: It is imperative to click on the thumbs up icon if you wanted to bid.
6. Bid Now: Click on the “BID NOW” button in this column to participate in the Online Auction. A click on the “VIEW BID” button will display the already quoted details of the completed Online Auction.
6.1. Enter the bid price including tax, freight and other charges here.
6.2. Click on the update button in the Action column to update the entered details successfully.
6.3. Click on the Submit button to successfully update the details entered and let the buyer view your quote details.
7. This will display the number of messages received and by clicking on the number you will be able to view the message and start a conversation with the buyer.
8. Status: This column will display if the buyer has approved your interest or not.
9. In order to facilitate the flow of information, bidzpro allows you to add multiple attachments, this in turn helps you to scale up your efficiency by leaving more time to perform other essential business tasks.
10 Buyer attachment: This column will display the attachments added by the buyer at the time of posting the requirement.
11. Online Auction Status: This will display the status of your Online Auction, whether it is in live, completed, or canceled.
12. RFI (Request for Information): The RFI list page helps you to view the entire listing of the requirements posted by the buyer.
1. Get Quick Quote: Enter your requirement in one line to help us choose the right buyer.
2. Attach a file document (if any) to help the buyers better understand your requirement.
3. In order to facilitate the flow of information, bidzpro allows you to add multiple attachements, this in turn helps you to scale up your efficiency by leaving more time to perform other essential business tasks.
4. Enter the keywords of products/services you are dealing with.
5. Select the category from the drop down menu where your requirement will best fit in.
6. Enter the specifics of your requirement. In case if there is any technical specification for your requirement, then you can specify here.
7. Enter the required quantity.
8. Select the metrics.
9. Enter your Reserve /Expected Price per unit. (Reserve price is the price that the buyer is willing to accept for an item.)
9.1. Click on the “+ADD button” to add more products/services matching your category.
9.2. If you want to delete the added products/delete, click on the delete icon.
10. Select the currency type.
11. Select an End Date for your requirement.
12. Select your End Time.
13. If you want your company name to be displayed to the bidder, then select "Yes", on the other hand, if you would like to keep your company name clandestine then select "No".
14. Click on the “Save and Continue” button to proceed.
Note: Upon clicking the button “Save & Continue”, an invitation will be sent automatically to buyers inside bidzpro who have tagged in that particular product category.
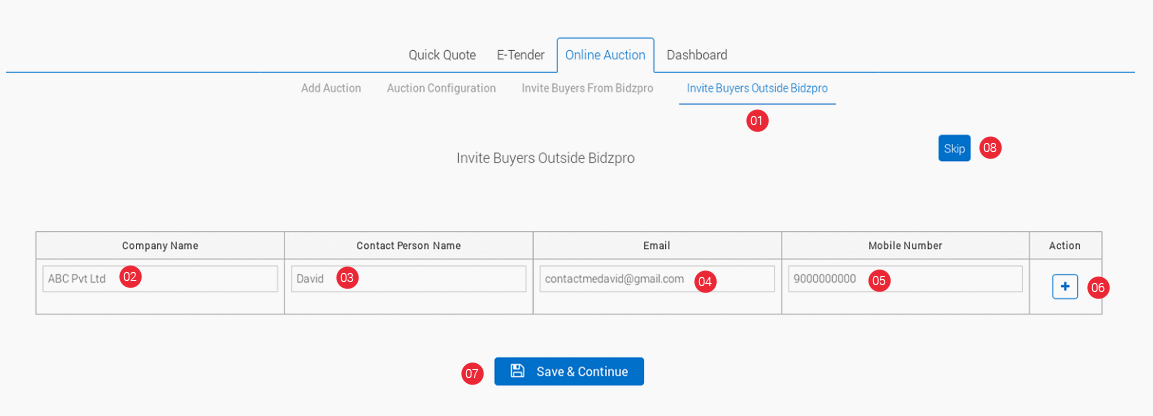
1. Additionally, you (seller) can also invite buyers outside bidzpro.
2. Enter the Company Name, Contact Person Name, Email address and Mobile Number of the Buyer whom do you want to participate in the bidding.
3. Click on the “+” button to add more buyers of your choice.
4. When you are done entering the details of the buyer, click on the “Save and Continue” button to proceed further.
5. If you do not want to invite any buyers outside Bidzpro, you can pass over this option by clicking on the “Skip” button.
The Quick Quote list page helps you to view the entire listings along with other details like whom you have invited, the attachments added and so on.
1. Select “Create New Item” to post a new buy requirement. You (seller) can enjoy the option of pushing your RFI (Request for Information) to E-Tender as well or you can select the “Item List” to add from the existing ones.
2. Enter your buying requirement to help us choose the right buyer.
3. In order to facilitate the flow of information, bidzpro allows you to add multiple attachements, this in turn helps you to scale up your efficiency by leaving more time to perform other essential business tasks.
4. Select category type: If your buy requirement is a product, then select the same, on the other hand, if your requirement is service-oriented then select service.
5. Enter the keywords of your buy requirement.
6. Select an appropriate category matching your product or service requirement.
7. Enter the technical specification of your requirement (if any).
8. Enter the quantity required for your requirement.
9. Select the metrics from the drop-down.
10. Enter the bid quantity. (Ask price for one product or for the wholelot)
11. Select the bid unit from the drop-down.
12. Enter your Reserve /Expected Price per unit.(Reserve price is the price that the buyer is willing to accept for an item.)
13. Click on the “+ ADD” button to add more requirements. If you want to delete the added products, click on the delete icon.
14. Select your start date and time.
15. Select your end date and time.
16. Select your currency type.
17. Enter the EMD amount. (EMD is a deposit amount. This is to ensure that a Bidder does not submit a Dummy Bid or back out at time of tender opening)
18. If you want your company name to be displayed to the bidder, then select "Yes", on the other hand, if you would like to keep your company name clandestine then select "No".
19. Click on the “Save and Continue” button to proceed further.
1. Select the seller from the list whom you would like to invite from Bidzpro.
2. If you do not want to invite any sellers inside Bidzpro, you can pass over this option by clicking on the “Skip” button.
3. When you are done selecting the details of the seller, click on the “Save and Continue” button to proceed further.
1. To invite sellers outside Bidzpro, enter the Company Name, Person Name, Email address and Mobile Number of the Seller whom do you want to participate in the bidding.
2. Click on the “+” button to add more sellers of your choice.
3. When you are done entering the details of the seller, click on the “Save and Continue” button to proceed further.
4. If you do not want to invite any sellers outside Bidzpro, you can pass over this option by clicking on the “Skip” button.
The E-Tender list page helps you to view the entire listings along with other details like whom you have invited, the attachments added and so on.

1. Select create new item to post a new buy requirement. You (seller) can enjoy the option of pushing your RFI (Request for Information) to E-Tender as well or you can select the “Item List” to add from the existing ones.
2. Enter your buy requirements in one line to help us choose the right buyer.
3. In order to facilitate the flow of information, bidzpro allows you to add multiple attachements, this in turn helps you to scale up your efficiency by leaving more time to perform other essential business tasks.
4. Select category type: If your buy requirement is a product, then select the same, on the other hand, if your requirement is service-oriented then select service.
5. Enter appropriate keywords of the product or service you are looking for.
6. Select an appropriate category from the drop-down.
7. Enter the specifics of your buy requirement. In case if there is any technical specification for your buy requirement, then you can specify here.
8. Enter the required quantity of your buy requirement.
9. Select the Metrics. (Unit of Measurement).
10. Enter the bid quantity. (Ask price for one product or for the wholelot)
11. Select bid unit.
12. Enter opening price. (Opening price is the amount the bid starts from)
13. Enter bid factor. (Bid factor is the difference between the bid and the ask price)
14. Enter the Reserve/Expected Price/Per Unit. (Reserve price is the price that the buyer is willing to accept for an item.)
15. Click on the “+ADD” button to add more products.
16. Select your start date and time.
17. Select your end date and time.
18. Select your currency type.
19. Select a time frame from the drop-down to extend the bid in the last hour of a listing.
20. Select the extension time from the drop-down to extend the bid and gain competitive edge.
21. Select from the drop-down, the number of extensions you wanted to have for a particular bid.
22. Select the bidder's view: Position or Price & Position.
23. If you want to approve the sellers for your buy requirement automatically select Yes, if you want to filter them and decide, then select No.
24. If you want your company name to be displayed to the bidder, then select "Yes", on the other hand, if you would like to keep your company name clandestine then select "No".
25. Click on the “Save and Continue” button to proceed further.
1. Select the buyer from the list whom you would like to invite from Bidzpro.
2. If you do not want to invite any buyer from Bidzpro, you can pass over this option by clicking on the “Skip” button.
3. When you are done selecting the details of the buyer, click on the “Save and Continue” button to proceed further.
1. To invite buyers outside bidzpro, you need to fill in the details of the buyer whom you want to invite.
2. Enter the Company Name, Contact Person Name, Email address and Mobile Number of the buyer whom do you want to participate in the bidding.
3. Click on the “+” button to add more buyers of your choice.
4. When you are done entering the details of the buyer, click on the “Save and Continue” button to proceed further.
5. If you do not want to invite any buyers outside Bidzpro, you can pass over this option by clicking on the “Skip” button.
The Online Auction list page helps you to view the entire listings along with other details like whom you have invited, the attachments added and so on.
1. Enter your buy requirements in one line to help us choose the right buyer.
2. In order to facilitate the flow of information, bidzpro allows you to add multiple attachements, this in turn helps you to scale up your efficiency by leaving more time to perform other essential business tasks.
3. Select category type: If your buy requirement is a product, then select the same, on the other hand, if your requirement is service-oriented then select service.
4. Enter appropriate keywords of the product or service you are looking for.
5. Select an appropriate category from the drop-down.
6. Enter the specifics of your buy requirement. In case if there is any technical specification you wanted to mention for your buy requirement, then you can specify here.
7. Enter the required quantity of your buy requirement.
8. Select the Metrics. (Unit of Measurement)
9. Select the End date and time.
10. Click on the “Save and Continue” button to proceed further.
1. To invite buyers outside Bidzpro, enter the Company Name, Person Name, Email address and Mobile Number of the Seller whom do you want to participate in the bidding.
2. Click on the “+” button to add more sellers of your choice.
3. When you are done entering the details of the seller, click on the “Save and Continue” button to proceed further.
4. If you do not want to invite any sellers Outside Bidzpro, you can pass over this option by clicking on the “Skip” button.
1. The RFI list page helps you to view the entire listing. Click on the search box and enter a title or product name to filter your search product wise.
2. If you want to view the listings date wise, then click on the calendar icon and enter the start and end date to view the same.
3. Similarly, the filter box helps you to view the RFI that is in live, completed, and the canceled ones as well.
4. At this point of time, if you wanted to add a new RFI, then you click on the “+ Add RFI” and post your requirements if any.
5. The invited column will display the number of invited buyers for RFI. By clicking on the number, you will be able to view the details, additionally, you can also send a reminder to the buyers.
6. The “Response” column will help you view the details of the buyers who have responded to your buy requirement. A click on the number will display the entire information of the same and if you find them suitable, then you can click on the “Enroll Now” button to have that particular enrolled to your sellers list.

7. The “Enrolled” column will display the details of the buyers whom you have enrolled.
8. The messages column will display the number of messages received and by clicking on the number you will be able to view the message and start a conversation with the buyer.
9. In order to facilitate the flow of information, bidzpro allows you to add multiple attachments, this in turn helps you to scale up your efficiency by leaving more time to perform other essential business tasks.
10. The Action column will help you to view, edit, cancel, post query, invite buyer and delete your RFI.
11. RFI Status column will display the status of your Request For Information.
12. To push your RFI to E-Tender click on the radio button matching the respective row.
13. To push your RFI to Online Auction click on the radio button matching the respective row.
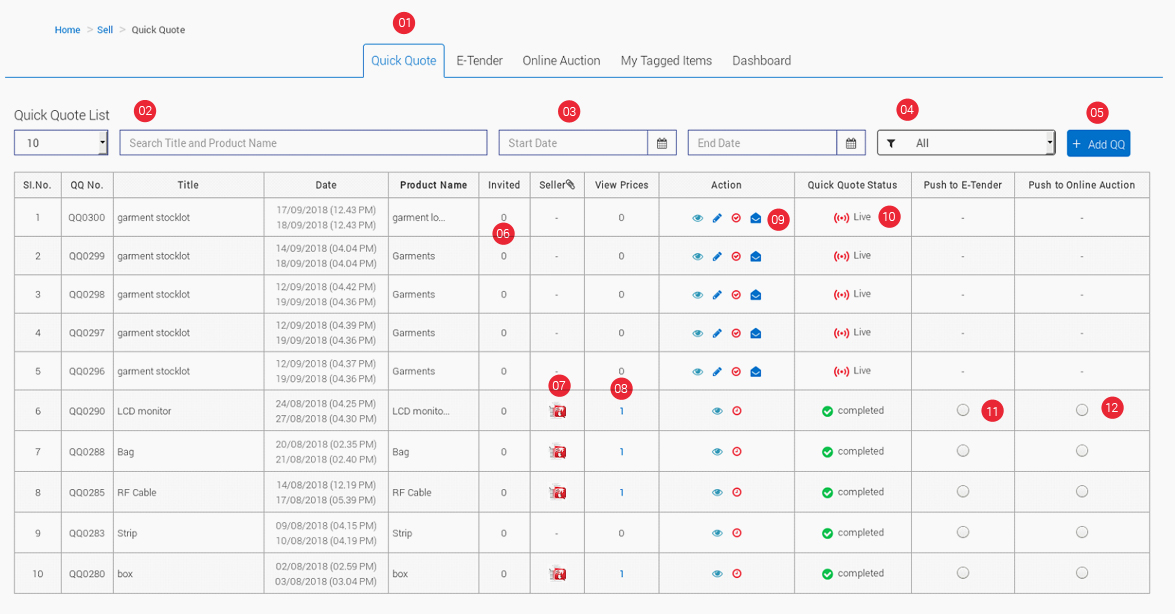
1. Quick Quote list: Manage sell enquiries and follow-up with your Quick Quote sell requests here.
2. Click on the search box and enter a title or product name to filter your search product wise.
3. If you wanted to view your sell requirements date wise, then click on the calendar icon and enter the start and end date to view the same.
4. Similarly, the filter box helps you to view the Quick Quote that is in live, completed, and the canceled ones as well.
5. At this point of time, if you wanted to add a new sell requirement, then you can click on the “+ Add QQ” and post your requirements if any.
6. The invited column will display the number of buyers you have invited outside Bidzpro. By clicking on the number, you will be able to view the details of the invited buyers.
7. In order to facilitate the flow of information, bidzpro allows you to add multiple attachments, this in turn helps you to scale up your efficiency by leaving more time to perform other essential business tasks.
8. View prices: This column will help you view all bids posted by buyers and when you click on the number you will be able to view it in two categories, product and company wise namely. Alongside, you will be able to extract the product wise and company wise report in PDF and Excel form in the respective pages. Having said that, the buyers quoted price will be displayed in the status column in the form of H1, H2, H3 and so on denoting the first highest price, the second highest price. Based on that, you (seller) can decide about whom to have a transaction with and exchange correspondence to proceed further.
a. Product wise:
b. Company wise:
9. Action: *By clicking on the view icon you can see the already posted Quick Quote.
*Clicking on the editor icon helps you to edit your QQ.
*If you wanted to cancel your QQ, click on the cancel icon.
*Clicking on the invite icon helps you to invite buyers outside Bidzpro.
*The option of extending the date and time of your Quick Quote is also available, however, it is applicable only for the completed QQ bids. As you extend, a notification will be sent to the buyers who have already participated in the deal.
10. The “QQ Status” column will display the status of your Quick Quote whether it is in live, completed, or canceled.
11. Push to E-Tender: If you wanted to move any of your completed Quick Quote to E-Tender, then click on the radio button matching the respective row to do the same.
11.1. Call for E-Tender: Fill in the details and click on the “Save and Continue” button to proceed further with moving your completed Quick Quote to E-Tender.
12. Push to Online Auction: If you wanted to move any of your completed Quick Quote to Online auction, then click on the radio button matching the respective row to do the same.
12.1. Fill in the details and click on the “Save and Continue” button to proceed further with moving your completed Quick Quote to Online auction.
1. E-Tender list: Manage enquiries and keep track of your E-Tender sell requests here. The E-Tender list page helps you to view the entire listing. Click on the search box and enter a title or product name to filter your search product wise.
2. If you want to view the listings date wise, then click on the calendar icon and enter the start and end date to view the same.
3. Similarly, the filter box helps you to view the E-Tender that is in live, completed, and the canceled ones as well.
4. At this point of time, if you wanted to add a new E-Tender, then you click on the “+ Add E-Tender” and post your requirements if any.
5. The invited column will display the number of invited buyers for E-Tender.
6. The interested column will display the buyers response to your query.
7. The messages column will display the number of messages received and by clicking on the “Read” button you will be able to view the message and start a conversation with the buyer.
8. The approved column will display the number of interested buyers whom you have approved. By clicking on the number you will be able to view the details of the approved buyer.
9. Recd Bids: This column will help you view all bids posted by buyers and when you click on the number you will be able to view it in two categories, product and company wise namely. Alongside, you will be able to extract the product wise and company wise report in PDF and Excel form in the respective pages. Having said that, the buyers quoted price will be displayed in the status column in the form of H1, H2, H3 and so on denoting the first highest price, the second highest price. Based on that, you (seller) can decide about whom to have a transaction with and exchange correspondence to proceed further.
9.1. E-Tender: View all the bids posted by buyers in two categories, product and company wise namely.
a. Product wise
b. Company wise
10. The Seller attachment column will help you view the attachments you added during the time of posting your E-Tender requirement.
11. Action: *Clicking on the respective icons in this column will help you view the already posted E-Tender, edit, cancel, and delete too.
*Similarly, you can invite buyers inside and outside Bidzpro by clicking on the invite icon.
*A click on the publish icon will make it go live.
*A click on the message icon will help you (buyer) to post a query or send messages to invited sellers.
*The option of extending the date and time of your E-Tender is also available, however, it is applicable only for the completed E-Tender. As you extend, a notification will be sent to the sellers who have already participated in the deal.
12. E-Tender Status: The “E-Tender Status” column will display the status of your E-Tender, whether it is in live, completed, or canceled.
13. Push to Online Auction: If you wanted to move any of your completed E-Tender to Online Auction, then click on the radio button matching the respective row to do the same.
13.1. Call for Online Auction: Fill in the details and click on the “Save and Continue button” to proceed further with the process of moving your completed E-Tender to online auction.
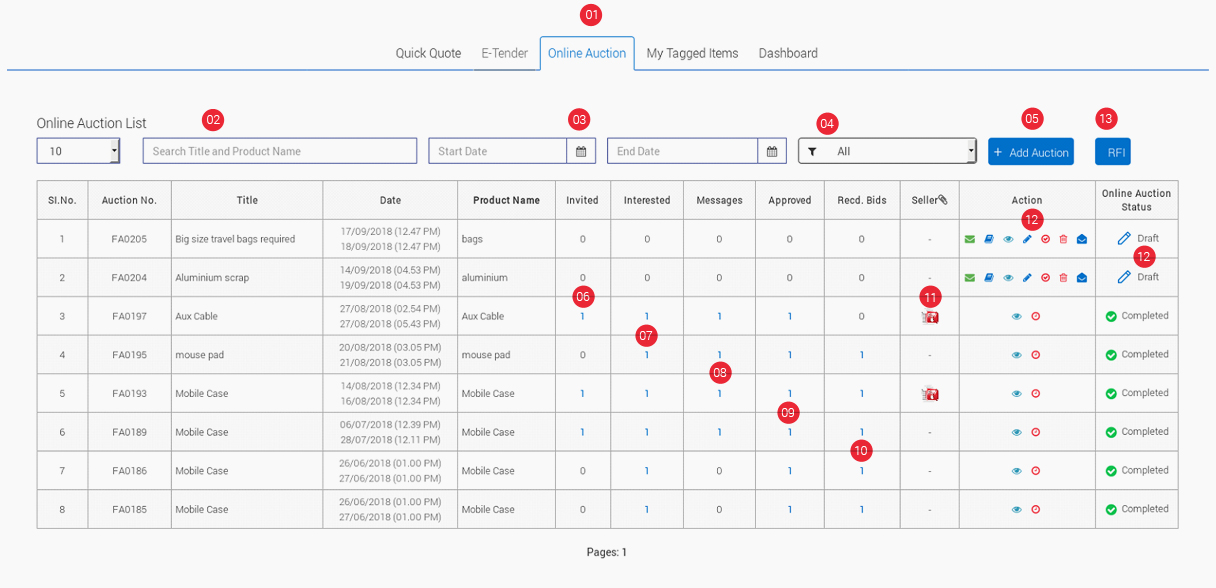
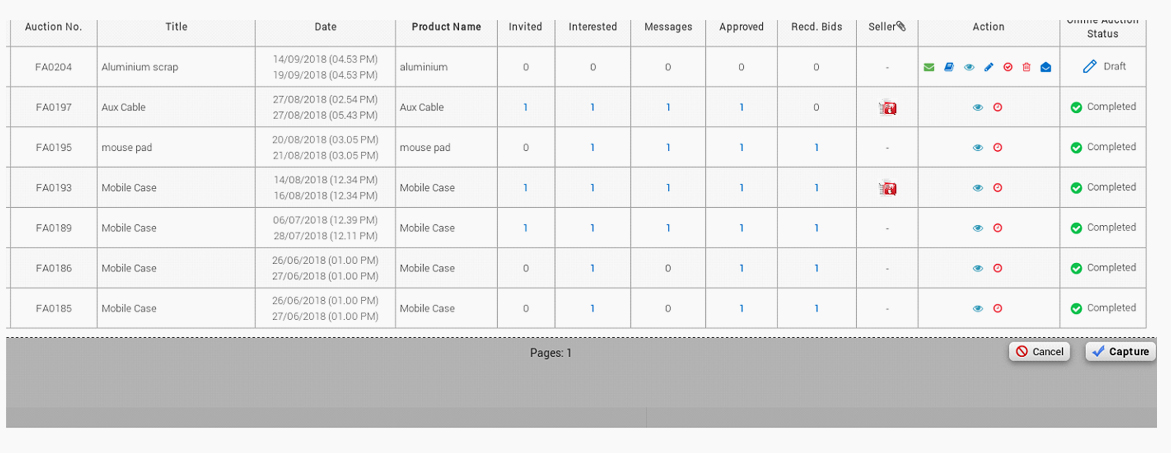
1. The Online Auction list helps you to view the entire listing. Keep track of your Online auction sell requests here.
2. Click on the search box and enter a title or product name to filter your search product wise.
3. If you want to view the listings date wise, then click on the calendar icon and enter the start and end date to view the same.
4. Filter your search by selecting an option from the drop-down to view the Online Auction that is in live, completed, upcoming, and the canceled ones as well. Similarly, selecting the option draft will help you view the ones that you have not published.
5. At this point of time, if you wanted to add a new Online Auction, then you can click on the “+ Add Auction” button and post your requirements if any.
6. The invited column will display the number of invited buyers for Online Auction.
7. The interested column will display the number of buyers who have responded to seller query.
8. The messages column will display the number of messages received and by clicking on the “Read” button you will be able to view the message and start a conversation with the seller.
9. The approved column will display the number of enrolled buyers whom you have approved.
10. Recd Bids: This column will help you view all bids posted by buyers and when you click on the number you will be able to view it in two categories, product and company wise namely. Alongside, you will be able to extract the product wise and company wise report in PDF and Excel form in the respective pages. Having said that, the buyers quoted price will be displayed in the status column in the form of H1, H2, H3 and so on denoting the first highest price, the second highest price. Based on that, you (seller) can decide about whom to have a transaction with and exchange correspondence to proceed further.
a. Product wise
b. Company wise
11. The seller attachment column will help you view the attachments you added during the time of posting your Online Auction requirement.
12. Action: *Clicking on the respective icons in this column will help you view the already posted (sell requirement) Online auction, edit, cancel, and delete too. *Similarly, you can invite sellers inside and outside Bidzpro by clicking on the invite icon. *A click on the message icon will help you (buyer) to post a query or send messages to invited sellers. *A click on the publish icon will make the draft form to go live. *The option of extending the date and time of your Online auction is also available, however, it is applicable only for the completed Online auction bids. As you extend, a notification will be sent to the sellers who have already participated in the deal.
13. Online Auction Status: The “Online Auction Status” column will display the status of your Online Auction, whether it is in live, completed, or canceled. The draft options are the ones that you have not published.
14. RFI: RFI will show the Request for Information list.

 Login
Login Registration
 DASHBOARD
  BUY
BUY  SELL
SELL  MESSAGES
 ANALYTICS
 YOUR ACCOUNT
 ABOUT US
  HELP
HELP  DEMO
DEMO Blog
Blog